Video Pattern – Samara from the Ring

Drunken Aunt Wendy Crocheted Samara Doll

VHS tapes are rare these days. But if you happen upon an unmarked cassette, make sure you don’t watch it less Samara comes out of the TV to scare you to death.

She’s another part of my mini-monster collection. Other patterns done are Freddy Krueger, Billy from Saw, Jason Voorhees, Beetlejuice, Twisty, and The Babadook. New ones are added each year. Join my mailing list for links to exclusive content. Use #drunkenauntwendy if you post on Instagram.

Follow along with the video to make your own mini monster.

Frank Cyclopstra – Free Pattern

Crochet Monster Pattern

2014-03-05 15.53.48

Old blue eye, will croon a little song for you.

Back when I was obsessed with making monsters. I love this guy and his little pocket square. He’s a super fun and super bright monster.

Once again he isn’t tested so let me know if you have any problems or corrections.

FRANK CYCLOPSTRA
© DrunkenAuntWendyDesigns

Materials
Worsted Weight Yarn
I love this yarn – White
I love this yarn – Black
I love this yarn – Orange Neon
I love this yarn – Limelight
Vanna’s Choice – Aqua
Hot Pink Felt
Size E crochet hook
Polyfiberfill
Large Eye Needle

Abbreviations
SC – Single Crochet
CH- Chain
FO – Fasten Off
SL ST – Slip Stitch
INC – Make two Single Crochet in Same Stitch
DEC – Single Crochet two stitches together
BLO – Back Loops Only
Note: Entire project is worked in the round. Use a stitch marker or a scrap piece of yarn to mark the beginning of each row. Then you don’t have to count every row. Do not join unless instructed to.

Parentheses indicate a repeat. Repeat the stitches in the parentheses for the number of times indicated.

The bracketed number [] is the number of stitches at the end of each row.

I spread my increases out so there isn’t a seam on the finished piece. If you do not like this method, you can do regular increases.

If you have any questions, please feel free to email me at drunkenauntwendy@gmail.com.


CENTER LEG – in Orange Neon

Ch 2
Round 1: 6 SC in 2nd CH from hook.
Round 2: (INC) 6 times [12].
Round 3: (SC, INC) 6 times [18].
Round 4: (SC, INC, SC) 6 times [24].
Round 5: (3 SC, INC) 6 times [30].
Round 6: (2 SC, INC, 2 SC) 6 times [36].
Round 11-16: 6 rows SC [36 in each row].
FO. Set aside until you finish the other 2 legs.

SIDE LEGS (Make 2) – Orange Neon
Ch 2
Round 1: 6 SC in 2nd CH from hook.
Round 2: (INC) 6 times [12].
Round 3: (SC, INC) 6 times [18].
Round 4: (SC, INC, SC) 6 times [24].
Round 5: (3 SC, INC) 6 times [30].
Round 6: (2 SC, INC, 2 SC) 6 times [36].
Round 11-18: 8 rows SC [36 stitches per row].
Fasten Off the first leg and make a second leg. After finishing the second leg proceed to below instructions.

BODY

Round 19: SC around each leg to join [108].
Rounds 20-21: 2 rows SC [108 stitches per row]
Round 22: (16 SC, DEC) 6 times [102].
Round 23: (15 SC, DEC) 6 times [96].
Round 24: (14 SC, DEC) 6 times [90].
Round 25: (13 SC, DEC) 6 times [84].
Round 26: (12 SC, DEC) 6 times [78].
Round 27: (11 SC, DEC) 6 times [72].
Round 28: (10 SC, DEC) 6 times [66].
Round 29: (9 SC, DEC) 6 times [60].
Round 30: (8 SC, DEC) 6 times [54].
Round 31: (7 SC, DEC) 6 times [48].
Round 32: (6 SC, DEC) 6 times [42].
Round 33: (5 SC, DEC) 6 times [36].
Round 34: (4 SC, DEC) 6 times [30].
Start Stuffing and continue as you go.
Round 35: (3 SC, DEC) 6 times [24].
Round 36: (2 SC, DEC) 6 times [18].
Rounds 37-39: 3 rows SC [18 stitches per row].
Round 40: (SC, INC, SC) 6 times [24].
Round 41: (3 SC, INC) 6 times [30].
Round 42: (2 SC, INC, 2 SC) 6 times [36].
Round 41: (3 SC, INC) 6 times [30].
Round 42: (2 SC, INC, 2 SC) 6 times [36].
Round 43: (5 SC, INC) 6 times [42].
Round 44: (3 SC, INC, 3 SC) 6 times [48].
Rounds 45-54: 10 rows SC [48 stitches per row.
Round 55: (6 SC, DEC) 6 times [42].
Round 56: (5 SC, DEC) 6 times [36].
Round 57: (4 SC, DEC) 6 times [30].
Round 58: (3 SC, DEC) 6 times [24].
Round 59: (2 SC, DEC) 6 times [18].
Round 60: (SC, DEC) 6 times [12].
Round 61: DEC 6 times [6].
Fasten off leaving a long tail. Thread tail through the last row and pull up tight to close the hole.

EYE
In Black, CH 2
Round 1: 6 SC in 2nd Chain from hook, Round 2: (INC) 6 times [12], Change color to aqua.
Round 3: (INC, SC) 6 times [18], Change color to white
Round 4: Sl Stitch in first stich for jogless join, SC, INC (SC, INC, SC) 5 times [24].
Round 5: (3SC, INC) 6 times [30].

FO leaving a long tail. Use tail to sew the eye to body.

Embroider a large eyebrow in Black over the eye.

BOWTIE in Aqua
Ch 11,
Row 1: In 3rd Chain from hook DC, DC, HDC, HDC, SC, HDC, HDC, DC, DC, DC, Slip stitch 5 to the center SC. Wrap Yarn around to pull center tight. SL through the wraps to secure them. Ch enough to fit around neck, Slip Stitch to bow tie to secure it in place around his neck.

Pocket Square in Orange
Ch 6
Row 1: SC in 2nd Chain from hook, SC in next 4 stitches [5].
Rows 2-4: Ch 1, turn, SC 5 [5 stitches per row].
Row 5: SC in FLOs [5 stitches]

Fasten off.
Attach Aqua with a slip stitch to make the accent. TC, DC, SC, Sl St

HEAD BUMPS – make 5 in limelight
Ch 2
Round 1: 6 SC in 2nd Chain from hook [6].
Round 2: INC in each stitch [12].
Round 3: SC row [12].
Fasten off. Lightly stuff and attach to the head.


Sergeant Spinner – Free Pattern

Crochet Spider Pattern

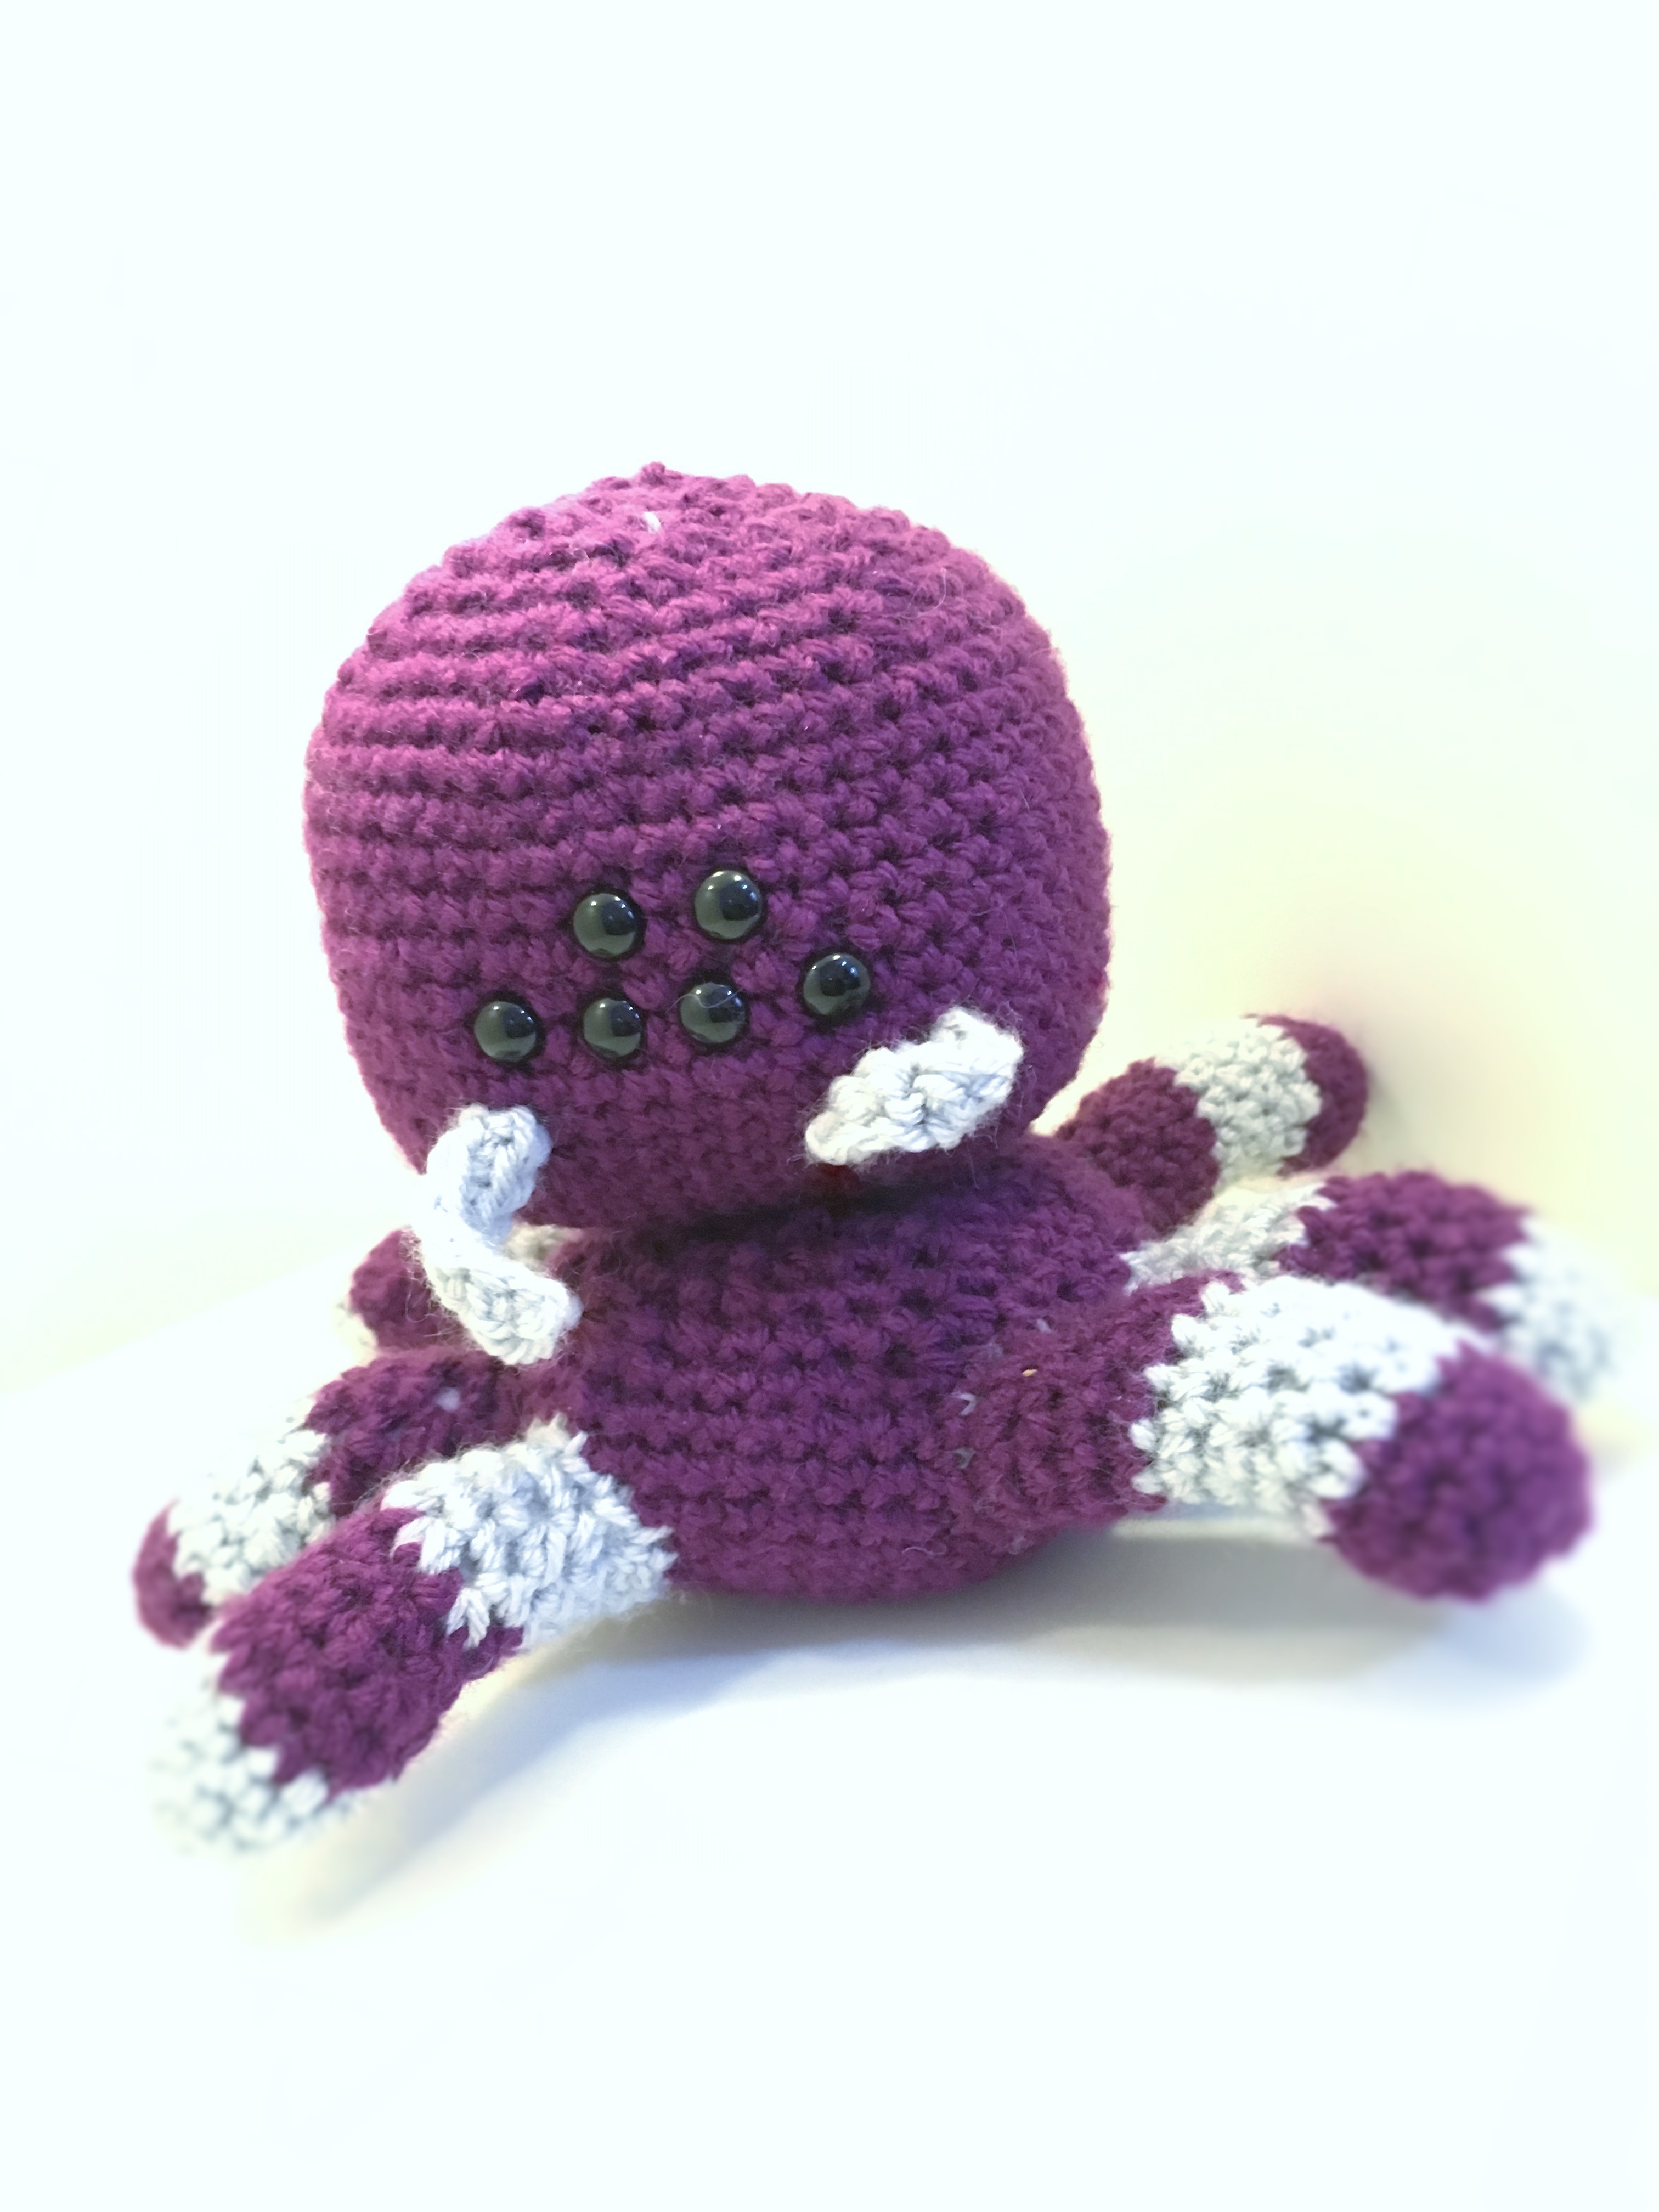
Not one of my mini-monsters, but spiders scare the crap out of me.

This might be one of the scariest things I ever made. Those eyes, those legs… EEEEK!

Enjoy this free pattern. Let me know if you like him or if you have problems. Make sure to use #drunkenauntwendy if you post a picture on Instagram.

Mini-monsters are being typed and will be put up as they are completed.

Sargeant Spinner


Materials


I love this yarn – Graymist

I love this yarn – Eggplant
6 9mm safety eyes

Size E crochet hook
Poly fiberfill
Large eye blunt needle


Abbreviations


Ch – Chain

SC – Single Crochet
INC – 2 Single Crochet in designated stitch
DEC – Single Crochet 2 stitches together

DC – Double Crochet


Gauge is not important for this project. If you have purchased the kit, it is important to use the right size hook  in order to ensure you have enough yarn.
Note – this project is worked in continuous rounds. Do not join the rounds.


Notes: Almost the entire project is worked in the round. Use a stitch marker or a scrap piece of yarn to mark the beginning of each row. Then you don’t have to count every row. Do not join unless instructed to.


Parentheses indicate a repeat. Repeat the stitches in the parentheses for the number of times indicated.


The bracketed number [] is the number of stitches at the end of each row.


I spread my increases out so there isn’t a seam on the finished piece. If you do not like this method, you can do regular increases.


If you have any questions, please feel free to email me at drunkenauntwendy@gmail.com.


HEAD

In Eggplant, Ch 8,
Round 1: SC in 2nd Chain from hook, SC in next 5 stitches, 3 SC in last stitch, using the unused loops from the first 6 stitches SC 6 times, 3 SC in the end [18].

Round 2: (6 SC, 3 INC) 2 times [24].
Round 3: {6 SC (SC, INC) 3 times} 2 times [30].
Round 4: {6 SC (SC, INC, SC) 3 times} 2 times [36].
Round 5: {6 SC (3 SC, INC) 3 times} 2 times [42].
Round 6: {6 SC (2 SC, INC, 2  SC) 3 times} 2 times [48].

Rounds 7-17: 11 rows SC [48 stitches per row]

Round 18: (6 SC, DEC) 6 times [42].

Round 19: (5 SC, DEC) 6 times [36].

Round 20: (4 SC, DEC) 6 times [30].

Place Eyes as follows:

2 in between rows 11-12 approximately 2 stitches apart.

4 between rows 13-14, 2 stitches apart spacing the two above evenly.

Start stuffing firmly.
Round 21: (3 SC, DEC) 6 times [24].

Round 22: (2 SC, DEC) 6 times [18].

Round 23: (SC, DEC) 6 times [12].
Round 24: (DEC) 6 times [6].

Fasten off, leave a long tail for sewing. Weave the tail through the last six stitches and pull to close the opening.


MANDIBLES (Make 2)

In Graymist Ch 7

Row 1: SC in 2nd Ch from hook, SC remaining 5 stitches [6].

Fasten off. Sew to the head under the eyes. Twist the mandibles slightly to get the feeler look.


BODY

In Eggplant, Ch 2

Round 1: 6 SC in 2nd Chain from hook [6].

Round 2: INC in each stitch [12].

Round 3: (SC, INC) 6 times [18].

Round 4: (SC, INC, SC) 6 times [24].

Round 5: (3 SC, INC) 6 times [30].

Round 6: (2 SC, INC, 2 SC) 6 times [36].

Round 7: (5 SC, INC) 6 times [42].

Round 8: (3 SC, INC, 3 SC) 6 times [48].

Rounds 9-12: 4 rows SC [48 stitches per row].

Round 13: (6 SC, DEC) 6 times [42].

Round 14: (5 SC, DEC) 6 times [36].

Round 15: (4 SC, DEC) 6 times [30].

Start stuffing firmly.
Round 16: (3 SC, DEC) 6 times [24].

Round 17: (2 SC, DEC) 6 times [18].

Round 18: (SC, DEC) 6 times [12].
Round 19: (DEC) 6 times [6].

Fasten off, leave a long tail for sewing. Weave the tail through the last six stitches and pull to close the opening.

Sew to the bottom of the head.


LEGS (Make 8)

Note 4 legs are made in the color scheme 4 eggplant, 4 graymist, 4 eggplant. The other 4 are made in the reverse 4 graymist, 4 eggplant, 4 graymist. They are sewn on in an alternating pattern on the body.

In starting color, Ch 2

Round 1: 6 SC in 2nd Chain from hook [6].

Round 2: INC in each stitch [12].

Rounds 3-4: 2 rows SC, Change colors [12 stitches per row].

Rounds 5-6: 2 rows SC [12 stitches per row].

Round 7: DEC, DEC, 4 SC, INC, INC, 2 SC [12].

Round 8: SC row, Change Colors [12].

Round 9: DEC, DEC, 4 SC, INC, INC, 2 SC [12].

Round 10 SC row, Change Colors [12].

Round 11: DEC, DEC, 4 SC, INC, INC, 2 SC [12].

Round 12: SC row, Change Colors [12].

Fasten off. Stuff firmly. Sew around the body making sure all the curves of the legs go the same way.


The Babadook – Free Pattern

Crochet Babadook Pattern

 the babadook picture

Next in my series of mini movie monsters we have The Babadook from the movie of the same name. Your finished little monster will be about 5″ from top of his hat to the end of his outfit.

I find him super cute and not creepy at all. Again not tested, so let me know if you have problems. Coming soon we should have Jason, Michael Myers, Pennywise and Twisty. At least that is my 1st 6. I’ve sketched 6 more. I’m working on Ghostface now. I had to rework him as he looked too much like Jack Skellington.

Materials


I love this yarn Black

I love this yarn in Antique White

9 mm safety eyes
Size E crochet hook

Large eye blunt needle

Polyfiberfill

Abbreviations


SC – Single Crochet

Ch- Chain
INC – SC 2 stitches into same stitch

DEC – SC two stitches together
BLO – Back loops only

FLO – Front Loops only

Gauge – Gauge is not important for this project, but if you are making it from the kit, you should use the right size needle to ensure you don’t run out of yarn.


Notes:

Parentheses indicate a repeat. Repeat the stitches in the parentheses for the number of times indicated.

The bracketed number [] is the number of stitches at the end of each row.


I spread my increases out so there isn’t a seam on the finished piece. If you do not like this method, you can do regular increases.


Crochet section is worked in partly in the round. Use a stitch marker or a scrap piece of yarn to mark the beginning of each row. Then you don’t have to count every row. Do not join unless instructed to.


If you have any questions, please feel free to email me at drunkenauntwendy@gmail.com.


BODY


In Black, Ch 2
Round 1: 6 SC in 2nd Ch from hook [6].
Round 2: INC in each stitch [12].
Round 3: (SC, INC) 6 times [18].
Round 4: (SC, INC, SC) 6 times [24].

Round 5: In BLOs (3 SC, INC) 6 times [30].

Round 6-9: 4 rows SC [30 per row].

Round 10: (13 SC, DEC) 2 times [28]. Round 11: (5 SC, DEC) 4 times [24].

Round 12: (4 SC, DEC) 4 times [20].

Round 13: (8 SC, DEC) 2 times [18].

Round 14: SC row [18].

Round 15: SC row [18].

Fasten off. Stuff and set aside.


RATTY TAILS AT THE BOTTOM OF BODY

In Black, Attach with a slip stitch to the unused loops from Round 5.

(Ch 3, SC in 2nd Stitch, SC, Slip St to next stitch in Round 5) Repeat 9 times.


Fasten off.


EYE PATCHES (make 2)

In Antique White, Ch 2

Round 1:  6 SC in 2nd Chain from Hook Join with a Slip Stitch to make a circle [6].

Fasten off.

Insert Eye posts through center.


HEAD


In Black, Ch 2
Round 1: 6 SC in 2nd Ch from hook [6].
Round 2: INC in each stitch [12].
Round 3: (SC, INC) 6 times [18].
Round 4: (5 SC, INC) 3 times [21].

Round 5: (6 SC, INC) 3 times [24].

Rounds 6-8: 3 rows SC [24 stitches each row].

Stop here and insert safety eyes that were already through the eye patches. Embroier Mouth in Antique White using one straight stitch and two little straight stitches.Start stuffing.

Round 9: (6 SC, DEC) 3 times [21].

Round 10: (5 SC, DEC) 3 times [18].

Round 11: (SC, DEC) 6 times [12].

Round 12: DEC 6 times [6].

Fasten off. Attach to Body.


HAT


In Brown, Ch 2
Round 1: 6 SC in 2nd Ch from hook [6].
Round 2: INC in each stitch [12].
Round 3: (SC, INC) 6 times [18].
Round 4: SC in BLOs [18].

Round 5: (DEC, SC) 6 times [12].

Round 6: SC row [18].


Round 7: In FLOs (INC, SC) 6 times [18].

Round 8: (SC, INC, SC) 6 times [24].

Round 9: (3 SC, INC) 6 times [30].

Fasten off. Weave in ends.


HAIR

Wrap Black yarn around your hand for 6 wraps. Cut to have 6 pieces for hair. Attach to every other unused loop from Row Round 7. Let Dangle.


Sew Hat to the top of the head through the brim.


Voila


Freddy Krueger – Free Pattern

Freddy Krueger Crochet


I’ve been working on these absolutely adorable mini monsters.

Mini Monster
These pots don’t need to be watered.

I love scary movies and October is fast approaching. Nightmare on Elm Street is one of my favorites. Freddy Krueger is scary and funny all at once. My favorite kind of movie villain.

While they don’t have to be in pots, they certainly look cute in these little 2.5″ terra cotta pots. The finished ones are about 5 inches tall.

As I have mentioned before, the below pattern isn’t tested. If you have problems or issues, please let me know. If you make him, use #drunkenauntwendy so I can find your work on Instagram and give you love.


IMG_3137


Freddy Krueger – mini monsters

© DrunkenAuntWendyDesigns


Materials


I love this yarn Stonewash in Coraline


I love this yarn in Brown


I love this yarn in Terra Cotta


I love this yarn in Light Sage


I love this cotton in Dove
I love this yarn in Black
12 mm safety eyes
Size E crochet hook


Large eye blunt needle


Polyfiberfill


Abbreviations


SC – Single Crochet


Ch- Chain
INC – SC 2 stitches into same stitch


DEC – SC two stitches together
BLO – Back loops only


FLO – Front Loops only


Gauge – Gauge is not important for this project, but if you are making it from the kit, you should use the right size needle to ensure you don’t run out of yarn.


Notes:


Parentheses indicate a repeat. Repeat the stitches in the parentheses for the number of times indicated.


The bracketed number [] is the number of stitches at the end of each row.


I spread my increases out so there isn’t a seam on the finished piece. If you do not like this method, you can do regular increases.


Crochet section is worked in partly in the round. Use a stitch marker or a scrap piece of yarn to mark the beginning of each row. Then you don’t have to count every row. Do not join unless instructed to.


If you have any questions, please feel free to email me at drunkenauntwendy@gmail.com.


BODY


In Brown, Ch 2
Round 1: 6 SC in 2nd Ch from hook [6].
Round 2: INC in each stitch [12].
Round 3: (SC, INC) 6 times [18].
Round 4: (SC, INC, SC) 6 times [24].


Round 5: (3 SC, INC) 6 times [30].


Round 6: SC row [30]. Change Colors to Terra Cotta


Rounds 7-8: 2 Rows SC [30 stitches each row] Change Colors to light sage don’t cut the Terra Cotta. Run it up the inside.


Round 9: SC Row [30].


Round 10: (13 SC, DEC) 2 times [28]. Change colors to Terra Cotta, Don’t cut light sage. Run it up the inside of the body.


Round 11: (5 SC, DEC) 4 times [24].


Round 12: (4 SC, DEC) 4 times [20]. Change colors to Light Sage


Round 13: (8 SC, DEC) 2 times [18].


Round 14: SC row [18]. Change color to Terra Cotta. Fasten off the Sage.


Round 15: SC row [18].


Fasten off. Stuff and set aside.


HEAD


In Coraline, Ch 2
Round 1: 6 SC in 2nd Ch from hook [6].
Round 2: INC in each stitch [12].
Round 3: (SC, INC) 6 times [18].
Round 4: (5 SC, INC) 3 times [21].


Round 5: (6 SC, INC) 3 times [24].


Rounds 6-8: 3 rows SC [24 stitches each row].


Stop here and insert safety eyes, and start stuffing.

Embroider Eyebrows in Black


Round 9: (6 SC, DEC) 3 times [21].


Round 10: (5 SC, DEC) 3 times [18].


Round 11: (SC, DEC) 6 times [12].


Round 12: DEC 6 times [6].


Fasten off. Attach to Body.


HAT


In Brown, Ch 2
Round 1: 6 SC in 2nd Ch from hook [6].
Round 2: INC in each stitch [12].
Round 3: (SC, INC) 6 times [18].
Round 4: SC in BLOs [18].


Round 5: SC row [18].


Round 6: (DEC, SC) 6 times [12].


Round 7: In FLOs (INC, SC) 6 times [18].


Round 8: (SC, INC, SC) 6 times [24].


Round 9: (3 SC, INC) 6 times [30].


Fasten off. Weave in ends.


Sew to the top of the head. Dent the top of the hat to make it look like a fedora and curve the sides of the brim.


Using Brown, embroider small straight stitches on the side of the body for the glove. Using the Dove, embroider four long straight stitches for the knives in his glove.


One, two Freddy’s coming for you!

IMG_3140.JPG


Free Pattern – Ms. Prickles – The Cactus

Drunken Aunt Wendy Crocheted Cactus

Meet Ms. Prickles. Isn’t she just the cutest.

I’m changing things up. I will post patterns here after I type them. They won’t be tested, so if there is an error, I am sorry. Please feel free to let me know.

While you can make this from the pattern below, some prefer the convenience of an ad-free .pdf. You can get that here for a nominal fee.  Want to make Ms. Prickles, but don’t want to buy all the yarn? There’s a kit for that. Finally, want a Ms. Prickles, but you don’t crochet? You can always order your very own plush.

There is another Cactus pattern if you want variety.

Previous .pdfs of older patterns will be removed.

Cacti© DrunkenAuntWendyDesigns
Materials

I love this Yarn – Black (1 yd)
I love this Yarn – Limelight (12 yds)
I love this Yarn – Sungold (12 yds)
I love this yarn – Hot Rose (2 yds)
2 12 mm safety eyes
Size E crochet hook
2.5 inch Terra Cotta Pots
Poly fiberfill
Glue if you want
Large eye blunt needle

Abbreviations

Ch – Chain
SC – Single Crochet
INC – 2 Single Crochet in designated stitch
DEC – Single Crochet 2 stitches together
DC – Double Crochet
BLO – back loops only

Gauge is not important for this project unless you have purchased a kit. Using the right size hook is important to ensure you have enough yarn.

Notes: Almost the entire project is worked in the round. Use a stitch marker or a scrap piece of yarn to mark the beginning of each row. Then you don’t have to count every row. Do not join unless instructed to.
Parentheses indicate a repeat. Repeat the stitches in the parentheses for the number of times indicated.

The bracketed number [] is the number of stitches at the end of each row.

I spread my increases out so there isn’t a seam on the finished piece. If you do not like this method, you can do regular increases.

If you have any questions, please feel free to email me at drunkenauntwendy@gmail.com.

BASE
In Sungold, Ch 2
Round 1: 6 SC in 2nd Chain from hook [6].
Round 2: INC in each stitch [12].
Round 3: (SC, INC) 6 times [18].
Round 4: (SC, INC, SC) 6 times [24].
Round 5: (3 SC, INC) 6 times [30].
Round 6: SC row in BLOs [30].
Round 7: (DEC, 3 SC) 6 times [24].
Round 8: SC row [24].
Round 9: (DEC, 2 SC) 6 times [18].
Round 10: SC row [18].
Round 11: (DEC, SC) 6 times [12].
Round 12: SC row [12].
Stuff
Round 13: DEC 6 times in BLO.
Fasten off. Using a long tail sew up opening. Once you have sewn on the body stuff into the pot. You can glue it in if you want.

BODY

In Limelight CH 2
Round 1: 6 SC in 2nd Chain from hook [6].
Round 2: INC in each stitch [12].
Round 3: (SC, INC) 6 times [18].
Round 4: (SC, INC, SC) 6 times [24].
Round 5: (3 SC, INC) 6 times [30].
Rounds 6-7: 2 rows SC [30 stitches in each row].
Round 8: (DEC, 3 SC) 6 times [24].
Rounds 9-10: 2 rows SC [24 stitches per row].
Round 11: (DEC, 2 SC) 6 times [18].

Insert safety eyes between rows 8 and 9 approximately 7 stitches apart.
Start stuffing.

Rounds 12-13: 2 rows SC [18 stitches per row].
Round 14: (DEC, SC) 6 times [12].

Using black embroider mouth using a straight stitch with a small stitch to make the curve.

Round 15-16: 2 rows SC [12 per row].

Fasten off and sew to base.

BRANCH
In Limelight CH 2
Round 1: 6 SC in 2nd Chain from hook [6].
Round 2: INC in each stitch [12].
Rounds 3-4: 2 rows SC [12 stitches per row].

Start stuffing

Round 5: DEC 6 times [6].
Rounds 6-7: 2 rows SC [6 stitches per row].
Fasten off. Sew to the body at an angle.

FLOWER
In Hot Rose
Ch 2
Round 1: 6 SC in 2nd Ch from hook [6].
Round 2: INC in each stitch around, slip stitch to join [12].
Round 3: (3 DC in 1st Stitch, Slip stitch in next stitch) 6 times, [6 DC, 6 Slip Stitch].

Fasten off. Attach to head above the eye opposite the branch.

KODAK Digital Still Camera


To make her giant, three strands of yarn held together, 25 mm eyes and a 5 inch pot result in a Ms. Prickles that is about 1 foot tall.


Helmet Pig

Free crochet pattern Angry Birds

I reworked my Helmet Pig from Angry Birds. I needed something for all my birds to attack. You can find the patterns for red, black, yellow and blue. There is even a green pig if you want a couple different versions. Helmet pig is now available for you to make your own. Throw the birds at them. It is fun.  As you can see, this one has already taken some damage.

As I have been trying to expand my crafty repertoire here lately, I tried my had at cross stitching last week. It took a bit longer than I expected. Here’s my progress so far:

I’m going to have to pick it up again in a few weeks. The pattern is from the shop ElCrossStitch on Etsy. There were quite a few fun patterns and she was doing a BOGO sale.

The best part of this project was the price. Materials cost me less than $10.00. I like it when my crafts give me lots of time for the price.

I was also working on my resin jewelry since the last time. The post office just released these awesome new stamps, which made amazing necklaces. And as luck would have it, the resin was exceedingly cooperative this week. No issues with setting up, so nothing had to be thrown away.

That’s it for this week. Let me know if you make the pig. I am working on Yakko’s brother Wakko this week. Hopefully, I will be able to get both Wakko and Dot done this week.


Yakko – Free Pattern

Animaniac crochet

If you follow me on Facebook and/or Instagram, you know I have been creating Yakko this week.

This is the initial pattern with the smaller face piece. Hopefully when I make his brother, Wakko and the Warner sister, Dot, I’ll get it right. Then they can run around the Warner Movie Lot.FullSizeRender

He looks a lot cuter with his body.

I haven’t tested this pattern at all. Please let me know if there are any issues with the pattern or suggestions or recommendations.Yakko Pattern

Next week I will be crocheting items from other designers. I like to try other patterns so I can see different takes on things and different ways to make my crochet creatures come to life.

The next few free patterns will be from Animaniacs. Let me know what you think my series after that should be. I was thinking Princess Bride characters. Andre the Giant as Fezzik as a plush doll could be the cutest thing ever.

She-Hulk Free Pattern

She Hulk Crochet Pattern

I know it has been forever. I’ve been working on all sorts of new things. If you don’t follow me on Instagram, you should. I am finally getting used to the platform and getting a lot better at it.

Now for the main event: SHE-HULK!

I love comic book ladies and feel they are underrepresented in the crochet world. IMG_2897

Look at that face. I used my eyelash technique, because it is my favorite. I may run out of doll lashes soon. Also her booty shorts are just the cutest.

The pattern is available below. I have not tested it. I think her boobs need to be bigger. When I test it, I will try that part. I also have not calculated the yardage for the different colors. If you run into problems or errors, please contact me or leave a comment. Make sure to use #drunkenauntwendy if you post on Instagram so I can find it.

Materials
Worsted Weight Yarn
I love this yarn – Limelight
I love this yarn – Amethyst
I love this yarn – Jelly Bean
I love this yarn – Black
I love this yarn – White
12 mm Safety Eyes
Doll Eyelashes
Size E crochet hook
Slicker Brush
Needlefelting tool
Polyfiberfill
Large Eye Needle

Abbreviations
SC – Single Crochet
HDC – Half Double Crochet
CH- Chain
FO – Fasten Off
SL ST – Slip Stitch
INC – Make two Single Crochet in Same Stitch
DEC – Single Crochet two stitches together
BLO – Back Loops Only

Note: Entire project is worked in the round. Use a stitch marker or a scrap piece of yarn to mark the beginning of each row. Then you don’t have to count every row. Do not join unless instructed to.

Parentheses indicate a repeat. Repeat the stitches in the parentheses for the number of times indicated.

The bracketed number [] is the number of stitches at the end of each row.

I spread my increases out so there isn’t a seam on the finished piece. If you do not like this method, you can do regular increases.

If you have any questions, please feel free to email me at drunkenauntwendy@gmail.com.

Cut two sections of 3 doll lashes and glue to the underside of the eyes. Use a strong glue. I use E6000. Set aside to dry while you work on the head.

HEAD – in Limelight
The head is made by doing an oval increase. Sometimes it helps to mark where your increases are going to go with a spare piece of contrasting yarn. Just note that the first row is worked on both sides of the starting chain. The face is then embroidered on before you finish the head and stuff her.

Ch 8
Round 1: SC in 2nd Ch, SC in next 5 stitches. 3 SC in last stitch. Working in the unused loops from the chain, SC 5, 3 SC in last chain. [18].

Round 2: [6 SC, (INC) 3 times] repeat bracket one more time [24].

Round 3: [6 SC, (SC, INC) 3 times] repeat bracket one more time [30].
Round 4: [6 SC, (SC, INC, SC) 3 times] repeat bracket one more time [36].
Round 5: [6 SC, (3 SC, INC) 3 times] repeat bracket one more time [42].
Round 6: [6 SC, (2 SC, INC, 2 SC) 3 times] repeat bracket one more time [48].

Rounds 7-17: SC in each stitch for 11 rows [48 stitches per row].

Fasten off. Insert eyes 4 rows down from the open edge 9 stitches apart. Make sure the eyelashes are where you want them before you put the washers on for the eyes.

Embroider nose in limelight with three long straight stitches coming out of a center point to create a triangle.

Using black, embroider eyebrows using a backstich.

Make sure you tie all the tails off inside the head to prevent unraveling later.

HAIR – in Jelly Bean
Ch 8
Round 1: SC in 2nd Ch, SC in next 5 stitches. 3 SC in last stitch. Working in the unused loops from the chain, SC 5, 3 SC in last chain. [18].

Round 2: [6 SC, (INC) 3 times] repeat bracket one more time [24].

Round 3: [6 SC, (SC, INC) 3 times] repeat bracket one more time [30].
Round 4: [6 SC, (SC, INC, SC) 3 times] repeat bracket one more time [36].
Round 5: [6 SC, (3 SC, INC) 3 times] repeat bracket one more time [42].
Round 6: [6 SC, (2 SC, INC, 2 SC) 3 times] repeat bracket one more time [48].

Rounds 7-8: SC in each stitch for 2 rows [48 stitches per row].
Fasten off leaving a long tail for sewing.
Stuff the head and sew on the hair continuing to stuff as you go.

Cut several 8 inch pieces of jelly bean to attach as hair. You can make the hair longer if you wish.

Attach the hair by folding the piece of hair in half, pulling the loop through and securing the open ends. Attach in a line on the left side of her head for the part. Attach on the other side of the line. Attach throughout the head. Using a slicker brush, go through the hair causing the yarn to unravel. This can take upwards of an hour depending on how many strands of hair you use. Then using the needlefelting tool, style the hair.

FEET (Make 2)
In White
Ch 5
Round 1: SC in 2nd Ch, SC in next 2 stitches. 3 SC in last stitch, working in the unused loops from the chain, SC 3, 3 SC in last chain. [12].
Round 2: [3 SC, (INC) 3 times] repeat bracket one more time [18].
Round 3: SC in BLOs [18].
Round 4: SC 3 times, DEC 3 times, 9 SC [15].
Round 5: 2 SC, 2 DEC, 9 SC [13].
Round 6: SC row [13]. Change Colors to limelight
Round 7: 3 SC, Spike Stich, 9 SC [12 SC, 1 spike stitch].
Round 8: DEC, 11 SC [12]
Rounds 9-12: 4 rows SC [12 stitches per row] change colors to amethyst
Rounds 12-13: 2 rows SC [12 stitches per row].
Fasten off the first leg.
Do not fasten off leg number 2, follow the instructions below for leg number 2.
Round 13: SC around stitches in leg number one and then around the stitches in leg number 2 [24]. Using the tail from leg number one, sew up any gaps that may have resulted at the join.

Stuff legs and continue crocheting in the round.

Rounds 14-16: SC in each stitch for 3 rows. Change color to white in last stitch. [24 stitches per row].
Round 17: SC row, change color to Amethyst in last stitch [24].

Round 18: (2 SC, DEC) 6 times [18].
Round 19: (SC, DEC) 6 times [12].
Rounds 20-21: 2 rows SC [12 stitches per row].
Round 22: (2 SC, INC) 4 times [16].
Rounds 23-24: 2 rows SC, Change colors to White in last stitch [16].
Round 25: (2 SC, DEC) 4 times, change color to Green in last stitch [12].
Round 26: DEC 6 times [6].
Round 27: SC row [6].
Fasten off and sew to head.

ARMS (make 2)
In White
Ch 2
Round 1: 6 SC in 2nd Ch from hook [6].
Round 2: (SC, INC) 3 times [9].
Rounds 3-4: 2 rows SC, change colors to limelight in the last stitch [9 stitches per row].
Round 5: (SC, DEC) 3 times [6].
Rounds 6-14: 9 rows SC [6 stitches per row].
Fasten off. Sew to the sides of body and to the head.


Weave in all ends.

She-hulk is in the house.

Helga has gotten an update

Crocheted Hedgehog

I’ve updated Helga. Hopefully she will be clearer to read now and easier to understand.

The kit should be available on Etsy by the end of today.

For an ad free .pdf format of this pattern buy now

KODAK Digital Still CameraKODAK Digital Still Camera

Materials

I love this yarn – Greybeard (95 yds)

I love this yarn – Peacock, Amethyst or Hot Rose (2 yds)

Vanna’s Choice – Beige (7 yds)
12 mm Safety eyes

12 mm safety animal noses

Size E crochet hook

Large eye blunt needle

Polyfiberfill

Abbreviations


SC – Single Crochet

Ch- Chain
INC – SC 2 stitches into same stitch

DEC – SC two stitches together
BLO – Back loops only

LS – Loop Stitch

TC – Triple crochet

DC – Double Crochet

Gauge – Gauge is not important for this project, but if you are making it from the kit, you should use the right size needle to ensure you don’t run out of yarn.

Notes:

Parentheses indicate a repeat. Repeat the stitches in the parentheses for the number of times indicated.

The bracketed number [] is the number of stitches at the end of each row.


I spread my increases out so there isn’t a seam on the finished piece. If you do not like this method, you can do regular increases.


Crochet section is worked in partly in the round. Use a stitch marker or a scrap piece of yarn to mark the beginning of each row. Then you don’t have to count every row. Do not join unless instructed to.


If you have any questions, please feel free to email me at drunkenauntwendy@gmail.com.


BODY

In Beige

Ch 2

Round 1: In 2nd Ch from hook, SC 4 [4].

Round 2: INC 4 times [8].

Round 3: INC, 7 SC [9].

Round 4: INC, 8 SC [10].

Round 5: (INC, 4 SC) 2 times [12].

Round 6: (INC, SC) 6 times [18].

Round 7: SC Row [18].

Round 8: (SC, INC, SC) 6 times [24].

Round 9: (3 SC, INC) 6 times [30].

Fasten off.

Insert nose in the center of round 1.

Place eyes between rows 6 and 7, 5 to 6 stitched apart.

With the wrong side facing (inside of the head), find the bottom center. Count back five and join gray with a slip stitch.

There will be stitches at the bottom that are not done in loop stitch to keep the bottom of Helga flat.

Unless otherwise instructed, the Increases in the parenthesis with LS should be done as a Loop Stitch.

Round 10: (4 SC, INC) 2 times (4 LS, INC) 4 times [12 SC, 24 LS].

Round 11: (5 SC, INC) 2 times (5 LS, INC) 4 times [14 SC, 28 LS].

Round 12: 14 SC, 28 LS.

Round 13: Repeat row 12.

Round 14: DEC, 10 SC, DEC, 28 LS [12 SC, 28 LS].

Round 15: DEC, 8 SC, DEC, 28 LS [10 SC, 28 LS].

Round 16: 10 SC, 28 LS

Rounds 17-20:  Repeat round 16 4 times [10 SC, 28 LS per round].

Round 21: DEC, 6 SC, DEC, 28 LS [8 SC, 28 LS].

Round 22: 8 SC, 28 LS.

Rounds 23-25: Repeat Round 22 3 times [8 SC, 28 LS per row].

Start Stuffing

Round 26: 4 SC, DEC, 2 SC remaining decreases are done in loop stitch 2 LS, DEC (4 LS, DEC) 4 times [7 SC, 23 LS].

Round 27: 3 SC, DEC, 2 SC remaining decreases are done in loop stitch LS, DEC (3 LS, DEC) 4 times [6 SC, 18 LS].

Round 28: 2 SC, DEC, 2 SC remaining decreases are done in loop stitch DEC (2 LS, DEC) 4 times [5 SC, 13 LS].

Round 29: (LS, DEC) 6 times [12 LS].

Round 30: DEC 6 times [6 SC].

Fasten off and thread yarn through last round and pull up tight to close.

If you wish to have an ad free .pdf, please check out my Ravelry or Etsy Shops.

I am working on updating all my patterns and creating kits. There will be new free patterns eventually.

Oh and I got two of the Zoomigurumi books for Mother’s Day. I am dividing my time between making all those super cute patterns and working on my own.

Happy Crocheting.