Note: Hats are worked in the round. Use a stitch marker or a scrap piece of yarn to mark the beginning of each row. Then you don’t have to count every row. Do not join unless instructed to.
Parentheses indicate a repeat. Repeat the stitches in the parentheses for the number of times indicated.
The bracketed number [] is the number of stitches at the end of each row.
I spread my increases out so there isn’t a seam on the finished piece. If you do not like this method, you can do regular increases.
If you have any questions, please feel free to email me at drunkenauntwendy@gmail.com.
BODY
Paint 2/3 of the bottom of cork purple. The head is not a part of this. Let dry.
Once purple is dry, paint top third with yellow mixed with white. After dry, come back in with the purple and give him suspenders.
Once the paint is dry. Insert screw hook in the top of the cork.
Using Sharpie find an unmarked spot on the cork and draw two ovals to act as the eyes.
Using the pink marker, make a large circle for a nose.
Using the black marker make a zig zag for the mustache on each side of the nose.
This is a quick pattern that is easy to customize. Change up the colors and have fun with all sorts of color combinations.
Note this pattern is not tested.
Materials
Brava Sport Weight Yarn
Alfalfa (55 yds)
Custard (57 yds)
Orange (5 yds)
Black (2 yds)
Marina (2 yds)
White (5 yds)
Size E crochet hook
Polyfiberfill
Large Eye Needle
Abbreviations
SC – Single Crochet
CH- Chain
FO – Fasten Off
SL ST – Slip Stitch
INC – Make two Single Crochet in Same Stitch
DEC – Single Crochet two stitches together
Note: Entire project is worked in the round. Use a stitch marker or a scrap piece of yarn to mark the beginning of each row. Then you don’t have to count every row. Do not join unless instructed to.
Parentheses indicate a repeat. Repeat the stitches in the parentheses for the number of times indicated.
The bracketed number [] is the number of stitches at the end of each row.
I spread my increases out so there isn’t a seam on the finished piece. If you do not like this method, you can do regular increases.
Rounds 11-18: 8 Rows SC, Change Colors to Custard (60 stitches per row)
Rounds 19-26: 8 Rows SC (60 stitches per row).
Round 27: (8 SC, DEC) 6 times (54).
Round 28: (7 SC, DEC) 6 times (48).
Round 29: (6 SC, DEC) 6 times (42).
Round 30: (5 SC, DEC) 6 times (36).
Round 31: (4 SC, DEC) 6 times (30).
Round 32: (3 SC, DEC) 6 times (24).
Round 33: (2 SC, DEC) 6 times (18).
Round 34: (SC, DEC) 6 times (12).
Round 35: DEC 6 times (6).
Fasten off. Thread tail through stitches on Round 35 and pull up to close.
EYES (make 2)
Ch 2, in Black
Round 1: 6 SC in 2nd Ch from hook, Change Colors to Aqua (6).
Round 2: INC in each stitch, (12) Change colors to White
Round 3: (INC, SC) 6 times (18).
Round 4: (SC, INC, SC) 6 times (24).
Fasten off, leave a long tail for sewing.
BEAK
In Orange, CH 2
Round 1: In 2nd Ch from hook 4 SC [4].
Round 2: 3 SC in each stitch [12].
Round 3: SC row [12].
Round 4: SC, 3 SC in next stitch (2 SC, 3 SC in next stitch) 3 times, SC [20].
Round 5: 2 SC, 3 SC in next stitch (4 SC, 3 SC in next stitch) 3 times, 2 SC [28].
Fasten off. Fold in half making a triangle. Fold again and leave partly open and sew to the front of bird.
WINGS make 2
In Alfalfa
Ch 2
Round 1: 6 SC in 2nd Ch from hook [6].
Round 2: INC, INC, 4 SC [8].
Round 3: SC row [8].
Round 4: INC, INC, 6 SC [10].
Round 5: SC row [10].
Round 6: INC, INC, 8 SC [12].
Round 7: INC, INC, 10 SC [14].
Round 8: SC, INC, INC, 12 SC [16].
Round 9: 2 SC, INC, INC, 14 SC [18].
Rounds 10-11: 2 rows SC [18 stitches per row].
Fasten off and sew to the sides of bird right at the color change.
HEAD FEATHER (Large)
In Custard, Ch 2
Round 1: In 2nd Ch from hook 4 SC [4].
Round 2: INC 4 times [8].
Rounds 3-6: 4 rows SC [8 stitches per row].
Round 7: (DEC, 2 SC) 2 times [6].
Round 8: Fold the piece in half and SC the opening closed [3].
Fasten off and leave a long tail for sewing. Waiting until you finish the small feather to sew.
HEAD FEATHER (small)
In Custard, Ch 2
Round 1: In 2nd Ch from hook 4 SC [4].
Round 2: INC 4 times [8].
Round 3: SC row [8].
Round 4: (DEC, 2 SC) 2 times [6].
Round 5: Fold the piece in half and SC the opening closed [3].
Fasten off. Sew to big feather and sew to top of head.
TAIL FEATHER
In Custard, Ch 8
The tail feather is made by doing an oval increase. Sometimes it helps to mark where your increases are going to go with a spare piece of contrasting yarn. Just note that the first row is worked on both sides of the starting chain.
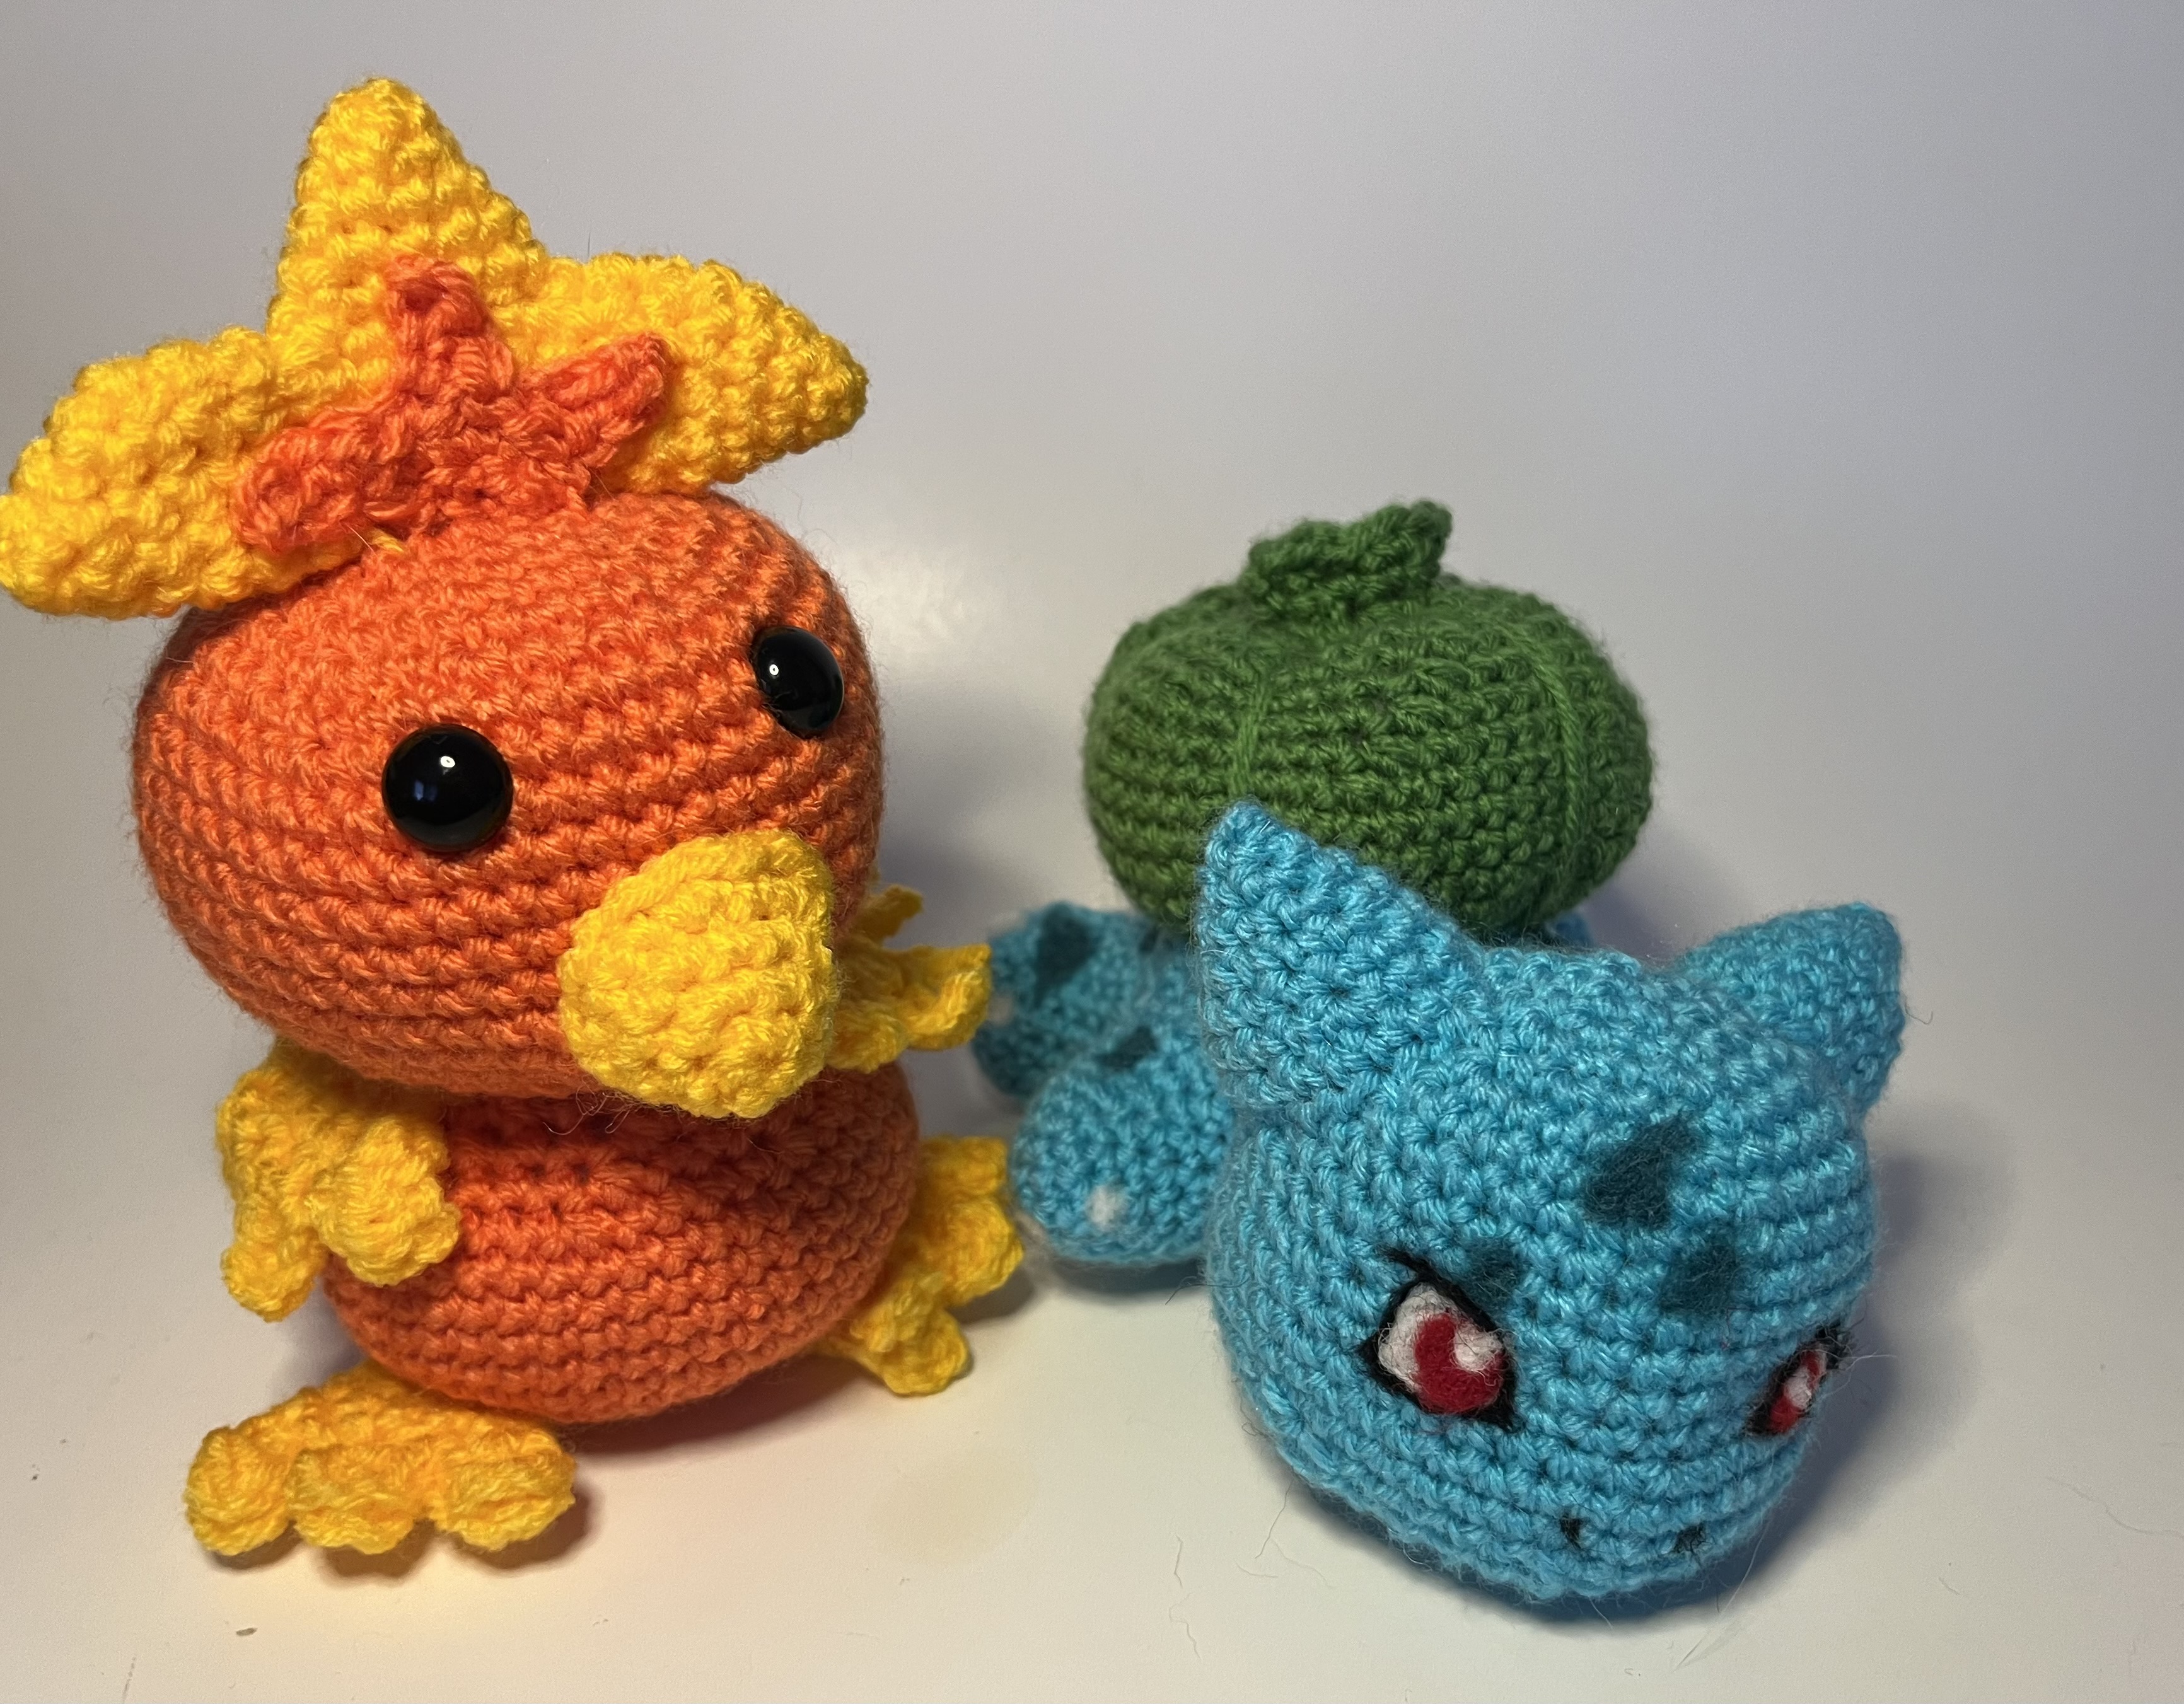
This year, I had the dumbest idea. I should crochet all the Pokemon. Then I looked at a pokedex. While I play Pokemon Go, I was not quite prepared for the sheer number of Pokemon. With the release of Scarlet and Violet it numbers at around 1008. This may take a few years so I will post my progress and the links to the patterns.
I started with Bulbasaur.
This took me awhile to find the best pattern. I wanted to make sure it was as close to the original Pokemon as possible.
Bulbasaur.
This pattern I found on deviant art was my absolute favorite. I did have to look up a tutorial on how to do the needle felted eyes, but it was great to add something new to my skill set.
Then I used a random number generator to figure out who was next.
Random.org came up with #255 Torchic who is also completely adorable.
Also a starter pokemon and so cute. I got the pattern here. There are a bunch of Pokemon patterns on this website so I might be back. I did choose to use safety eyes on this one instead of felt.
That’s as far as I have gotten. I will update when I have more, Pokeballs, included.
I grew up watching re-runs of the Addams Family in black and white. We also watched the movie with Christina Ricci as a kid. So, when the new series came out, I had to watch it. The line “Wednesday is allergic to color” stuck with me.
I needed a new cork ornament for this year. Thus, this little item was created. You know she doesn’t like Christmas or color, so the black and white Santa Hat popped into my head.
This is a super-fast project to whip up and a great way to use up those corks you have been saving.
This pattern isn’t officially tested, though I have followed it 5 times to make an army of Wednesdays. If you make it, please use #drunkenauntwendy so I can see your work.
Note: Hats are worked in the round. Use a stitch marker or a scrap piece of yarn to mark the beginning of each row. Then you don’t have to count every row. Do not join unless instructed to.
Parentheses indicate a repeat. Repeat the stitches in the parentheses for the number of times indicated.
The bracketed number [] is the number of stitches at the end of each row.
I spread my increases out so there isn’t a seam on the finished piece. If you do not like this method, you can do regular increases.
If you have any questions, please feel free to email me at drunkenauntwendy@gmail.com.
BODY
Paint cork black. Leave top of cork unpainted for the face.
Once the paint is dry. Insert screw hook in the top of the cork.
Using Sharpie find an unmarked spot on the cork and draw two ovals to act as the eyes. You can also add eyelashes.
Using white paint make two upside down triangles at edge of black, with the center matching the center of the eyes.
HAT
In White Chain 2
Round 1: 6 SC in 2nd Chain from hook. [6]
Round 2: SC row [6]
Round 3: DEC 3 times, Change color to black in last stitch [3]
Round 4: INC in each stitch [6].
Round 5: INC in each stitch [12].
Round 6: (SC, INC) 6 times [18].
Rounds 7-8: 2 rows SC, change color to white in last stitch [18].
Round 9: SC row in FLOS [18].
Round 10: SC row [18] fasten off.
HAIR
Cut Six Pieces of black yarn about 6 inches long. Find center point of the hat and pull 3 pieces of yarn on each side using the unused loops from Round 9.
Separate into 3 groups, 2 strands per group and braid pigtails. Use the side of the cork to gauge length. Tie above bottom of cork with black thread. Cut off bottom of hair even with the bottom of the cork.
In the Conjuring Universe there’s a super creepy doll. She’s possessed by the spirit of Annabelle and allegedly malicious.
That’s okay, this version isn’t possessed she’s just cute. New to the Horror Mini Series I present Annabelle. She’s a quick crochet and great scrap buster. Remember, this pattern isn’t tested.
DEC – SC two stitches together BLO – Back loops only
FLO – Front Loops only
Gauge – Gauge is not important for this project, but if you are making it from the kit, you should use the right size needle to ensure you don’t run out of yarn.
Notes:
Parentheses indicate a repeat. Repeat the stitches in the parentheses for the number of times indicated.
The bracketed number [] is the number of stitches at the end of each row.
I spread my increases out so there isn’t a seam on the finished piece. If you do not like this method, you can do regular increases.
Crochet section is worked in partly in the round. Use a stitch marker or a scrap piece of yarn to mark the beginning of each row. Then you don’t have to count every row. Do not join unless instructed to.
If you have any questions, please feel free to email me at drunkenauntwendy@gmail.com.
EYES
Using the matte nail polish, paint eyes and set aside.
DRESS
In White, Ch 2 Round 1: 6 SC in 2nd Ch from hook [6]. Round 2: INC in each stitch [12]. Round 3: (SC, INC) 6 times [18]. Round 4: (SC, INC, SC) 6 times [24].
Round 5: (3 SC, INC) 6 times [30].
Round 6: SC in BLOS [30].
Round 7: (3 SC, DEC) 6 times [24]
Round 8: SC row [24]
Round 9: (2 SC, DEC) 6 times [18]
Round 10: SC row [18].
Start Stuffing
Round 11: (SC, DEC) 6 times, Change Colors to Red in last stitch [12].
Rounds 11-12: 2 rows SC, Change colors to white in last stitch [12 stitches per row]
Using Red Yarn, Embroider a large red V above the waistline.
HEAD
In Beige, Ch 2 Round 1: 6 SC in 2nd Ch from hook [6]. Round 2: INC in each stitch [12]. Round 3: (SC, INC) 6 times [18]. Round 4: (5 SC, INC) 3 times [21].
Round 5: (6 SC, INC) 3 times [24].
Rounds 6-8: 3 rows SC [24 stitches each row].
Stop here and insert safety eyes, don’t put the backs on yet.
Using the Black Embroidery Floss embroider 4 tiny lines around each eye. Put backs on.
Round 9: (6 SC, DEC) 3 times [21].
Round 10: (5 SC, DEC) 3 times [18].
Using black Embroidery floss, embroider a straight line for a mouth. Make two small stitches perpendicular to the mouth line to finish mouth. Tie off inside head.
Round 11: (SC, DEC) 6 times [12].
Round 12: DEC 6 times [6].
Fasten off. Attach to Body.
HAIR
Attach hair creating a part. Cut the front for bangs, divide the back and create 2 braids.
I’ve been consistent. It’s crazy. I’m really trying to get more typed and up. There are so many patterns that I have written that I still have not typed. I’m working on some mythical creatures and a potential book.
Not all patterns will stay free forever so get it while you can. These two are great because you can make them separately or sew them together. You also can coat them in blood because that is just an excellent idea.
DEC – SC two stitches together BLO – Back loops only
FLO – Front Loops only
Gauge – Gauge is not important for this project, but if you are making it from the kit, you should use the right size needle to ensure you don’t run out of yarn.
Notes:
Parentheses indicate a repeat. Repeat the stitches in the parentheses for the number of times indicated.
The bracketed number [] is the number of stitches at the end of each row.
I spread my increases out so there isn’t a seam on the finished piece. If you do not like this method, you can do regular increases.
Crochet section is worked in partly in the round. Use a stitch marker or a scrap piece of yarn to mark the beginning of each row. Then you don’t have to count every row. Do not join unless instructed to.
In Beige, Ch 2 Round 1: 6 SC in 2nd Ch from hook [6]. Round 2: INC in each stitch [12]. Round 3: (SC, INC) 6 times [18]. Round 4: (5 SC, INC) 3 times [21].
Round 5: (6 SC, INC) 3 times [24].
Rounds 6-8: 3 rows SC [24 stitches each row].
Stop here and insert safety eyes between rows 6-7. Start stuffing.
Round 9: (6 SC, DEC) 3 times, Change to brown[21].
Round 10: (5 SC, DEC) 3 times [18].
Round 11: (SC, DEC) 6 times [12].
Round 12: DEC 6 times [6].
Fasten off. Attach to Body.
HAIR
In Light Brown
Using the hair color, wrap the yarn around an item the same width as you want the length of your hair to be. (I used my iphone). These wraps should be as long on the phone as your set aside piece of hair. The more wraps you do, the thicker the hair.
Fold the yarn in half and insert into the brown section of the head. Pull up a loop and then take the remaining yarn through the loop to secure it. Repeat to fill the head.
Finishing
Using the Black Embroidery Floss, embroider eyelashes and mouth on each doll.
Use the white ribbon to tie up the hair at the side and to tie ribbon around the center of the dress.
Make a second doll. Sew the dolls together or leave them separate.
I read this book when I was in 6th grade. I’ve been reading crazy stuff for a long time. Had to read the book before I watched the 80s mini-series.
There are patterns for both versions of Pennywise. You can make them both.
Materials
Yarn in Yellow, Green, Beige and Brown
Red Marker
12 mm safety eyes Size E crochet hook
Large eye blunt needle
Polyfiberfill
Abbreviations
SC – Single Crochet
Ch- Chain INC – SC 2 stitches into same stitch
DEC – SC two stitches together
Gauge – Gauge is not important for this project, but if you are making it from the kit, you should use the right size needle to ensure you don’t run out of yarn.
Notes:
Parentheses indicate a repeat. Repeat the stitches in the parentheses for the number of times indicated.
The bracketed number [] is the number of stitches at the end of each row.
I spread my increases out so there isn’t a seam on the finished piece. If you do not like this method, you can do regular increases.
Crochet section is worked in partly in the round. Use a stitch marker or a scrap piece of yarn to mark the beginning of each row. Then you don’t have to count every row. Do not join unless instructed to.
If you have any questions, please feel free to email me at drunkenauntwendy@gmail.com.
BODY
In Green, Ch 2 Round 1: 6 SC in 2nd Ch from hook [6]. Round 2: INC in each stitch [12]. Round 3: (SC, INC) 6 times [18]. Round 4: (SC, INC, SC) 6 times [24].
Round 5: (3 SC, INC) 6 times [30].
Round 6: SC row [30]. Change Color to yellow
Rounds 7-9: 2 Rows SC [30 stitches each row].
Round 10: (13 SC, DEC) 2 times [28].
Round 11: (5 SC, DEC) 4 times [24].
Round 12: (4 SC, DEC) 4 times [20].
Round 13: (8 SC, DEC) 2 times [18].
Fasten off. Stuff and set aside.
HEAD
In Beige, Ch 2 Round 1: 6 SC in 2nd Ch from hook [6]. Round 2: INC in each stitch [12]. Round 3: (SC, INC) 6 times [18]. Round 4: (5 SC, INC) 3 times [21].
Round 5: (6 SC, INC) 3 times [24].
Rounds 6-8: 3 rows SC [24 stitches each row].
Stop here and insert safety eyes, embroider eyebrows with brown yarn and start stuffing.
Round 9: (6 SC, DEC) 3 times[21].
Round 10: (5 SC, DEC) 3 times [18].
Round 11: (SC, DEC) 6 times [12].
Round 12: DEC 6 times [6].
Fasten off. Leave a long tail. Using tail thread through stitches from Round 12 and pull up tight to close the hole.
Attach to Body.
HOOD
The hood is made working back and forth not in the round.
In Yellow, Ch 21
Row 1: Sc in 2nd Chain from hook, 19 SC, Ch 1, turn [20].
Black Embroider Floss 12 mm safety eyes Size E crochet hook
Large eye blunt needle
Polyfiberfill
Abbreviations
SC – Single Crochet
Ch- Chain INC – SC 2 stitches into same stitch
DEC – SC two stitches together
Gauge – Gauge is not important for this project, but if you are making it from the kit, you should use the right size needle to ensure you don’t run out of yarn.
Notes:
Parentheses indicate a repeat. Repeat the stitches in the parentheses for the number of times indicated.
The bracketed number [] is the number of stitches at the end of each row.
I spread my increases out so there isn’t a seam on the finished piece. If you do not like this method, you can do regular increases.
Crochet section is worked in partly in the round. Use a stitch marker or a scrap piece of yarn to mark the beginning of each row. Then you don’t have to count every row. Do not join unless instructed to.
If you have any questions, please feel free to email me at drunkenauntwendy@gmail.com.
BODY
In Orange, Ch 2 Round 1: 6 SC in 2nd Ch from hook [6]. Round 2: INC in each stitch [12]. Round 3: (SC, INC) 6 times [18]. Round 4: (SC, INC, SC) 6 times [24].
Round 5: (3 SC, INC) 6 times [30].
Round 6: SC row [30]. Change Color to white
Rounds 7-9: 2 Rows SC [30 stitches each row].
Round 10: (13 SC, DEC) 2 times [28].
Round 11: (5 SC, DEC) 4 times [24].
Round 12: (4 SC, DEC) 4 times [20].
Round 13: (8 SC, DEC) 2 times [18].
Round 14: SC row [18].
Round 15: SC row [18].
Fasten off. Stuff and set aside.
HEAD
In Beige, Ch 2 Round 1: 6 SC in 2nd Ch from hook [6]. Round 2: INC in each stitch [12]. Round 3: (SC, INC) 6 times [18]. Round 4: (5 SC, INC) 3 times [21].
Round 5: (6 SC, INC) 3 times [24].
Rounds 6-8: 3 rows SC [24 stitches each row].
Stop here and insert safety eyes, and start stuffing.
Round 9: (6 SC, DEC) 3 times, Change Color to Grey [21].
Round 10: (5 SC, DEC) 3 times [18].
Round 11: (SC, DEC) 6 times [12].
Round 12: DEC 6 times [6].
Fasten off. Leave a long tail. Using tail thread through stitches from Round 12 and pull up tight to close the hole. Use the grey thread to embroider a deep widows peak.
Attach to Body.
JACKET STRAPS (Make 2)
In White Chain 26
Row 1: Sc in 2nd Ch from hook, SC in remaining 24 stitches. Fasten off and leave a long tail for sewing.
Sew the straps across the chest of the body wrapping around to the back.
MASK
Mask is made working in rows back and forth.
In Taupe, Ch 11
Row 1: Starting in 2nd Ch from hook, DEC, 6 SC, DEC¸turn [8 SC]
This year I present my new horror minis. Due to Instagram polling, the Shining Twins are not bloody. I feel as though they should be, but I was overruled. Thankfully, I didn’t ask about Georgie. I think I’m the most proud of Ash and his ripped shirt with tiny chainsaw.
These should be typed eventually, but I wanted to share the new ones.
I started to venture away from the eyelashes I was using. Mainly because I didn’t have the patience to wait for the glue to dry.