Mini Monsters – Carrie

Crocheted Carrie

Last year I did a bunch of mini monsters for Halloween. I didn’t get them all typed. I wanted to add this one to the mix. They’re all gonna laugh at you.

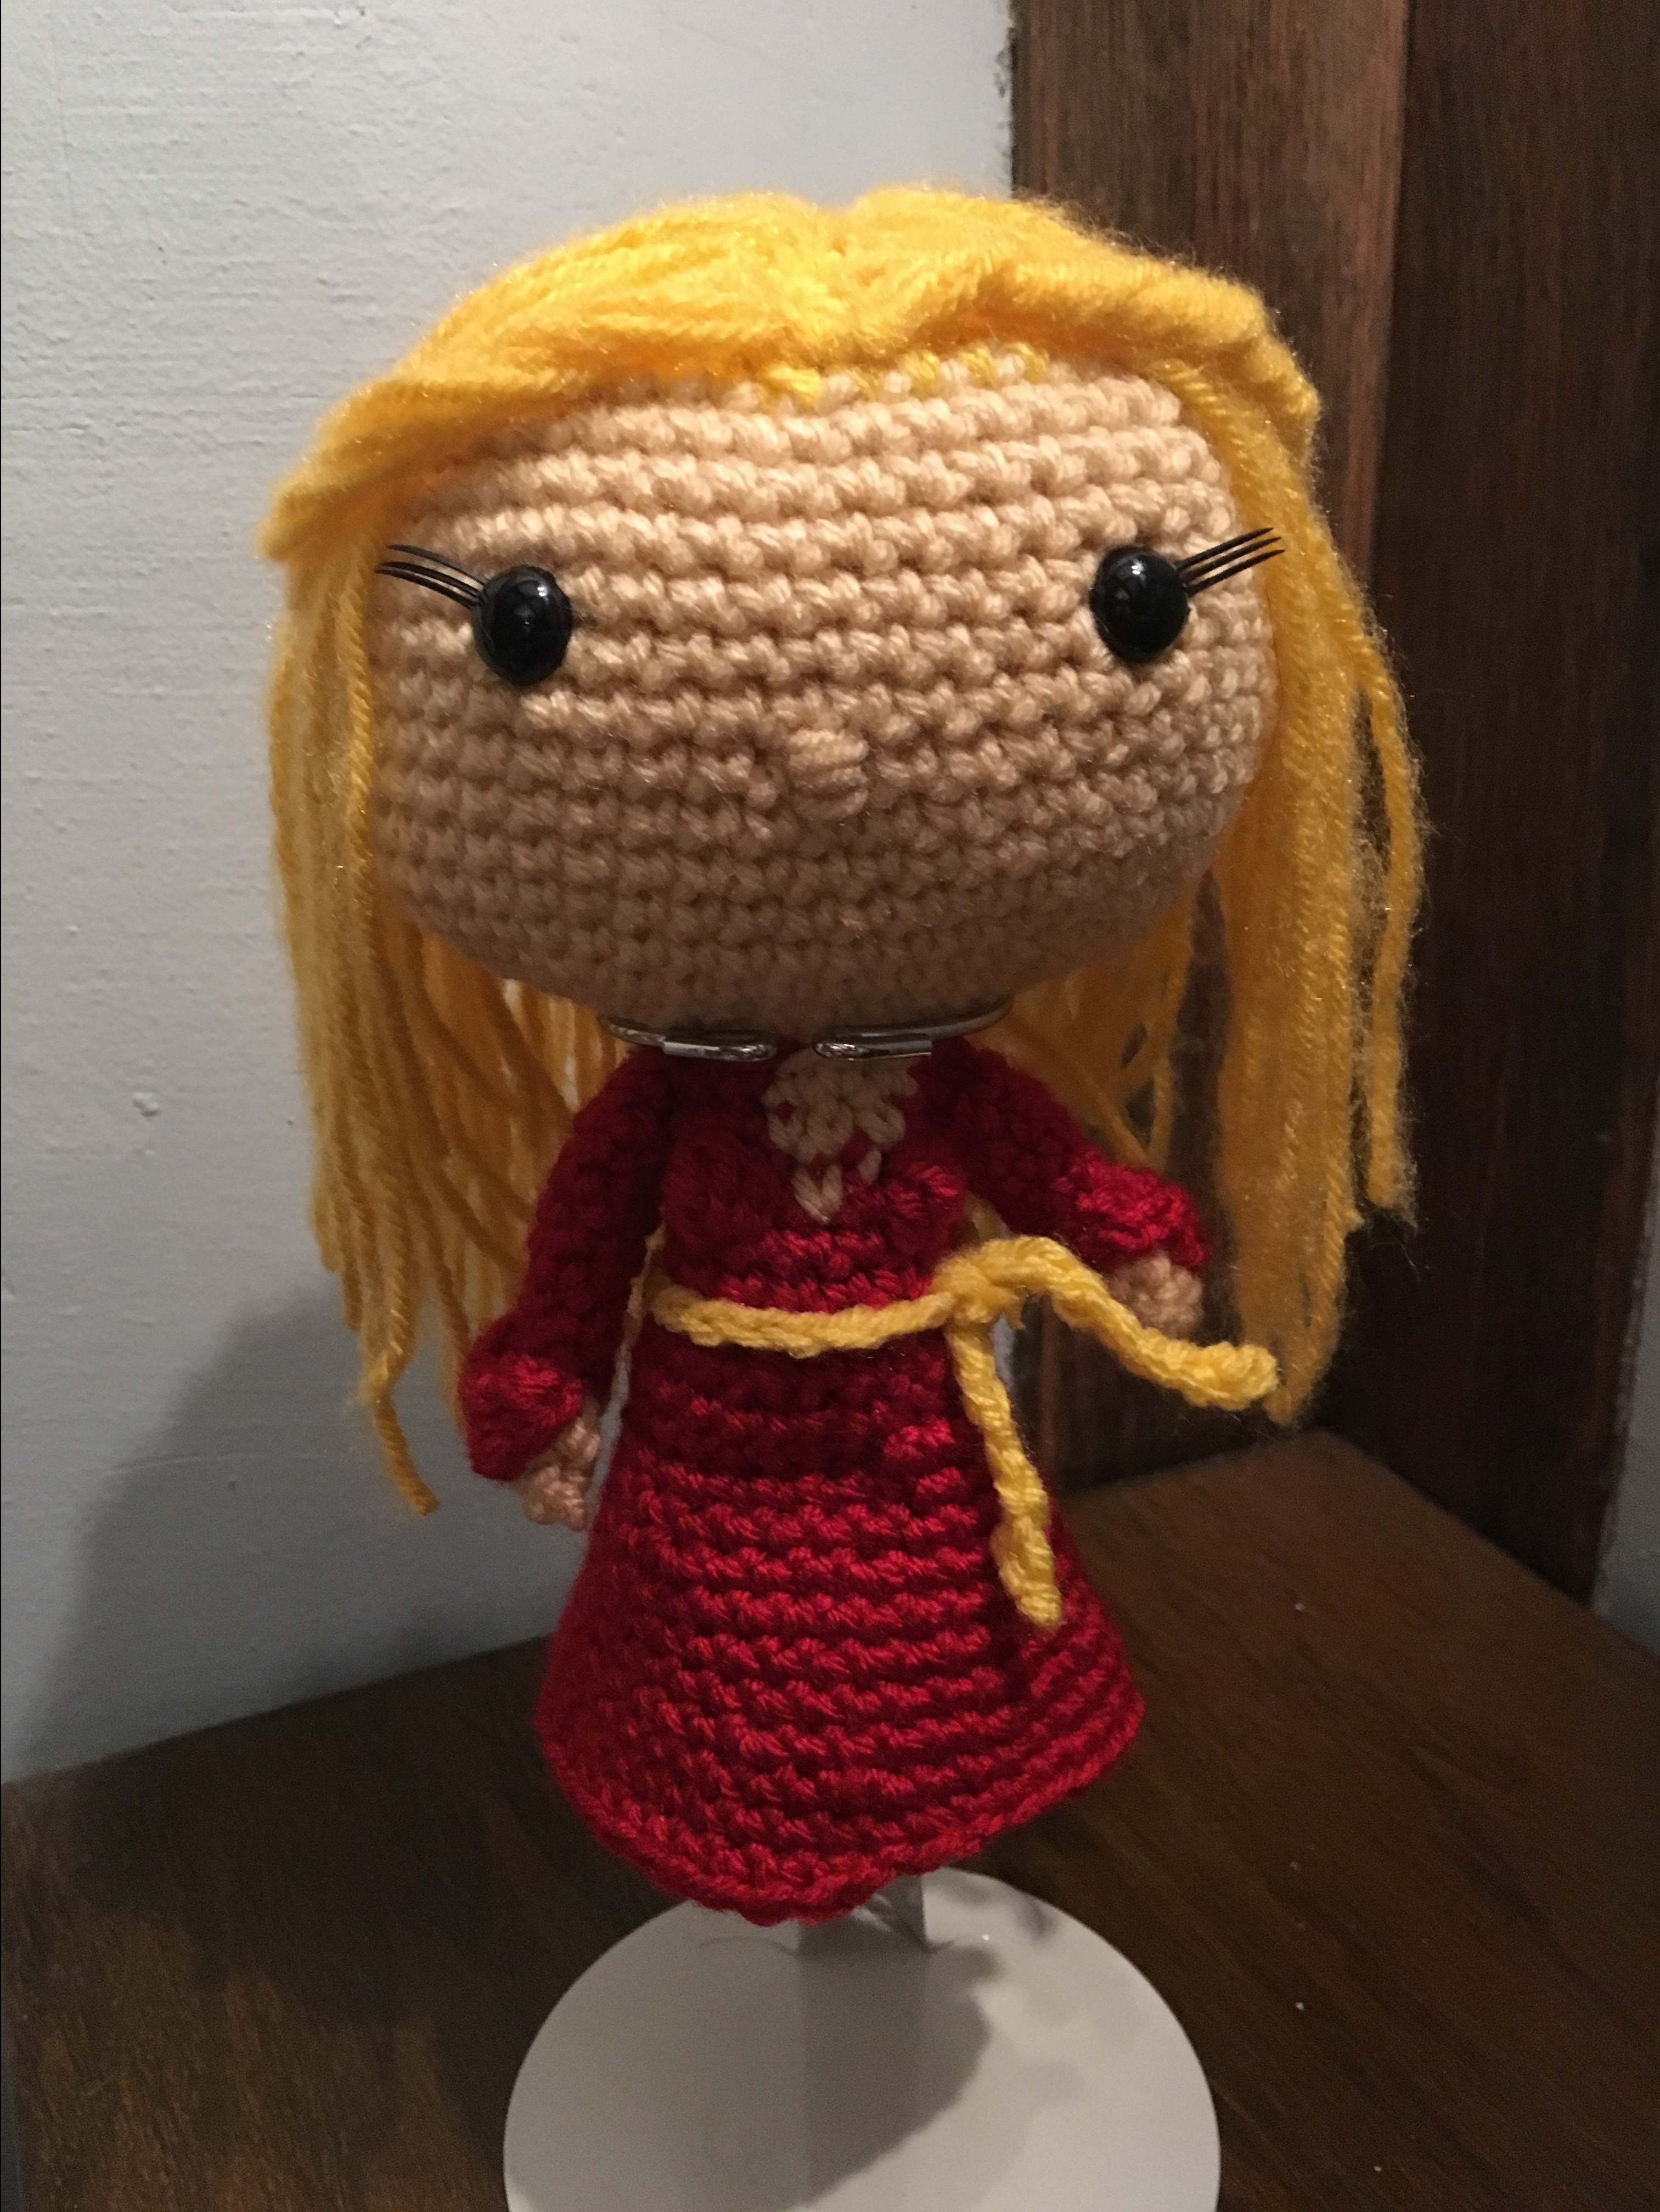
One of my first Steven King books and my absolute best Halloween Costume. (I even won a contest)

Crocheted Carrie
Blood everywhere

As you can see, I may have gotten blood all over my walls and radiator. Its all good because it was just stage makeup mixed with a lot of water. (I was going to use paint, but in the test run it dried really crusty). The makeup stays nice and bright, but it does transfer off if you rub it directly.

The hair can be attached anyway you like. This is a new method, that I like a lot, but it is a touch confusing.

You also can make her with no blood, but where is the fun in that.

IMG_4903

Carrie – mini monsters
© DrunkenAuntWendyDesigns

Materials

I love this yarn Soft Pink
Vanna’s Choice – Beige
Fuzzy yellow yarn
12 mm safety eyes
Doll Eyelashes
Epoxy 6000
Red Theater Makeup and Water
Size E crochet hook
Large eye blunt needle
Polyfiberfill

Abbreviations

SC – Single Crochet
Ch- Chain
INC – SC 2 stitches into same stitch
DEC – SC two stitches together
BLO – Back loops only
FLO – Front Loops only

Gauge – Gauge is not important for this project, but if you are making it from the kit, you should use the right size needle to ensure you don’t run out of yarn.

Notes:
Parentheses indicate a repeat. Repeat the stitches in the parentheses for the number of times indicated.
The bracketed number [] is the number of stitches at the end of each row.

I spread my increases out so there isn’t a seam on the finished piece. If you do not like this method, you can do regular increases.

Crochet section is worked in partly in the round. Use a stitch marker or a scrap piece of yarn to mark the beginning of each row. Then you don’t have to count every row. Do not join unless instructed to.

If you have any questions, please feel free to email me at drunkenauntwendy@gmail.com.

EYES

Cut a section of three eyelashes per eye. Glue to the flat part of the safety eyes and set aside to dry.
HEAD

In Beige, Ch 2
Round 1: 6 SC in 2nd Ch from hook [6].
Round 2: INC in each stitch [12].
Round 3: (SC, INC) 6 times [18].
Round 4: (5 SC, INC) 3 times [21].
Round 5: (6 SC, INC) 3 times [24].
Rounds 6-8: 3 rows SC [24 stitches each row].
Stop here and insert safety eyes, and start stuffing.
Round 9: (6 SC, DEC) 3 times [21].
Round 10: (5 SC, DEC) 3 times [18].
Round 11: (SC, DEC) 6 times [12].
Round 12: DEC 6 times [6].
Fasten off.

DRESS
In Pink, Ch 2
Round 1: 6 SC in 2nd Ch from hook [6].
Round 2: INC in each stitch [12].
Round 3: (SC, INC) 6 times [18].
Round 4: (SC, INC, SC) 6 times [24].
Round 5: (3 SC, INC) 6 times [30].
Round 6: In BLOs, SC row [30].
Round 7: (3 SC, DEC) 6 times [24].
Rounds 9-10: SC for 2 rows [24 stitches per row].
Round 11: (2 SC, DEC) 6 times [18].
Rounds 12-13: 2 rows SC [18 stitches per row.
Start Stuffing.
Round 14: (SC, DEC) 6 times [12].
Round 15: SC row [12].

Fasten off. Sew to head.

RUFFLE ON BOTTOM OF DRESS
In Pink, Attach to unused loops in Round 6
Round 1: Inc in each stitch [60].
Round 2: SC in each stitch [60].

Fasten off.

HAIR
In Fuzzy Yellow
Take a piece of yarn and measure the crown of your dolls head. Set this aside, you will use this to make sure you make enough hair.

Using the hair color, wrap the yarn around an item the same width as you want the length of your hair to be. (I used my iphone). These wraps should be as long on the phone as your set aside piece of hair. The more wraps you do, the thicker the hair.

Then using the same yarn, SC along the spine of your item catching 3-4 pieces of yarn at a time. (This secures the hair). Fasten off and leave a long tail for sewing.

Cut the hair at the other end.

Lay chain on head with hair covering face and tack down. Flip hair to the back of the head and start tacking down sections. Leave some free.

PIGS BLOOD
Wet the red makeup to a runny consistency. You want it in between honey and whole milk. Dump on your dolls head. I also used a toothbrush and spattered some on her to spread out the blood.

Franken Berry – Free Crochet Pattern

Crochet Frankenberry

It has been awhile since I have had time to type a pattern. I will try to be better. Here’s one of my Cereal Icons. I loved these commercials when I was little. My parents wouldn’t let us get these cereals as they were so sugary.

Remember, the pattern isn’t tested. Please use #drunkenauntwendy if you post on Instagram.

101_0513.JPG

Franken Berry
© 2019DrunkenAuntWendyDesigns

Materials
Worsted Weight Yarn
I love this yarn – Hot Rose
I love this yarn – Red
I love this yarn – Light Grey
I love this yarn – Rosy Cheeks
Black Embroidery Floss
12 MM Safety Eyes painted white
Size E crochet hook
Polyfiberfill
Large Eye Needle
Small Sharp Embroidery Needle

Abbreviations
SC – Single Crochet
CH- Chain
FO – Fasten Off
SL ST – Slip Stitch
INC – Make two Single Crochet in Same Stitch
DEC – Single Crochet two stitches together
BLO – Back Loops Only

Note: Entire project is worked in the round. Use a stitch marker or a scrap piece of yarn to mark the beginning of each row. Then you don’t have to count every row. Do not join unless instructed to.

Parentheses indicate a repeat. Repeat the stitches in the parentheses for the number of times indicated.

The bracketed number [] is the number of stitches at the end of each row.

I spread my increases out so there isn’t a seam on the finished piece. If you do not like this method, you can do regular increases.

If you have any questions, please feel free to email me at drunkenauntwendy@gmail.com.

HEAD – in Rosy Cheek
The head is made by doing an oval increase. Sometimes it helps to mark where your increases are going to go with a spare piece of contrasting yarn. Just note that the first row is worked on both sides of the starting chain. The face is then embroidered on before you add the hair and stuff him.

Ch 8
Round 1: SC in 2nd Ch, SC in next 5 stitches. 3 SC in last stitch. Working in the unused loops from the chain, SC 5, 3 SC in last chain. [18]
Round 2: [6 SC, (INC) 3 times] repeat bracket one more time [24].
Round 3: [6 SC, (SC, INC) 3 times] repeat bracket one more time [30].
Round 4: [6 SC, (SC, INC, SC) 3 times] repeat bracket one more time [36].
Round 5: [6 SC, (3 SC, INC) 3 times] repeat bracket one more time [42].
Round 6: [6 SC, (2 SC, INC, 2 SC) 3 times] repeat bracket one more time [48].
Rounds 7-17: SC in each stitch for 10 rows [48 stitches per row].
Fasten off. Note: This flat edge is what is attached to the bumps for the head.

EYE PATCHES (Make 2 in Hot Rose)
Ch 2
Round 1: 4 SC in 2nd Chain from hook [4].
Round 2: INC in each stitch around [8].
Fasten off.

Insert eye posts through the center hole.

Place safety eyes between rows 10-11 approximately 8 stitches apart. It helps to fold the head flat so you can make sure it is centered on the oval.

EYELIDS (make 2 in Hot Rose).
Ch 4
Row 1: SC in 2nd Chain from Hook, HDC, SC, Fasten off. [3].
Fasten off.

Sew at an angle over the plastic eye.
Embroider two nostrils using the Black Embroidery Floss and then a curved mouth underneath. Embroider a line across the eyes.

Make sure you tie all of these off inside the head to prevent unraveling later.

BOLTS – Make 2 in Red
CH 2
Round 1: 6 SC in 2nd CH from hook. [6].
Round 2: INC in stitch [12].
Round 3: In BLOs, SC in each stitch [12].
Fasten off and leave a long tail for sewing. Stuff lightly. Attach to head on sides between rows 7-8 before you attach the top of the head.

TOP OF HEAD in Rosy Cheeks
Note top of head is made in 2 pieces.
Ch 2
Round 1: 6 SC in 2nd CH from hook. [6].
Round 2: INC in stitch [12].
Round 3: (SC, INC) 6 times [18].
Round 4: (SC, INC, SC) 6 times [24].
Round 5: SC row
Fasten off first one, on the 2nd piece continue below.
Round 6: SC around both pieces [48].
Round 7: SC row [48].
Fasten off.

Line up middle points in hair and head and sew together stuffing as you go.

EYEBROWS – Make 2 in Hot Rose
Ch 6
Round 1: SC in 2nd Chain from hook, 4 SC [5].
Fasten off. Sew on the forehead a slight slant.

STEAM VALVE in Red
TOP
Ch 2
Round 1: 4 SC in 2nd Chain from Hook [4].
Round 2: (INC, SC) 2 times [6].
Round 3: (SC, INC, SC) 2 times [8].
Round 4: (3 SC, INC) 2 times [10].
Round 5: (2 SC, INC, 2 SC) 2 times [12].
Fasten off. Set aside to make the base of the Steam Valve.

BASE CYLINDER
Ch 2
Round 1: 4 SC in 2nd Chain from hook [4].
Round 2: INC in each stitch [8].
Round 3: SC in BLOS [8].
Rounds 4-7: 4 rows SC [8 stitches per row].
Start Stuffing
Round 8: 2 INC, SC, 2 DEC, SC [8].
Round 9: SC Row [8].
Round 10:2 SC, [place hook through stitch 3 rows below then into the next stitch SC] repeat one time, 4 SC [8].
Fasten off. Stuff firmly. Sew the curved side to the side of the head. Sew top of valve to the cylinder.

TEMPERATURE GUAGE
Made in 3 pieces
BOTTOM
In red, Ch 2
Round 1: 6 SC in 2nd Chain from hook [6].
Round 2: INC in each stitch [12].
Round 3: SC row [12].
Fasten off, sew to the side of head.

TOP PIECE
In red, Ch 2
Round 1: 6 SC in 2nd Chain from hook [6].
Round 2: INC in each stitch [12].
Round 3: (SC, INC) 6 times [18].
Round 4: SC in BLOs [18].
Round 5: (SC, DEC) 6 times [12].
Lightly stuff
Round 6: (DEC) 6 times [6].
Fasten off, leave a long tail. Thread tail through Round 6 and pull up tight to close the hole. Sew to top of the bottom.

FACE PLATE
In White, Ch 2
Round 1: 4 SC in 2nd SC from hook [4].
Round 2: INC in each stitch [8].
Fasten off. Embroider on a black V with embroidery floss. Sew to the top piece.
LEGS – Make 2 in Red
Ch 2
Round 1: 6 SC in 2nd Ch from hook [6].
Round 2: INC in each stitch [12].
Round 3: (SC, INC) 6 times [18].
Round 4: SC in BLOs [18].
Rounds 5-11: 7 rows SC [18 stitches per row].
Fasten off 1st leg. On 2nd leg do not fasten off. Continuing with the 2nd leg
Round 12: SC around both legs to join them [36].
Rounds 13-15: 3 rows SC, Change colors to Hot Rose [36 stitches per row].
Start stuffing here. Make sure you stuff each leg.
Round 14: SC row [36].
Round 15: (4 SC, DEC) 6 times [30].
Round 16: SC row [30].
Round 17: (3 SC, DEC) 6 times [24].
Round 18: SC row [24].
Round 19: (2 SC, DEC) 6 times [18].
Round 20: SC row [18].
Round 21: (SC, DEC) 6 times [12].
Fasten off. Sew to the bottom of the head.

ARMS – make 2
In Rosy Cheeks, Ch 2
Round 1: 4 SC in 2nd chain from hook [4].
Round 2: SC row [4].
Round 3: (SC, INC) 2 times [6]
Rounds 4-6: 3 rows SC, Change colors to Hot Rose [6].
Rounds 7-11: 5 rows SC
Fasten off, tighten hole and sew to the sides of the body.

CHAINS Make 2 sets
Chain 9 loosely. Sew to body like suspenders.

Mystique – Free Crochet Pattern

Crochet Pattern Mystique

I am working on my Drunken Care Bears. They are super cute. I’m making a Wino Bear.

I haven’t had as much time as I like to keep up with all my ideas. I think I have some crafting ADD. I can’t focus on one thing at a time. I love to do all types of crafts.

Next up, air plant cork magnets and soaps. These have an ulterior purpose as I will be selling them at the vacant space where my new bar is going. (Maybe the bar is what is taking up all my time).

Anyway, I have been focusing on female pop culture characters. You voted on Instagram for the Marvel Universe. I decided on Mystique.

I think I have finally perfected that hourglass figure typical to most comic book characters.

Crochet Pattern Mystique

One of my favorite characters from the X-Men. I love Mystique. I got the beads from the Bead Chest. I think the really add to the finished doll.

Remember that these patterns are not tested. If you have a problem, please let me know. Use #drunkenauntwendy if you make one an post a picture so I can find it and give you love.

Materials
Worsted Weight Yarn
I love this yarn – Blue Neon
I love this yarn – White
Vanna’s Choice – Rust
12 MM Safety Eyes Painted Yellow
Doll eyelashes
7 Skull Beads
Black Embroidery floss
E6000 epoxy
Size E crochet hook
Polyfiberfill
Large Eye Needle

Abbreviations
SC – Single Crochet
DC – Double Crochet
CH- Chain
FO – Fasten Off
SL ST – Slip Stitch
INC – Make two Single Crochet in Same Stitch
DEC – Single Crochet two stitches together
Puff Stitch –(Insert the hook in the stitch, yarn over, draw the yarn through the stitch) repeat 2 more times. You should have loops on your hook. Yarn over and draw through all 6 loops on the hook. Push the stitch out.
BLO – Back Loops Only
FLO – Front Loops Only

Note: Entire project is worked in the round. Use a stitch marker or a scrap piece of yarn to mark the beginning of each row. Then you don’t have to count every row. Do not join unless instructed to.

Parentheses indicate a repeat. Repeat the stitches in the parentheses for the number of times indicated.

The bracketed number [] is the number of stitches at the end of each row.

I spread my increases out so there isn’t a seam on the finished piece. If you do not like this method, you can do regular increases.

If you have any questions, please feel free to email me at drunkenauntwendy@gmail.com.

EYES

Before starting the head. Paint the eyes yellow. Once dry, clip a section of three lashes per eye. Glue to the flat portion of your safety eyes and set aside to dry.

HEAD in Blue Neon
Head is worked as an oval. The increases go on the sides of the oval.
Ch 8
Round 1: SC in 2nd Ch from hook, SC for 5 stitches, 3 SC in last stitch, working in the unused loops from the first few stitches, 6 SC, 3 SC in the beginning loop [18].
Round 2: 6 SC, INC 3 times, 6 SC, INC 3 times [24].
Round 3: 6 SC, (SC, INC) 3 times, 6 SC, (SC, INC) 3 times [30].
Round 4: 6 SC, (SC, INC, SC) 3 times, 6 SC, (SC, INC, SC) 3 times [36].
Round 5: 6 SC, (3 SC, INC) 3 times, 6 SC, (3 SC, INC) 3 times [42].
Round 6: 6 SC, (2 SC, INC, 2 SC) 3 times, 6 SC, (2 SC, INC, 2 SC) 3 times [48].
Rounds 7-17: 11 rows SC [48 stitches per row.
Fasten off.

Insert Eyes. Use a piece of blue to embroider nose with straight stitches.

Using Rust, embroider eyebrows above the eyes.

WIG CAP in Rust
Head is worked as an oval. The increases go on the sides of the oval.
Ch 8
Round 1: SC in 2nd Ch from hook, SC for 5 stitches, 3 SC in last stitch, working in the unused loops from the first few stitches, 6 SC, 3 SC in the beginning loop [18].
Round 2: 6 SC, INC 3 times, 6 SC, INC 3 times [24].
Round 3: 6 SC, (SC, INC) 3 times, 6 SC, (SC, INC) 3 times [30].
Round 4: 6 SC, (SC, INC, SC) 3 times, 6 SC, (SC, INC, SC) 3 times [36].
Round 5: 6 SC, (3 SC, INC) 3 times, 6 SC, (3 SC, INC) 3 times [42].
Round 6: 6 SC, (2 SC, INC, 2 SC) 3 times, 6 SC, (2 SC, INC, 2 SC) 3 times [48].
Fasten off leaving a long tail for sewing.

Stuff head and attach wig cap.

Attach one skull bead in center of head at the join line.

HAIR in Rust
Cut several pieces of hair 6 inches and 12 inches.

Using the 6 inch pieces, attach at the side of the head at the join. Work around the back of head in each stitch to the other side.

Using the 12 inch pieces, attach in two lines going straight back from the skull bead. Try to join them so there is a part. Attach the hair all the way to the end of the wig cap. Make more hair pieces as necessary to fill out the hair.

ARMS – Make 2 in white
Ch 2,
Round 1: 6 SC in 2nd Ch from hook [6].
Rounds 2-8: Sc for 7 rows [6 stitches per row]. Change color to Blue Neon in the last stitch.
Rounds 9-15: Sc for 7 rows [6 stitches per row].
Fasten off. Don’t stop. Set aside to sew to body letter.

FEET – Make 2, in white
Ch 5
Round 1: SC in 2nd Ch from hook, SC for 2 stitches, 3 SC in last stitch, working in the unused loops from the first few stitches, 3 SC, 3 SC in the beginning loop [12].
Round 2: 3 SC, INC 3 times, 3 SC, INC 3 times [18].
Round 3: Working in BLOs SC row [18].
Round 4: 3 SC, DEC in next 6 stitches, 6 SC [12].
Start stuffing feet.
Round 5: 2 SC, 3 DEC, 4 SC [9].
Rounds 6-9: 4 rows SC [9 Stitches per row]. Change colors to Blue neon in last stitch.
Round 10: SC in BLOs [9].
Rounds 11-15: 5 rows SC [9 Stitches per row]
Fasten off 1st leg and make second leg
Stuff as you go

BODY – continues from Body
Do not fasten off second leg.
Round 16: SC around each leg to join. [18].
Round 17: (2 SC, INC) 6 times [24].
Round 18: (3 SC, INC) 6 times [30].
Round 19: SC row [30].
Round 20: 7 SC (this is to move to the side. Adjust if necessary.) Change Color to White in the next stitch. SC remaining 22 stitches [23 white, 7 blue].
Round 21: 11 SC, 8 SC in BLOs, 8 SC, 3 SC in BLOS
Round 22: 5 SC in BLOS (DEC, 2 SC) 6 times, SC [24].
Round 23: (2 SC, DEC) 6 times [18].
Round 24: (SC, DEC) 6 times [12].
Rounds 25-27: 3 rows SC [12 stitches per row.
Round 28: (SC, INC) 6 times [18].
Round 29: (2 SC, INC) 6 times [24].
Rounds 30-31: 2 rows SC [24 stitches per row].
Round 32: (2 SC, DEC) 6 times [18]
Round 33: (SC, DEC) 6 times [12]
Round 34: SC row [12].
Fasten off
SKIRT in White
Front and back, Attach to unused loops from Rounds 21-22 with a slip stitch, SC in each stitch – 8 stitches per row. SC until you reach the length you desire. I stopped at the top of the boots but you can make it longer or shorter.

BELT
Using Black Embroidery thread, make a chain through the skulls. Go up through the first skull down through the second. Back up through the 1st, down the second, up through the 3rd skull, down through the 4th, up through the 3rd, down through the 4th. Up through the 5th, down through the 6th, back up through the 5th, down through the 6th. Work the thread back through all the stitches. Fasten off.

Sew to the waist right at the top of the skirt.

Princess Buttercup – Free Crochet Pattern

Crochet Pattern for Princess Buttercup

If you follow me on Instagram (if you don’t you should), you’ll know I’m working on Cheetara from the Thundercats. There was also a poll for my next item. The winner is the Marvel Universe. There are a lot of male superhero crochet patterns out there so I’m going to try to make the female ones. I’ve already done She-Hulk and I have a huge list of more Marvel Female Characters.

I’ve had a bit of free time lately, so I’ve been typing. I was on a Princess Bride kick a while back. I’ve already posted Westley. Please enjoy. Remember these patterns are not tested. Let me know if you have problems. If you post a picture please tag me or use #drunkenauntwendy. Then I can find it. 

Now I present to you. Princess Buttercup.

Crochet Pattern for Princess Buttercup

Materials
Worsted Weight Yarn
Vanna’s Choice – Beige
I love this yarn – Red
I lover this yarn – Yellow
12 MM Safety Eyes
Doll Eyelashes
Epoxy 6000
Size E crochet hook
Polyfiberfill
Large Eye Needle
Small Sharp Embroidery Needle

Abbreviations
SC – Single Crochet
CH- Chain
FO – Fasten Off
SL ST – Slip Stitch
INC – Make two Single Crochet in Same Stitch
DEC – Single Crochet two stitches together
BLO – Back Loops Only
Puff Stitch –(Insert the hook in the stitch, yarn over, draw the yarn through the stitch) repeat 2 more times. You should have loops on your hook. Yarn over and draw through all 6 loops on the hook. Push the stitch out.
Note: Entire project is worked in the round. Use a stitch marker or a scrap piece of yarn to mark the beginning of each row. Then you don’t have to count every row. Do not join unless instructed to.

Parentheses indicate a repeat. Repeat the stitches in the parentheses for the number of times indicated.

The bracketed number [] is the number of stitches at the end of each row.

I spread my increases out so there isn’t a seam on the finished piece. If you do not like this method, you can do regular increases.

If you have any questions, please feel free to email me at drunkenauntwendy@gmail.com.

EYES
Cut a section of three lashes and glue to the flat part of the eye. Set aside until called for.

HEAD – in Beige
The head is made by doing an oval increase. Sometime it helps to mark where your increases are going to go with a spare piece of contrasting yarn. Just note that the first row is worked on both sides of the starting chain. The face is then embroidered on before you add the hair and stuff her.

Ch 8
Round 1: SC in 2nd Ch, SC in next 5 stitches. 3 SC in last stitch. Working in the unused loops from the chain, SC 5, 3 SC in last chain. [18]
Round 2: [6 SC, (INC) 3 times] repeat bracket one more time [24].
Round 3: [6 SC, (SC, INC) 3 times] repeat bracket one more time [30].
Round 4: [6 SC, (SC, INC, SC) 3 times] repeat bracket one more time [36].
Round 5: [6 SC, (3 SC, INC) 3 times] repeat bracket one more time [42].
Round 6: [6 SC, (2 SC, INC, 2 SC) 3 times] repeat bracket one more time [48].
Rounds 7-17: SC in each stitch for 11 rows [48 stitches per row]. Change color to yellow.
Place safety eyes between rows 10-11 approximately 8 stitches apart. It helps to fold the head flat so you can make sure it is centered on the oval.

Using beige yarn embroider a nose using straight stitches.

Make sure you tie all of these off inside the head to prevent unraveling later.

Round 18: (6 SC, DEC) 6 times [42].
Round 19: (5 SC, DEC) 6 times [36].
Round 20: (4 SC, DEC) 6 times [30].
Round 21: (3 SC, DEC) 6 times [24].
Start stuffing.
Round 22: (2 SC, DEC) 6 times [18].
Round 23: (SC, DEC) 6 times [12].
Round 24: DEC 6 times [6].
Fasten off. Thread tail through last 6 stitches. Pull up tight to close.

HAIR
Cut several strands about 12 inches long. Making a center part attach the strands of hair down the center of the head and along the back. Fill in as necessary. Make the hair as thick as you like. Take the hair from the front of the face and twist. Tack on the sides of the head.
ARMS – make 2
In Beige, Ch 2
Round 1: 4 SC in 2nd chain from hook [4].
Round 2: SC row [4].
Round 3: (SC, INC) 2 times [6] change colors
Round 4: SC row [6].
Round 5: SC in BLOS [6]
Rounds 6-11: 6 rows SC [6 Stitches per row].
Fasten off.
Join to the unused loops from round 5
Row 1: SC, DC, DC, SC, Slip Stitch, turn
Row 2: SC row, turn
Row 3: SC, DC, DC, SC slip stitch
Fasten off.

BELT in yellow
Ch 40 fasten off.

TORSO in red
Torso is worked as an oval. The increases go on the sides of the oval.
Ch 5
Round 1: SC in 2nd Ch from hook, SC for 2 stitches, 3 SC in last stitch, working in the unused loops from the first few stitches, 3 SC, 3 SC in the beginning loop [12].
Round 2: 3 SC, INC 3 times, 3 SC, INC 3 times [18].
Round 3: 3 SC, (SC, INC) 3 times, 3 SC, (SC, INC) 3 times [24].
Round 4: SC in BLOS [24].
Round 5: SC row [24].
Round 6: (2 SC, DEC) 6 times [18].
Round 7: (4 SC, DEC) 3 times [15].
Rounds 8-9: 2 rows SC [15 stitches per row].
Start stuffing
Round 10: Puff Stitch, SC, Change Colors to Beige, SC, Change Colors back to Red, SC, Puff Stitch, 10 SC [13 SC, 2 Puff stitches]
Round 11: SC, Change Color to Beige 3 SC, 11 SC [15]
Round 12: Repeat row 11.
Fasten off. Sew to bottom of head.
Attach Arms.

SKIRT in Red.
Join with a slip stitch to the unused loops from Round 4.
Round 1: Using the unused loops from Round 4, SC row [24].
Round 2: SC row [24].
Round 3: (3 SC, INC) 6 times [30].
Rounds 4-6: 3 rows SC [30 stitches per row].
Round 7: (2 SC, INC, 2 SC) 6 times [36].
Rounds 8-10: 3 rows SC [36 stitches per row.
Fasten off. Tie belt around waist.

Westley – Free Crochet Pattern

Westley Crochet Pattern

As you Wish!! Crochet your own Farm boy dressed up a the Dread Pirate Roberts. I love the Princess Bride. It is absolutely one of my favorite movies.

As always, this pattern hasn’t been tested yet. Feel free to contact me if you have any questions. Use #drunkenauntwendy if you post a picture so I can find him.

Westley
© 2018 DrunkenAuntWendyDesigns

Materials
Worsted Weight Yarn
Vanna’s Choice – Beige
I love this yarn – Black
Black Embroidery Floss
12 MM Safety Eyes
Plastic Cocktail Sword
Size E crochet hook
Polyfiberfill
Large Eye Needle
Small Sharp Embroidery Needle

Abbreviations
SC – Single Crochet
CH- Chain
FO – Fasten Off
SL ST – Slip Stitch
INC – Make two Single Crochet in Same Stitch
DEC – Single Crochet two stitches together
BLO – Back Loops Only

Note: Entire project is worked in the round. Use a stitch marker or a scrap piece of yarn to mark the beginning of each row. Then you don’t have to count every row. Do not join unless instructed to.

Parentheses indicate a repeat. Repeat the stitches in the parentheses for the number of times indicated.

The bracketed number [] is the number of stitches at the end of each row.

I spread my increases out so there isn’t a seam on the finished piece. If you do not like this method, you can do regular increases.

If you have any questions, please feel free to email me at drunkenauntwendy@gmail.com.

HEAD – in Beige
The head is made by doing an oval increase. Sometime it helps to mark where your increases are going to go with a spare piece of contrasting yarn. Just note that the first row is worked on both sides of the starting chain. The face is then embroidered on before you add the hair and stuff him.

Ch 8
Round 1: SC in 2nd Ch, SC in next 5 stitches. 3 SC in last stitch. Working in the unused loops from the chain, SC 5, 3 SC in last chain. [18]
Round 2: [6 SC, (INC) 3 times] repeat bracket one more time [24].
Round 3: [6 SC, (SC, INC) 3 times] repeat bracket one more time [30].
Round 4: [6 SC, (SC, INC, SC) 3 times] repeat bracket one more time [36].
Round 5: [6 SC, (3 SC, INC) 3 times] repeat bracket one more time [42].
Round 6: [6 SC, (2 SC, INC, 2 SC) 3 times] repeat bracket one more time [48].
Rounds 7-17: SC in each stitch for 11 rows [48 stitches per row]. Change color to black.
Place safety eyes between rows 10-11 approximately 8 stitches apart. It helps to fold the head flat so you can make sure it is centered on the oval.

Using beige yarn embroider a nose using straight stitches.

Using Black floss embroider a little mustache under the nose.

Make sure you tie all of these off inside the head to prevent unraveling later.

Round 18: (6 SC, DEC) 6 times [42].
Round 19: (5 SC, DEC) 6 times [36].
Round 20: (4 SC, DEC) 6 times [30].
Round 21: (3 SC, DEC) 6 times [24].
Start stuffing.
Round 22: (2 SC, DEC) 6 times [18].
Round 23: (SC, DEC) 6 times [12].
Round 24: DEC 6 times [6].
Fasten off. Thread tail through last 6 stitches. Pull up tight to close.

LEGS – Make 2 in Black
Ch 2
Round 1: 6 SC in 2nd Ch from hook [6].
Round 2: INC in each stitch [12].
Round 3: (SC, INC) 6 times [18].
Round 4: SC in BLOs [18].
Rounds 5-11: 7 rows SC [18 stitches per row].
Fasten off 1st leg. On 2nd leg do not fasten off. Continuing with the 2nd leg
Round 12: SC around both legs to join them [36].
Rounds 13-15: 3 rows SC [36 stitches per row].
Start stuffing here. Make sure you stuff each leg.
Round 14: SC row [36].
Round 15: (4 SC, DEC) 6 times [30].
Round 16: SC row [30].
Round 17: (3 SC, DEC) 6 times [24].
Round 18: SC row [24].
Round 19: (2 SC, DEC) 6 times [18].
Round 20: SC row [18].
Round 21: (SC, DEC) 6 times [12].
Fasten off. Sew to the bottom of the head.

ARMS – make 2
In Beige, Ch 2
Round 1: 4 SC in 2nd chain from hook [4].
Round 2: SC row [4].
Round 3: (SC, INC) 2 times [6]
Rounds 4-6: 3 rows SC, Change colors to Black [6].
Rounds 7-11: 5 rows SC
Fasten off, tighten hole and sew to the sides of the body.

HOLSTER – In Black
Ch 50
Row 1: Slip Stitch in 2nd Ch from hook, 11 Slip Stitches, 25 SC, 12 Slip Stitches.
Fasten off. Tie around his waist. Thread sword through the holster.

CHEST PIECE – in beige
Ch 6
Row 1: SC in 2nd Chain from hook, 4 SC (5).
Row 2: DEC, SC, DEC [3].
Row 3: SC, DEC [2].
Row 4: DEC [1].
Fasten off. Sew to torso in the center, with small point facing down. Using black yarn, embroider a black X across the chest piece.

MASK – in Black
Ch 70
Row 1: Slip stitch in 2nd chain from hook, 3 slip stitch, 6 SC, 49 HDC, 6 SC, 4 Slip Stitches [8 slip stitches, 12, SC, 49 HDC].
Row 2: Turn, Skip 1, 20 Slip Stitches, 8 SC, 10 Chain, skip 6, SC in next stitch, 2 SC, 10 Chain, Skip 6, SC in next stitch, 7 SC, 2 slip stitches (this is not a complete row)
Row 3: Turn, Skip 1, Slip stitch 8, 10 SC in Chain Space, Slip stitch 3, 10 SC in Chain Space, Slip Stitch 8.
Fasten Off. Sew to face.

Westley Crochet Pattern

Deadpool Ornament

Crochet Deadpool Ornament

Champagne Corks make the cutest little ornaments. Quick and easy, you can whip up a few in an hour or so. Make sure you leave time for the paint to dry.

Use #drunkenauntwendy if you post a picture online. IMG_5182

Deadpool Champagne Cork Ornaments
© DrunkenAuntWendyDesigns

Materials
Worsted Weight Yarn
I love this yarn – Red
I love this yarn – White
Champagne Corks
Red Acrylic Paint
White Acrylic Paint
Ball Stylus Sculpting Tools
Screw eye
Ribbon
Black Sharpie
Epoxy 6000

Gauge: is not important for this project

Abbreviations
SC – Single Crochet
CH- Chain
FO – Fasten Off
SL ST – Slip Stitch
INC – Make two Single Crochet in Same Stitch
DEC – Single Crochet two stitches together
BLOs – Back Loops Only
FLOs – Front loops only

Note: Hats are worked in the round. Use a stitch marker or a scrap piece of yarn to mark the beginning of each row. Then you don’t have to count every row. Do not join unless instructed to.

Parentheses indicate a repeat. Repeat the stitches in the parentheses for the number of times indicated.

The bracketed number [] is the number of stitches at the end of each row.

I spread my increases out so there isn’t a seam on the finished piece. If you do not like this method, you can do regular increases.

If you have any questions, please feel free to email me at drunkenauntwendy@gmail.com.
BODY

Paint cork red with the acrylic paint. I recommend two coats.

Once the paint is dry. Insert screw hook in the top of the cork.

Using the Sharpie, draw a diamond shape on the face and color in. Draw a line around the bottom of the cork to mark the belt. Make two upside down “U’s on the sides of the body.

Using the White Paint and the ball stylus, make two small dots in the black diamonds.

HAT
In White Chain 2
Round 1: 6 SC in 2nd Chain from hook. [6]
Round 2: SC row [6]
Round 3: DEC 3 times, Change color to red in last stitch [3]
Round 4: INC in each stitch [6].
Round 5: INC in each stitch [12].
Round 6: (SC, INC) 6 times [18].
Rounds 7-8: 2 rows SC, change color to white in last stitch [18].
Round 9: SC row.

Red Fraggle – Free Crochet Pattern

Crocheted Fraggle Pattern

When I was younger, I loved going to my Grandma’s to watch Fraggle Rock. We lived in the country and back then cable service didn’t reach that far. From the Fraggles to their Doozers to Majory the trash heap, I adored it all. It is possible that I may have been obsessed with Jim Henson and the Muppets.

As always, this pattern is not tested. Let me know if you have any problems. Please us #drunkenauntwendy if you make her so I can find your work.

Down at Fraggle Rock.

IMG_4727

Materials
Worsted Weight Yarn
I love this yarn – Red
I love this yarn – Orange
I love this yarn – Soft Pink
I love this yarn – Sungold
Size 18 mm Plastic Safety eyes
1 ½ inch to 2 inch pom pom maker
Size E crochet hook
Polyfiberfill
Large Eye Needle
Abbreviations
SC – Single Crochet
HDC – Half Double Crochet
DC – Double Crochet
CH- Chain
FO – Fasten Off
SL ST – Slip Stitch
INC – Make two Single Crochet in Same Stitch
DEC – Single Crochet two stitches together
BLO – Back Loops Only
FLO – Front Loops Only

Note: Almost the entire project is worked in the round. Use a stitch marker or a scrap piece of yarn to mark the beginning of each row. Then you don’t have to count every row. Do not join unless instructed to.

Parentheses indicate a repeat. Repeat the stitches in the parentheses for the number of times indicated.

The bracketed number [] is the number of stitches at the end of each row.

I spread my increases out so there isn’t a seam on the finished piece. If you do not like this method, you can do regular increases.

See last page for alternative color options

If you have any questions, please feel free to email me at drunkenauntwendy@gmail.com.

HEAD – in Sungold
The head is made by doing an oval increase. Sometimes it helps to mark where your increases are going to go with a spare piece of contrasting yarn. Just note that the first row is worked on both sides of the starting chain. The face is then embroidered on before you finish the head and stuff him.
Ch 8
Round 1: SC in 2nd Ch, SC in next 5 stitches. 3 SC in last stitch. Working in the unused loops from the chain, SC 5, 3 SC in last chain. [18].
Round 2: [6 SC, (INC) 3 times] repeat bracket one more time [24].
Round 3: [6 SC, (SC, INC) 3 times] repeat bracket one more time [30].
Round 4: [6 SC, (SC, INC, SC) 3 times] repeat bracket one more time [36].
Round 5: [6 SC, (3 SC, INC) 3 times] repeat bracket one more time [42].
Round 6: [6 SC, (2 SC, INC, 2 SC) 3 times] repeat bracket one more time [48].
Rounds 7-11: SC in each stitch for 5 rows [48 stitches per row].
Round 12: (6 SC, DEC) 6 times [42].
Round 13: (5 SC, DEC) 6 times [36].
Rounds 14-17: 4 rows SC [36 stitches per row].
Round 18: (4SC, DEC) 6 times [30].
Place eyes

Start stuffing
Round 19: (3 SC, DEC) 6 times [24].
Round 20: (2 SC, DEC) 6 times [18].
Round 21: (SC, DEC) 6 times [12].
Round 22: DEC 6 times [6].
Fasten off. Leave a long tail. Thread tail through the stitches in Round 22. Pull up tight to close the hole.

HAIR and TAIL (make 3)
In Orange,
Make a pompom using your pompom maker. Trim to shape. Sew two firmly to the head. Set aside 3rd for the tail.

BOWS
Using short pieces of Soft Pink, tie bows around the base of the pompoms.

NOSE
In Yellow,
Ch 2
Round 1: 6 SC in 2nd Chain from hook [6].
Round 2: INC in each stitch [12].
Round 3: SC row [12].
Round 4: (5 SC, INC) 2 times [14].
Fasten off, pull oblong and sew to face.

MOUTH
In red, Chain 9
Note this is worked back and forth
Row 1: Slip stitch in 2nd Chain from hook, SC, HDC, DC, DC, HDC, SC, Slip Stitch change color to yellow in last stitch [12]
Row 2: (SC, DEC) 4 times [8]
Row 3: DEC, 4 SC, DEC [6].
Fasten off and leave a long tail for sewing.
Sew under nose

BODY
In Orange, Ch 2
Round 1: 6 SC in 2nd Chain from hook [6].
Round 2: INC in each stitch [12].
Round 3: SC row [12].
Round 4: (SC, INC) 6 times [18].
Round 5: (SC, INC, SC) 6 times [24].
Round 6: (3 SC, INC) 6 times [30]
Rounds 7-8: 2 rows SC, change colors to red in the last stitch [30 stitches per row].
Round 9: SC row [30].
Round 10: SC in BLOs [30].
Round 11: (3 SC, DEC) 6 times [24].
Rounds 12-13: 2 rows SC [24 stitches per row].
Start stuffing.
Round 14: (2 SC, DEC) 6 times [18].
Rounds 15-16: 2 rows SC [18 stitches per row].
Round 17: SC in BLOS [18].
Fasten off and sew to the bottom of the head.

ARMS (Make 2)
In yellow, Ch 2
Round 1: 4 SC in 2nd Ch from hook [4].
Round 2: INC in each stitch [8].
Round 3: SC row [8].
Round 4: (2 SC, DEC) 2 times [6]. Change colors to Red in last stitch.
Round 5: SC row [6].
Round 6: SC row in BLOS [6].
Rounds 7-13: 7 rows SC [6 stitches per row].
Fasten off. Don’t stuff. Sew to sides of body.

LEGS AND FEET (Make 2)
In Yellow, Ch 5
Round 1: SC in 2nd Ch, SC in next 2 stitches. 3 SC in last stitch. Working in the unused loops from the chain, SC 3, 3 SC in last chain. [12].
Round 2: [3 SC, (INC) 3 times] repeat bracket one more time [18].
Round 3: SC row in FLOs [18].
Round 4: 3 SC, 3 DEC, 9 SC [15].
Round 5: SC, 4 DEC, 6 SC [11].
Start stuffing
Round 6: 3 DEC, 5 SC [8].
Rounds 7-14: 8 rows SC [8 stitches per row].
Fasten off and sew to bottom of body.

TAIL
In orange, Ch 2
Round 1: 4 SC in 2nd Ch from hook [4].
Rounds 2-11: 10 rows SC [4 stitches per row].
Fasten off. Attach left over pompom. Sew to the back of body in the orange section.

Free Pattern – Red Angry Bird

Crocheted plush red angry bird

This wasn’t my original plan for today, but the weather has been so crappy I haven’t been able to get outside and get a decent photo of the tote bag pattern I was going to list today. I’ve decided to leave this one up forever. There are a lot of Angry Bird Patterns out there. If you post a picture of your completed Red Angry Bird, please use #drunkenauntwendy so I can find it and give you lots of likes.

Here’s the pattern. Enjoy.

If you want to make more there are patterns for Angry Birds in Blue, black and  Yellow.

There are also patterns for a helmet pig and a green pig.

Copyright (c) 2011: Wendy’s Wild Life

Materials

Size E Crochet Hook

Polyfiberfill

I Love This Yarn – fire red (A)

I Love This Yarn – white (B)

I Love This Yarn – black (C)

I Love This Yarn – sungold (D)

Abbreviations

SC – Single Crochet

INC – Increase (2 SC in designated stitch)

CC – Change Colors

DEC – SC 2 stitches together

SL – Slip Stitch

RED ANGRY BIRD

Instructions

Body

In A chain 2

1. 6 SC in 2nd chain from hook

2. (INC) in each stitch (12)

3. (SC, INC) 6 times (18)

4. (SC, INC, SC) 6 times (24)

5. (3 SC, INC) 6 times (30)

6-7. 2 rows SC

8. (2 SC, INC, 2 SC) 6 times (36)

9-10. 2 rows SC

11. (5 SC, INC) 6 times (42)

12-13. 2 rows SC

14. (3 SC, INC, 3 SC) 6 times (48)

15-16. 2 rows SC

17. (7 SC, INC) 6 times (54)

18-19. 2 rows SC

20. CC to white for 1st and last stitch remaining stitches in A (4 SC, INC, 4 SC) 6 times

(60) [2 white, 58 red]

Note: White increases by 2 each row at the beginning and the end to create the white

V portion on the front of the bird. Instructions list the amount of stitches per row with

increases. I’ll also list the number of white/red stitches in [].

21. SC row, 1st 2 and last 2 stitches in white (60) [4, 56]

22. SC row, 1st 3 and last 3 stitches in white (60) [6, 54]

23. 1st 4 and last 5 stitches in white following (9 SC, INC) 6 times (66) [9, 57]

24. 1st 5 and last 6 stitches in white SC row (66) [11, 55]

25. SC 6 stitches in white, SC 49 stitches in red, cut red completely, SC 11 in white (66)

[17, 49]

26. (9 SC, DEC) 6 times (60)

27. (8 SC, DEC) 6 times (54)

28. (7 SC, DEC) 6 times (48)

29. (6 SC, DEC) 6 times (42)

30. (5 SC, DEC) 6 times (36)

31. (4 SC, DEC) 6 times (30)

32. (3 SC, DEC) 6 times (24)

33. (2 SC, DEC) 6 times (18)

Start stuffing

34. (1 SC, DEC) 6 times (12)

35. (DEC) 6 times (6)

Fasten off. Leave a long tail and use that to close up the opening.

Eyes (make 2)

In C, Ch 2

1. 6 SC in 2nd Ch from hook

2. CC to B, INC in each stitch (12), don’t cut the C color

3. (SC, INC) 6 times (18) CC to C

4. SL in each stitch (18)

Fasten off and leave a long tail for sewing. Sew above the white section as in the picture below.

Eyebrows (make 2)

In C, Ch 7

1. SC in 2nd Ch from hook, SC in remaining stitches (6)

2. Ch 1, turn, SC row (6)

Fasten off. Sew above the eyes, at a slant and slightly covering the eyes. See photos for placement.

Large Feathers (make 2)

In A, Ch 2

1. 4 SC in 2nd Ch from hook

2. (INC, SC) 2 times (6)

3. (INC, 2 SC) 2 times (8)

4. (INC, 3 SC) 2 times (10)

5. (INC, 4 SC) 2 times (12)

6-9. 4 rows SC

10. (DEC) 6 times (6)

Fasten off, see below for sewing instructions.

Small Feathers (make 3)

Repeat instructions for Large Feathers through row 5

6-7. 2 rows SC

8. (DEC) 6 times (6).

Fasten off. Leave a long tail for sewing.

Feather sewing instructions

Using one small and one large feather sew to the top of the head.

Using two small and one large feather sew to back of the body with the large feather in between the two small ones.

Top Beak

In D, Ch 2

1. 4 SC in 2nd Ch from hook

2. 3 SC in each stitch (12)

3. SC row

4. SC, (3 SC in next stitch, 2 SC) 3 times, 3 SC in next stitch, SC (20)

5. SC row

6. 2 SC, (3 SC in next stitch, 4 SC) 3 times, 3 SC in next stitch, 2

SC (20)

Fasten off, leave a long tail for sewing. Fold in half on the

diagonal. Fold in half to make an open triangle for the beak.

Small Beak

Repeat instructions for Large Beak through row 5.

The sewing instructions are the same, just invert the beak.

New Pattern Tuesday – Pac-Man Ghost

Pac Man Ghosts

My plan is to try to release a new pattern every Tuesday. The pattern will be free for at least a week. I’d love feedback during that time frame to fix any errors or confusing terms. If you post a picture, make sure you use #drunkenauntwendy so I can find it.

Some will stay up forever, some will be posted on my etsy site after the testing period.

I’ve seen a lot of patterns for Pac-Man and Ms. Pac-Man, but very few for Inky, Pinky, Blinky and Clyde. I felt they were under-represented.

If you want a pattern for Ms. Pac-Man, check out Craftyiscool. She has one listed and it’s really good.

Materials
Yarn
I Love This Yarn – Orange for Clyde
I Love This Yarn – Pink for Pinky
I Love This Yarn – Fire Red for Blinky
I Love This Yarn – Soft Blue for Inky
Notions
White felt with sticky back
10.5 mm Safety eyes
Size E crochet hook
Abbreviations
SC – Single Crochet
INC – Increase (work 2 SC into same stitch)
FLO – Front Loops Only
DC – Double Crochet

Instructions
Ch 2,
6 SC in 2nd chain from hook
INC in each stitch (12)
(1 SC, INC) 6 times (18)
(1 SC, INC, 1 SC) 6 times (24)
(INC, 3 SC) 6 times (30)
6 – 15. 10 rows SC
cut two ovals of felt. Snip a small slip in the felt to insert the safety eye. Make it either on the top, bottom, left or right depending on which direction you want you ghost to look. Place eyes between rounds 8 and 9
16. In FLO, (SC, skip next stitch, 5 DC in next stitch, skip next stitch, SC) 6 times. Join with a slip stitch and fasten off.
Bottom.
Repeat rows 1 – 5. Fasten off and sew to the bottom using the unused loops. Stuffing as you go.

20111212-235519.jpg