I had this odd idea to add horns to headbands. We are going to a Anime Comic Con this summer, so really I was thinking of an easy cosplay for myself.
So far I have come up with 4 different types. I haven’t got my daughter to pose with all the headbands.
Here’s me in my first set, before I finished them.
Here’s the first one finished. They were immediately annexed by my teenager.
Here’s your free pattern for the last set of horns. Enjoy. The others will be up eventually. Please use #drunkenauntwendy if you make them and post on Instagram.
Materials
Worsted Weight Yarn
I love this yarn – Pink
I love this yarn – Neon Blue
Black Plastic Headband
Size E crochet hook
Polyfiberfill
Large Eye Needle
Abbreviations
SC – Single Crochet
CH- Chain
FO – Fasten Off
SL ST – Slip Stitch
INC – Make two Single Crochet in Same Stitch
DEC – Single Crochet two stitches together
BLO – Back Loops Only
Note: Entire project is worked in the round. Use a stitch marker or a scrap piece of yarn to mark the beginning of each row. Then you don’t have to count every row. Do not join unless instructed to.
Parentheses indicate a repeat. Repeat the stitches in the parentheses for the number of times indicated.
The bracketed number [] is the number of stitches at the end of each row.
I spread my increases out so there isn’t a seam on the finished piece. If you do not like this method, you can do regular increases.
If you have any questions, please feel free to email me at drunkenauntwendy@gmail.com.
HORNS (Make 2)
Ch 2, in Neon Blue
Round 1: 4 SC in 2nd Ch from hook [4].
Round 2: INC in 1st Stitch, 3 SC [5].
Round 3: INC, 4 SC [6].
Round 4: INC, 5 SC [7].
Round 5: INC, 6 SC [8].
Round 6: INC, 7 SC [9].
Round 7: INC, 8 SC [10].
Round 8: Add pink, alternate SC in pink and blue for the row [10]. Drop Blue at the end.
Round 9: INC, 9 SC [11].
Round 10: INC, 10 SC [12].
Round 11: INC, 11 SC [13].
Round 12: INC, 12 SC [14].
Round 13: INC, 13 SC [15].
Round 14: INC, 14 SC [16].
Round 15: In BLOS, DEC 8 times [8].
Fasten off leaving a long tail for sewing.
Thread tail through the last row and pull up tight to close. Using the tail, attach the horns to the headband with the horns pointing backwards. Use several straight stitches to secure the horns.
I love making cork ornaments. I’ve been trying to expand and come up with new ideas. I promise, I did not drink all these bottles of Champagne by myself.
4-H is upon us here in Ohio. The kids take rabbits. We will be getting their 4-H rabbits soon. In honor of the rabbits, here are some super cute rabbit Cork Ornaments.
Materials
Worsted Weight Yarn
I love this yarn – Pink
I love this yarn – White
Champagne Cork
Screw eyes
Ribbon
Black Sharpie
Pink Sharpie
1 inch pompom maker or a fork
Epoxy 6000
Gauge: is not important for this project
Abbreviations
SC – Single Crochet
CH- Chain
FO – Fasten Off
SL ST – Slip Stitch
INC – Make two Single Crochet in Same Stitch
DEC – Single Crochet two stitches together
BLOs – Back Loops Only
FLOs – Front loops only
Note: Hats are worked in the round. Use a stitch marker or a scrap piece of yarn to mark the beginning of each row. Then you don’t have to count every row. Do not join unless instructed to.
Parentheses indicate a repeat. Repeat the stitches in the parentheses for the number of times indicated.
The bracketed number [] is the number of stitches at the end of each row.
I spread my increases out so there isn’t a seam on the finished piece. If you do not like this method, you can do regular increases.
If you have any questions, please feel free to email me at drunkenauntwendy@gmail.com.
TAIL
Wrap a 1” pompom maker with white yarn to make a full pompom. Glue to the back of cork.
HAT
In Pink
Ch 2
Round 1: 6 SC in 2nd Ch from hook [6]
Round 2: (INC) 6 times [12].
Round 3: (INC, SC) 6 times [18].
Rounds 4-6: 3 rows SC [18 stitch per row].
Fasten off.
EARS (make 2)
In Pink, Chain 8
Slip Stitch in 2nd Chain from hook, SL, 4 SC, 3 HDC in last stitch, working in the unused stitches from the first stitches, 4 SC, 2 SL. Fasten off. Leave a long tail for sewing. Attach to hat.
Attach screw eye to top of cork.
Cut 6 inch section of ribbon. Thread ribbon through the screw eye and tie to hold it in place. Place the hat over the cork, pulling the ribbon through the hat. Here you can glue the hat in place to keep it from slipping.
Using the Pink Sharpie draw a small triangle for the nose.
Using the Black Sharpie draw two circles for eyes and a small mouth.
This quarter I have taken up beading. It was really hard to start. Having the proper tools definitely makes it easier. I highly recommend using the right tools and amazon in order to make progress. Uploading images is proving difficult today. Make sure you check out what I have been up to on Instagram.
Meet Betty the Yeti. I created her for a contest. I didn’t win, but I adore her.
This caused me to start making all sorts of mythical/urban legend creatures. Make sure you check out Chtulu and Mothman.
She is made with Bernat Blanket Yarn which is what gives it the super soft snuggliness.
I’ve created a video tutorial for this pattern. You can follow along. For a written pattern
I took a week off to take the kids on Vacation for Spring Break. Then I was behind when it comes to typing patterns.
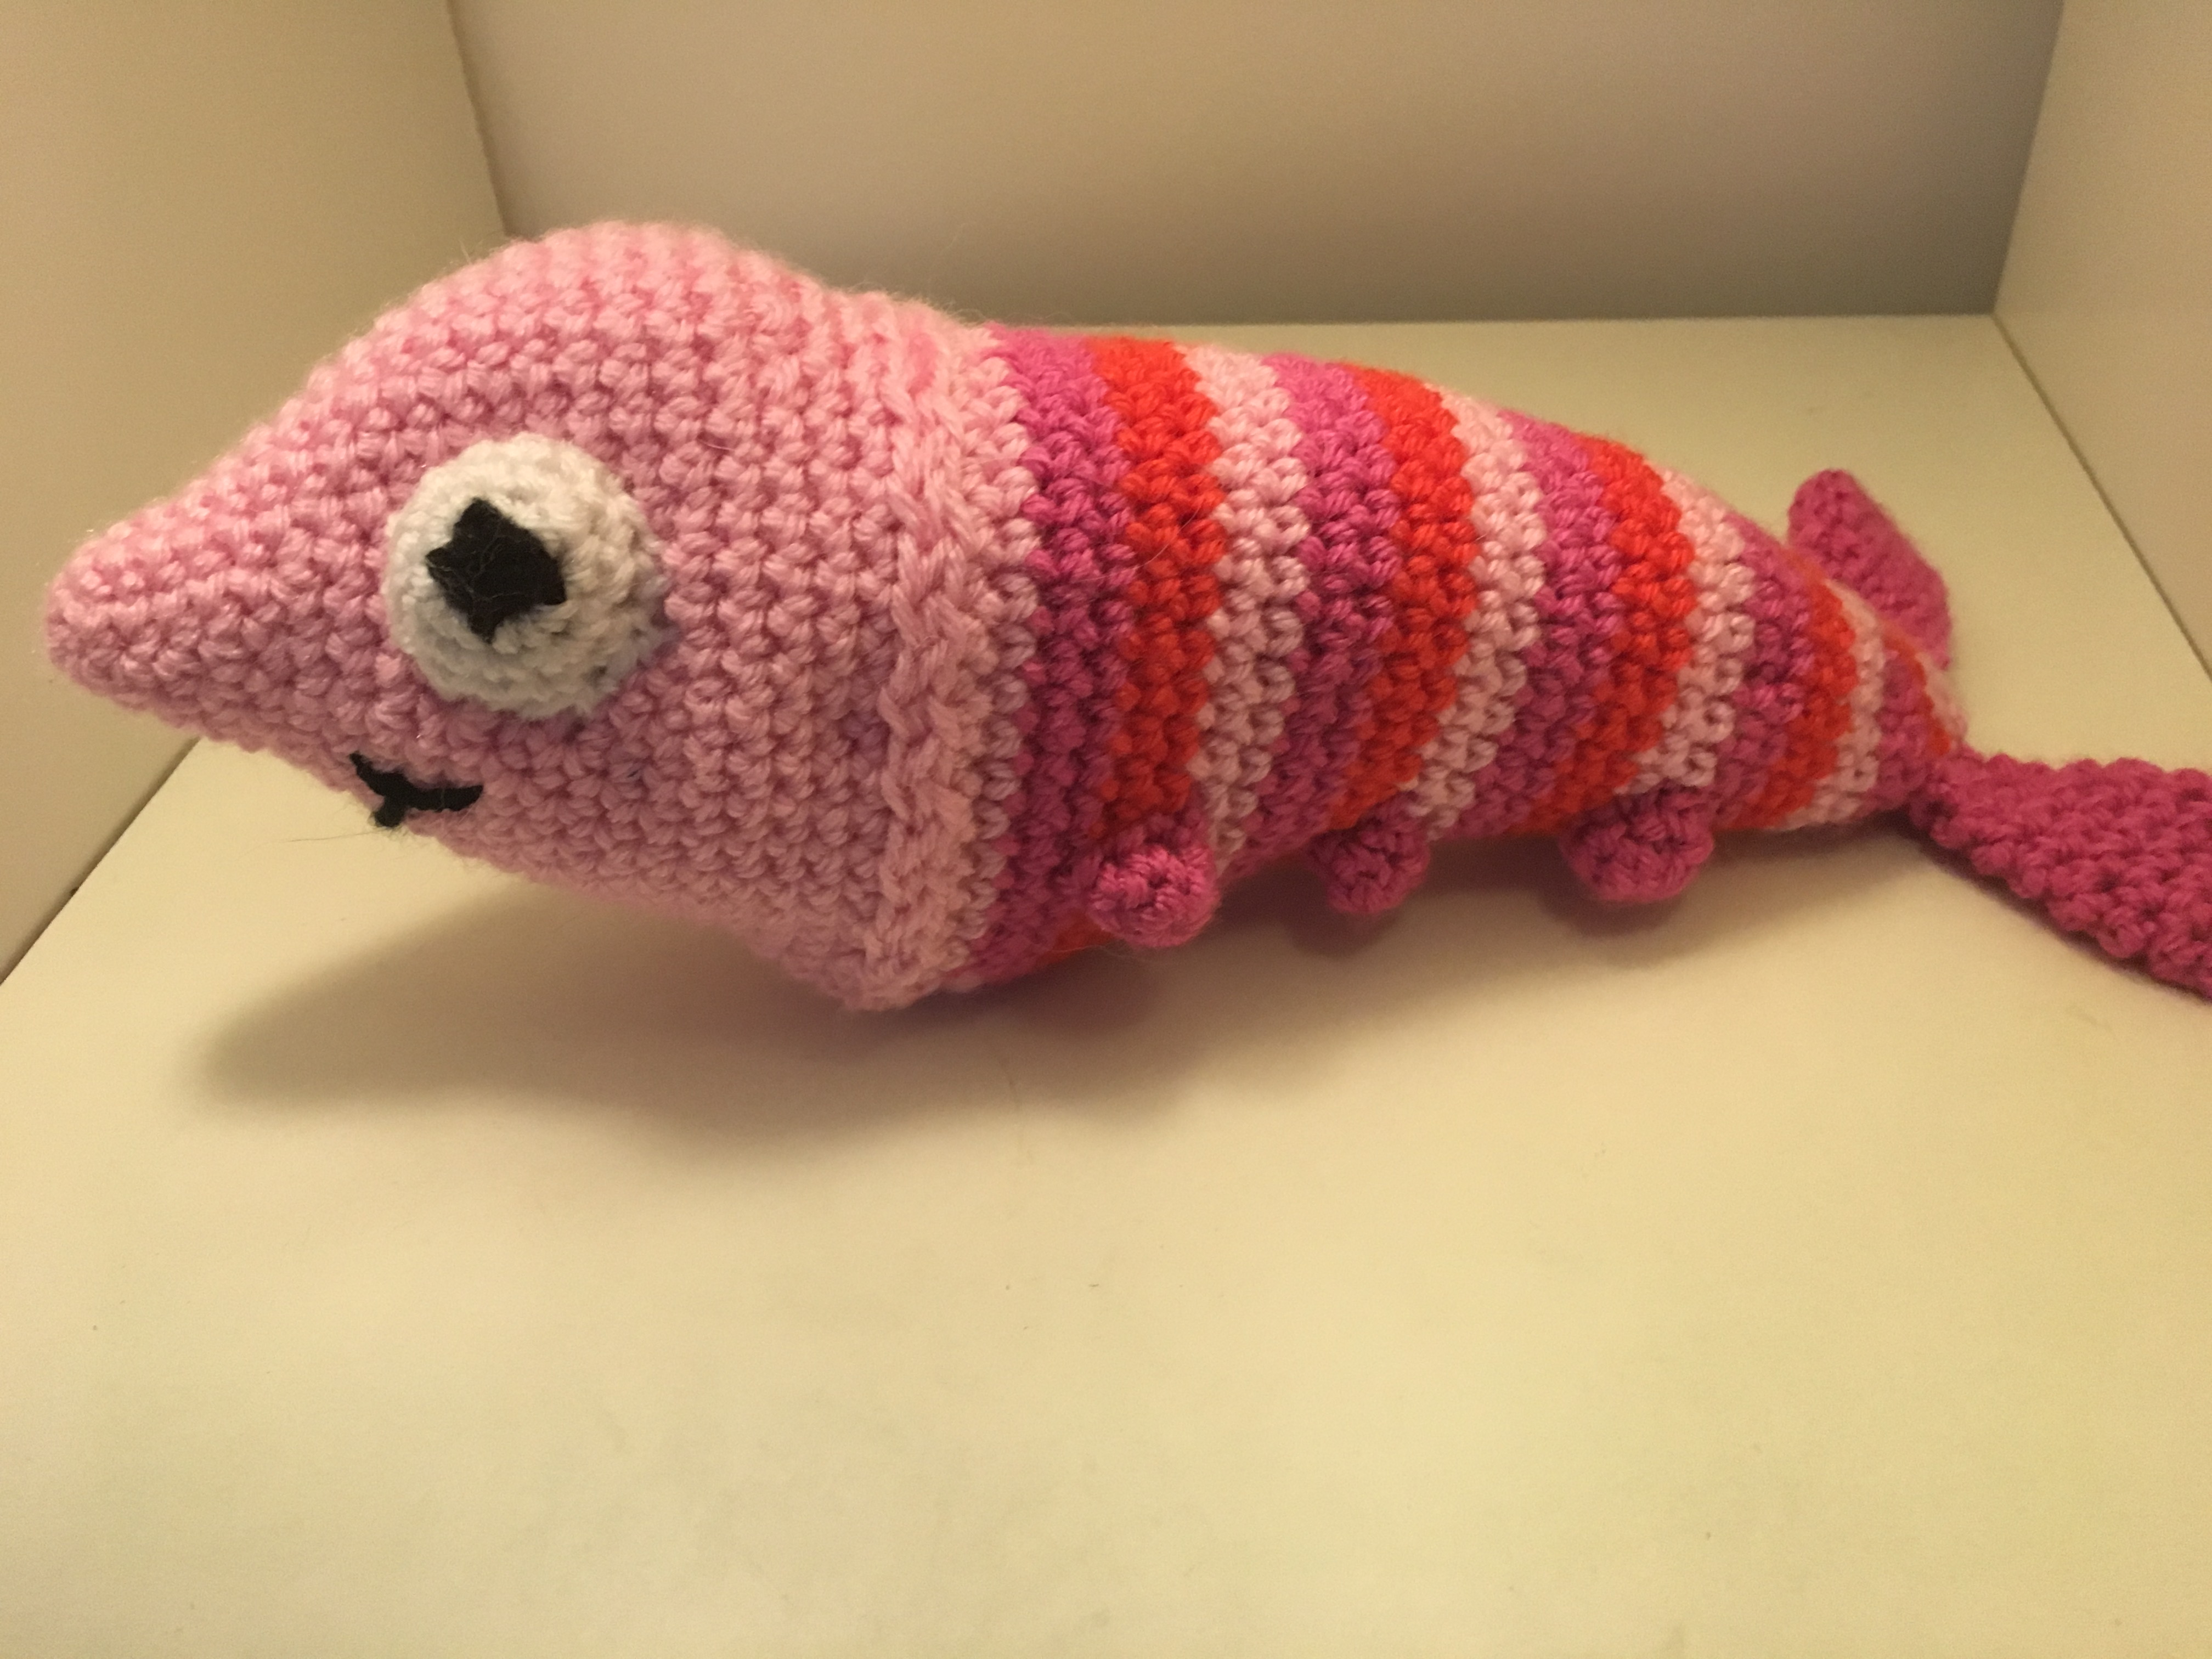
This is a new addition to my Cuddly Aquarium collection. I love when I get requests to make creatures I had never thought of. Follow me on Instagram @drunkenauntwendy for what I am currently working on.
Louie isn’t tested. Let me know if you have issues.
Reminder my mailing list is how you get exclusive content so sign up to make sure you never miss a pattern.
Materials
Worsted Weight Yarn
I love this yarn – Pink
I love this yarn – Orange
I love this yarn – Hot Pink
I love this yarn – Black
I love this yarn – White
Size E crochet hook
Polyfiberfill
Large Eye Needle
Abbreviations
SC – Single Crochet
HDC – Half Double Crochet
CH- Chain
FO – Fasten Off
SL ST – Slip Stitch
INC – Make two Single Crochet in Same Stitch
DEC – Single Crochet two stitches together
BLO – Back Loops Only
FLO – Front Loops Only
Note: Almost the entire project is worked in the round. Use a stitch marker or a scrap piece of yarn to mark the beginning of each row. Then you don’t have to count every row. Do not join unless instructed to.
Parentheses indicate a repeat. Repeat the stitches in the parentheses for the number of times indicated.
The bracketed number [] is the number of stitches at the end of each row.
I spread my increases out so there isn’t a seam on the finished piece. If you do not like this method, you can do regular increases.
If you have any questions, please feel free to email me at drunkenauntwendy@gmail.com.
EYES (make 2)
In Black, Ch 2
Round 1: 4 SC in 2nd CH from hook, change color to white [4].
Round 2: INC in each stitch [8].
Round 3: (INC, SC) 4 times [12].
Round 4: SC row [12].
Lightly stuff
Fasten off, leave a long tail for sewing. Set aside to attach to the head.
HEAD
In pink, CH 2
Round 1: 6 SC in 2nd CH from hook [6].
Round 2: (2 SC, INC) 2 times [8].
Round 3: (3 SC, INC) 2 times [10].
Round 4: (4 SC, INC) 2 times [12].
Round 5: SC row [12].
Round 6: (SC, INC) 6 times [18].
Round 7: SC row [18].
Round 8: (SC, INC, SC) 6 times [24].
Round 9: SC Row [24].
Round 10: (3 SC, INC) 6 times [30].
Rounds 11-12: 2 rows SC [30 stitches per row]
Round 13: (2 SC, INC, 2 SC) 6 times [36].
Round 14: (5 SC, INC) 6 times [42]
Rounds 15-17: SC in each stitch for 4 rows [42 stitches per row]
Round 18: 7 SC, 7 INC, 11 SC, 7 DEC, 3 SC. [42]
Rounds 19-21: SC in each stitch for 3 rows [42 stitches per row].
Round 22: (5 SC, DEC) 6 times [36].
Fasten off leave a long tail for sewing.
Stuff. Place where you would like to put the eyes and run a thread from one side to the other and pull up tight to create divots for the eyes.
Sew the eyes on and embroider a mouth in black.
BODY
Note: Body is worked 2 rows of each color in the following order. Hot Pink, Pink and Orange.
Starting with Hot Pink, Ch 2
Round 1: 6 SC in 2nd Chain from hook [6].
Round 2: INC in each stitch [12]. Change color to Pink.
Round 3: INC, 11 SC [13].
Round 4: INC, 12 SC [14]. Change color to Orange.
Round 5: INC, 13 SC [15].
Round 6: INC, 14 SC [16]. Change color to Hot Pink
Round 7: INC, 15 SC [17].
Round 8: INC, 16 SC [18]. Change color to Pink
Round 9: INC, 17 SC [19].
Round 10: INC, 18 SC [20]. Change color to Orange
Round 11: INC, 19 SC [21].
Round 12: INC, 20 SC [22]. Change color to Hot Pink
Round 13: INC, 21 SC [23].
Round 14: INC, 22 SC [24]. Change color to Pink
Round 15: INC, 23 SC [25].
Round 16: INC, 24 SC [26]. Change color to Orange
Round 17: INC, 25 SC [27].
Round 18: INC, 26 SC [28]. Change color to Hot Pink
Round 19: INC, 27 SC [29].
Round 20: INC, 28 SC [30]. Change color to Pink
Round 21: INC, 29 SC [31].
Round 22: INC, 30 SC [32]. Change color to Orange
Round 23: INC, 31 SC [33].
Round 24: INC, 32 SC [34]. Change color to Hot Pink
Round 24: INC, 33 SC [35].
Round 25: INC, 34 SC [36]. Change color to Pink
Rounds 26-27: 2 row SC [36 stitches per row]
Fasten off. Stuff and sew to head.
FEET (Make 6)
In Hot pink, Ch 2
Round 1: 6 SC in 2nd chain from hook [6].
Round 2: SC row [6].
Fasten off and sew evenly spaced to the sides of the body.
TAIL (make 2)
In Hot Pink, Ch 2
Round 1: 6 SC in 2nd chain from hook [6].
Round 2: INC in each stitch [12].
Round 3: SC row [12].
Round 4: (DEC, 4 SC) 2 times [10].
Round 5: SC row [10].
Round 6: (DEC, 3 SC) 2 times [8].
Round 7: SC row [8].
Round 8: (DEC, 2 SC) 2 times [6].
Round 9: SC row [6].
Fasten off and flatten. Sew to the bottom of the body.
I hope you have been following along with me on Instagram as I continue with my Princess Bride obsession.
As you wish
Inconceivable
I’ve been working on this fabulous wool scarf on my loom. I love how it turned out.
Warping the Plaid
Beginning the plaid
All done!
I am also participating in a crochet along. Meet Jose.
He’s a giant pirate bear. Right now, he’s 20 inches tall. I’ve run out of stuffing and already have had to go purchase more yarn. This thing is huge.
Free Pattern
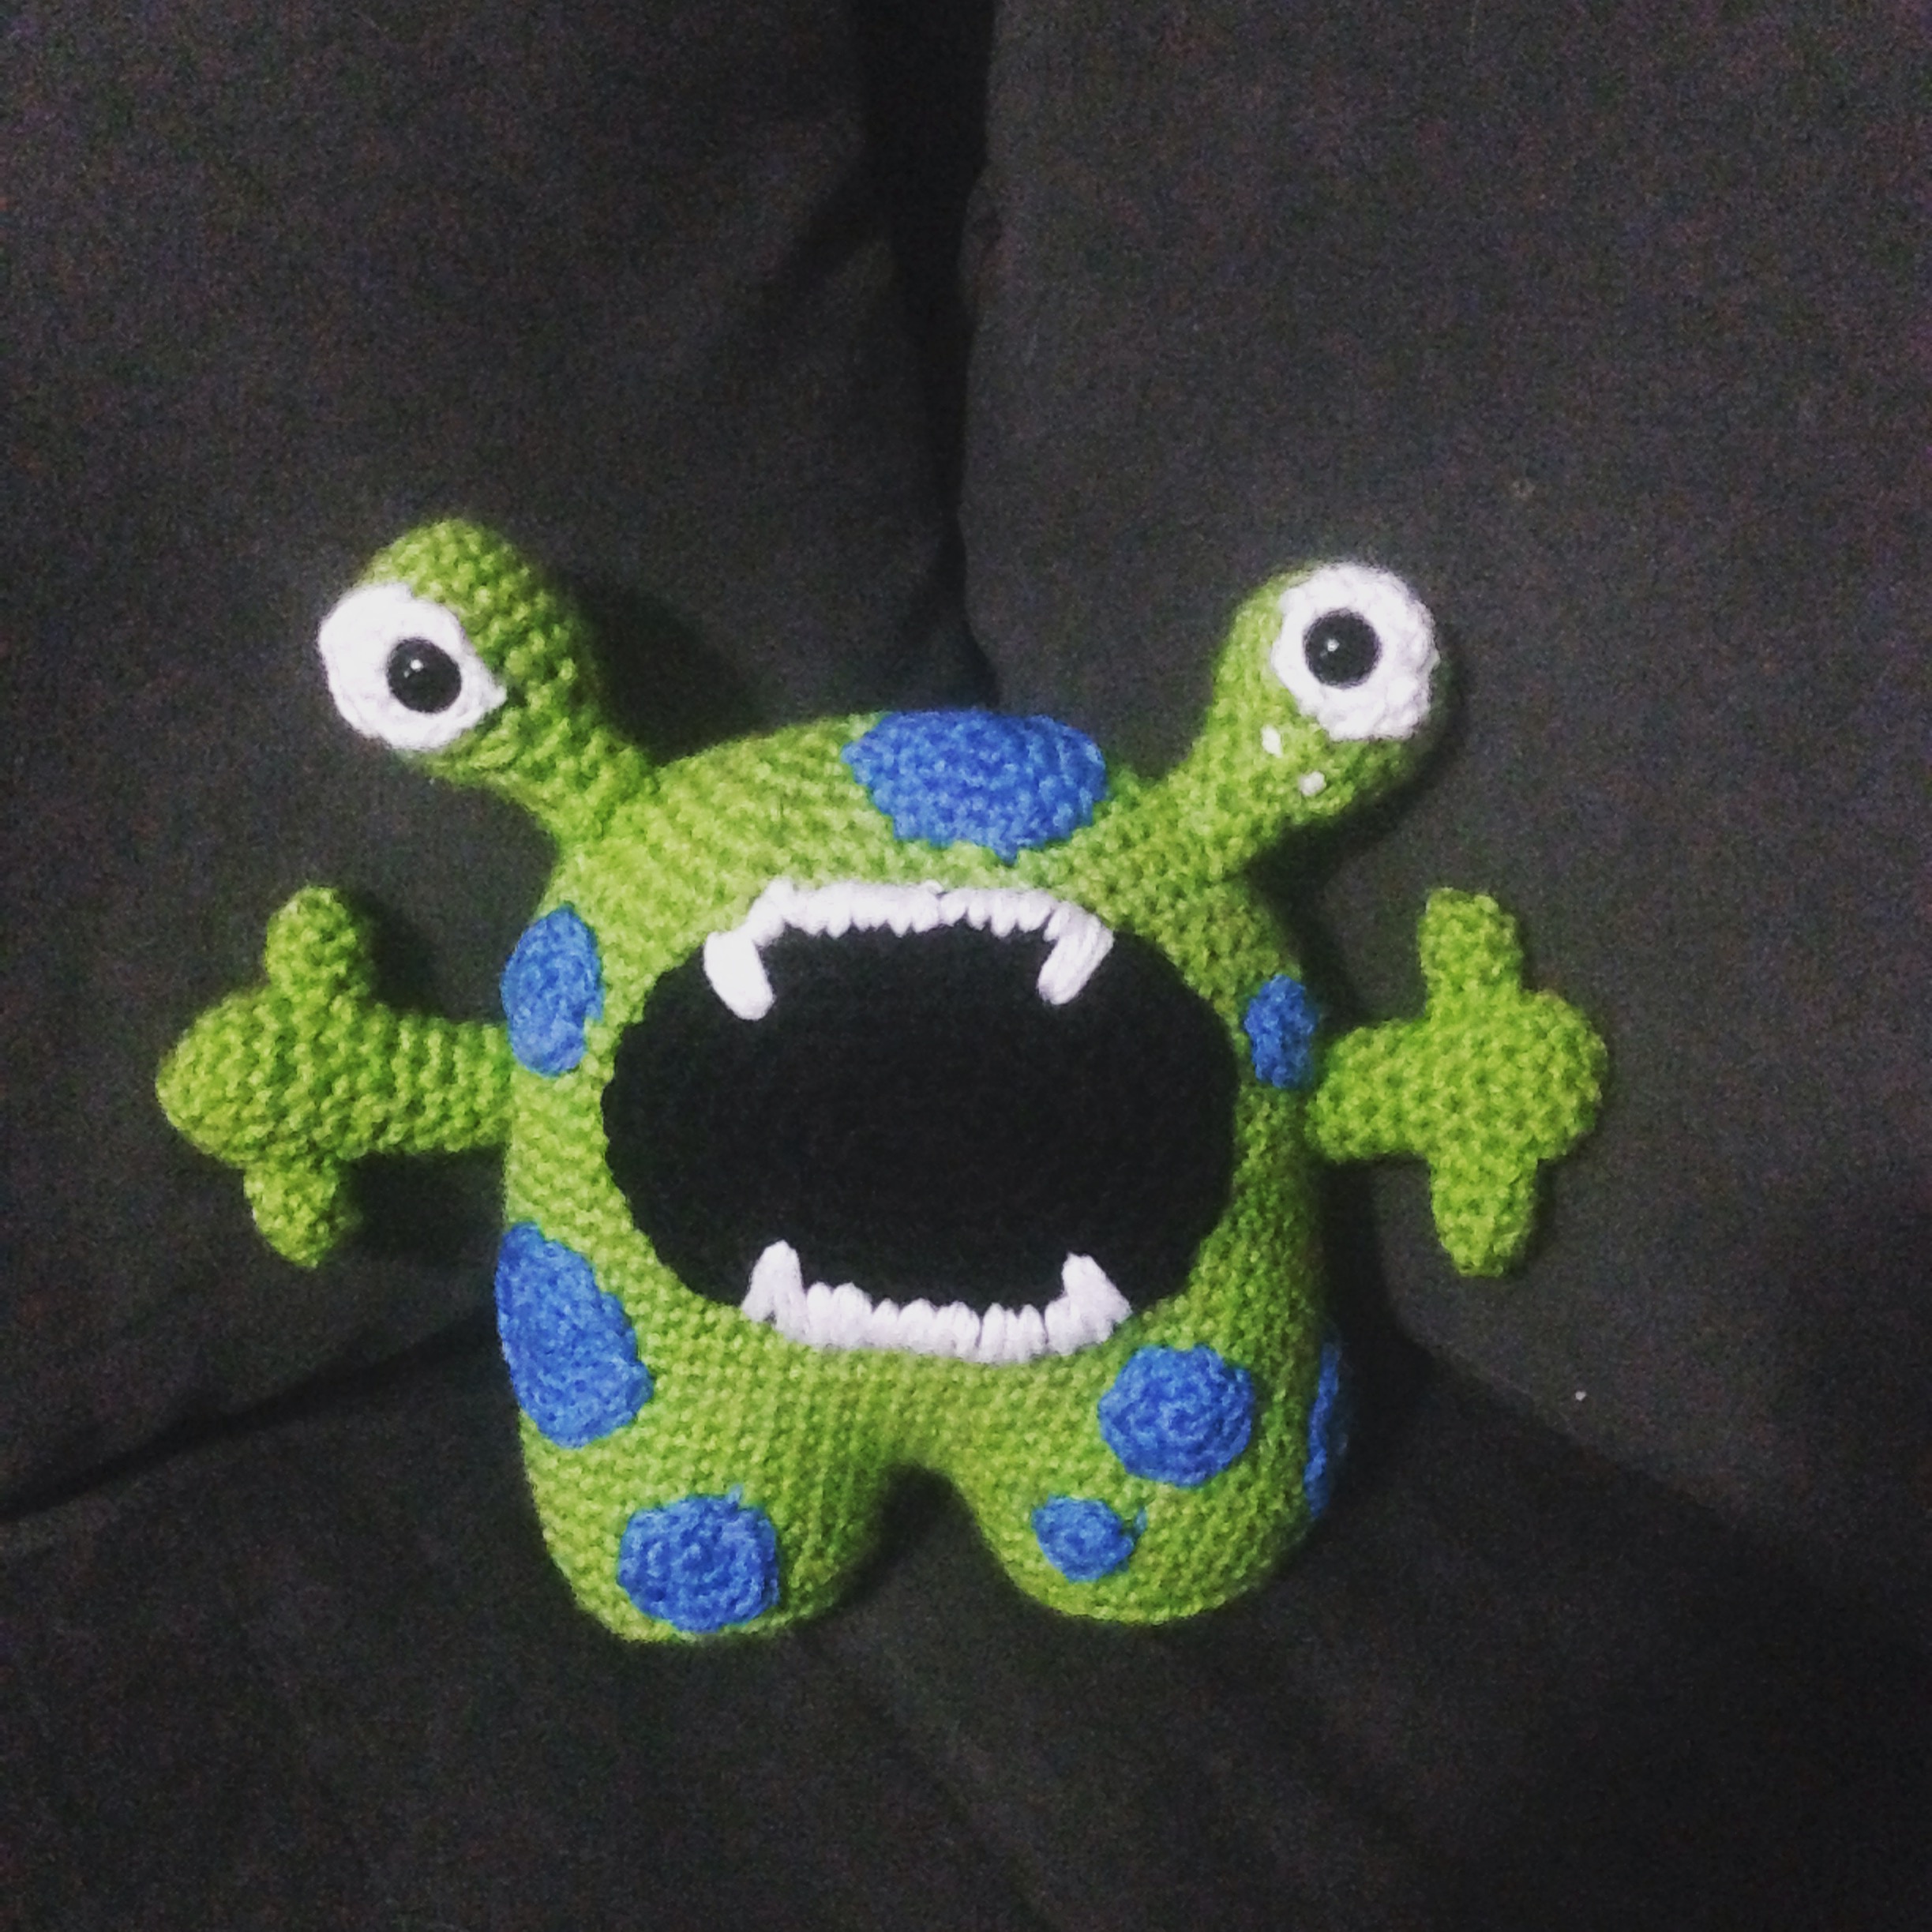
Awhile back I made a super cute monster that just wants a hug.
This is Clyde.
Make sure to use #drunkenauntwendy if you post on Instagram.
Materials
Worsted Weight Yarn
I love this yarn – Limelight
I love this yarn – Blue Neon
I love this yarn – Tropical Pink
Sport Weight Yarn
I love this cotton – White
I love this cotton – Black
12 MM Safety Eyes
Size E crochet hook
Polyfiberfill
Large Eye Needle
Abbreviations
SC – Single Crochet
CH- Chain
FO – Fasten Off
SL ST – Slip Stitch
INC – Make two Single Crochet in Same Stitch
DEC – Single Crochet two stitches together
BLO – Back Loops Only
Note: Entire project is worked in the round. Use a stitch marker or a scrap piece of yarn to mark the beginning of each row. Then you don’t have to count every row. Do not join unless instructed to.
Parentheses indicate a repeat. Repeat the stitches in the parentheses for the number of times indicated.
The bracketed number [] is the number of stitches at the end of each row.
I spread my increases out so there isn’t a seam on the finished piece. If you do not like this method, you can do regular increases.
If you have any questions, please feel free to email me at drunkenauntwendy@gmail.com.
BODY – in Limelight
The body is made by crocheting the legs first and then crocheting them to create the rest of the body.
(Leg 1)
CH 2
Round 1: 6 SC in 2nd CH from hook.
Round 2: (INC) 6 times [12].
Round 3: (SC, INC) 6 times [18].
Round 4: (SC, INC, SC) 6 times [24].
Round 5: (3 SC, INC) 6 times [30].
Round 6: In BLO, SC Row [30].
Rounds 7 – 9: SC in each stitch around for 3 rows [30 stitches per row].
Fasten off leg 1.
(Leg 2)
Repeat leg 1. Do not fasten off. Go straight to Round 10.
Round 10: Single crochet around Leg 2 and then around Leg 1 (60 stitches). Note: This combines the two legs together and sets up the body. You may need to sew up the space between the two legs.
Rounds 11 – 28: SC in each stitch for 18 rows [60 stitches per row].
Round 29: (DEC, 8 SC) 6 times [54].
Round 30: SC Row [54].
Round 31: (DEC, 7 SC) 6 times [48].
Round 32: SC row [48].
Round 33: (DEC, 6 SC) 6 times [42].
Round 34: (DEC, 5 SC) 6 times [36]. Start stuffing. Make sure you stuff firmly enough to hold the shape, but not too firmly that you stretch your stitches
Round 35: (DEC, 4 SC) 6 times [30].
Round 36: (DEC, 3 SC) 6 times [24].
Round 37: (DEC, 2 SC) 6 times [18].
Round 38: (DEC, 1 SC) 6 times [12].
Round 39: (DEC) 6 times [6]
FO leaving a long tail. Thread tail through last 6 stitches and pull up tight to close hole.
EYES – Make 2
Note: Eyes are made in two separate pieces. Whites and then the bases.
In White, CH 2
Round 1: 6 SC in 2nd Chain from hook,.
Round 2: (INC) 6 times [12].
Fasten off.
In Limelight
Round 1: 6 SC in 2nd Chain from hook,.
Round 2: (INC) 6 times [12].
Round 3: (INC, 1 SC) 6 times [18].
Rounds 4 – 7: SC in each stitch for 4 rows. [18 stitches per row].
Round 8: (DEC, 1 SC) 6 times [12].
Place the white on the base and insert the plastic eye. The eye shouldn’t be placed in the dead center but slightly offset. Make sure they are in the right place for each eye. Stuff eye and continue stuffing.
Round 9: (DEC) 6 times [6].
Rounds 10-12: SC in each stitch for 3 rows. [6 stitches per row].
Stuff the stem well.
FO leaving a long tail. Sew whites of the eyes down first. Use tail to sew to body along the top of head.
ARMS – Make 2
Central piece
In Limelight, Ch 2
Round 1: 6 SC in 2nd CH from hook
Round 2: (INC) 6 times [12].
Round 3-6: SC in each stitch for 4 rows. [12 stitches per row].
Round 7: (SC, DEC) 4 times, [8]
Round 8-11: SC in each stitch for 4 rows. [8 stitches per row].
Fasten off, leave a long tail
Fingers – make 2 per arm
In Limelight, Ch 2
Round 1: 6 SC in 2nd CH from hook
Round 2-3: SC in each stitch for 2 rows. [6 stitches per row].
Round 4: 2 stitches SC (this is not a complete row.
FO leaving a long tail. Stuff and sew to the central piece. Sew arm to the body below the first row of increases.
MOUTH
Ovals are worked in the round. Just note that the first row is worked on both sides of the starting chain. See pictures for help.
In Black, Ch 5
Round 1: SC in 2nd Ch, SC in next 2 stitches. 3 SC in last stitch. Working in the unused loops from the chain, SC3, 3 SC in last chain. [12]
Round 2: [3 SC, (INC) 3 times] repeat bracket one more time [18].
Round 3: [3 SC, (SC, INC) 3 times] repeat bracket one more time [24].
Round 4: [3 SC, (SC, INC, SC) 3 times] repeat bracket one more time [30].
Round 5: [3 SC, (3 SC, INC) 3 times] repeat bracket one more time [36].
Round 6: [3 SC, (2 SC, INC, 2 SC) 3 times] repeat bracket one more time [42].
Round 7: [3 SC, (5 SC, INC) 3 times] repeat bracket one more time [48].
Fasten off and sew to the body.
Using white doubled over; embroider teeth on the mouth making longer teeth in the corners and short teeth between them.
LARGE SPOTS –Make 5
In Blue Neon
CH 2
Round 1: 6 SC in 2nd CH from hook.
Round 2: (INC) 6 times [12].
Round 3: (SC, INC) 6 times [18].
Fasten off and sew to the body
MEDIUM SPOTS – Make 5
In Blue Neon
CH 2
Round 1: 6 SC in 2nd CH from hook.
Round 2: (INC) 6 times [12].
Fasten off and sew to the body
SMALL SPOTS – Make 5
In Blue Neon
CH 2
Round 1: 6 SC in 2nd CH from hook
Fasten off and sew to the body
This is Lila. It was a fun amialong. I wonder what we are going to do next month.
Check the side Instagram feed for Westley and Buttercup. You will want to watch the Princess Bride and re-enact it with the plush dolls.
I’ve got some new designs in the works: Head bands with horns! My daughter is into anime and cosplay, she’s so excited.
Now for your free pattern: Frankenstein’s Monster.
Look at those bolts
I’ve already posted his bride. You can now make the matching set.
Wedded Bliss
Or if you are into old movie monsters, you can add the mummy in to the set as well. This pattern is not tested. If you find a problem, let me know. If you make him, post on Instagram with #drunkenauntwendy so I can find it.
Enjoy:
Materials
Worsted Weight Yarn
I love this yarn – Limelight
I love this yarn – Graymist
I love this yarn – Graphite
I love this yarn – Black
Red, Black and Grey Embroidery Floss
10.5 MM Safety Eyes
Size E crochet hook
Polyfiberfill
Large Eye Needle
Small Sharp Embroidery Needle
Abbreviations
SC – Single Crochet
CH- Chain
FO – Fasten Off
SL ST – Slip Stitch
INC – Make two Single Crochet in Same Stitch
DEC – Single Crochet two stitches together
BLO – Back Loops Only
Note: Entire project is worked in the round. Use a stitch marker or a scrap piece of yarn to mark the beginning of each row. Then you don’t have to count every row. Do not join unless instructed to.
Parentheses indicate a repeat. Repeat the stitches in the parentheses for the number of times indicated.
The bracketed number [] is the number of stitches at the end of each row.
I spread my increases out so there isn’t a seam on the finished piece. If you do not like this method, you can do regular increases.
If you have any questions, please feel free to email me at drunkenauntwendy@gmail.com.
HEAD – in Limelight
The head is made by doing an oval increase. Sometime it helps to mark where your increases are going to go with a spare piece of contrasting yarn. Just note that the first row is worked on both sides of the starting chain. The face is then embroidered on before you add the hair and stuff him.
Ch 8
Round 1: SC in 2nd Ch, SC in next 5 stitches. 3 SC in last stitch. Working in the unused loops from the chain, SC 5, 3 SC in last chain. [18]
Round 2: [6 SC, (INC) 3 times] repeat bracket one more time [24].
Round 3: [6 SC, (SC, INC) 3 times] repeat bracket one more time [30].
Round 4: [6 SC, (SC, INC, SC) 3 times] repeat bracket one more time [36].
Round 5: [6 SC, (3 SC, INC) 3 times] repeat bracket one more time [42].
Round 6: [6 SC, (2 SC, INC, 2 SC) 3 times] repeat bracket one more time [48].
Rounds 7-17: SC in each stitch for 11 rows [48 stitches per row].
Fasten off. Note: This flat edge is what is attached to the hair. Place the oval increase side at the bottom in order to see placing for eyes and embroidery.
Place safety eyes between rows 10-11 approximately 8 stitches apart. It helps to fold the head flat so you can make sure it is centered on the oval.
Embroider a grey scar over the right eye by making a diagonal straight stitch and crossing the stitch with small straight stitches.
Next to the left eye you will want to embroider a black scar in the same fashion but more upright.
Using red, embroider a small straight mouth centered between the eyes about 5 rows lower.
Make sure you tie all of these off inside the head to prevent unraveling later.
BOLTS – Make 2 in Graymist
CH 2
Round 1: 6 SC in 2nd CH from hook. [6].
Round 2: INC in stitch [12].
Round 3: In BLOs, SC in each stitch [12].
Round 4: In BLOs, DEC in each stitch [6].
Round 5: DEC, SC, DEC, SC [4].
Rounds 6-7: 2 rows SC [4 stitches per row].
Fasten off and leave a long tail for sewing. Attach to head on sides between rows 7-8 before you attach the hair.
HAIR in Black
Ch 8
Round 1: SC in 2nd Ch, SC in next 5 stitches. 3 SC in last stitch. Working in the unused loops from the chain, SC 5, 3 SC in last chain. [18]
Round 2: [6 SC, (INC) 3 times] repeat bracket one more time [24].
Round 3: [6 SC, (SC, INC) 3 times] repeat bracket one more time [30].
Round 4: [6 SC, (SC, INC, SC) 3 times] repeat bracket one more time [36].
Round 5: [6 SC, (3 SC, INC) 3 times] repeat bracket one more time [42].
Round 6: [6 SC, (2 SC, INC, 2 SC) 3 times] repeat bracket one more time [48].
Round 7: SC row [48].
Round 8: SC row in BLO [48].
Fasten off and leave a really long tail for sewing.
Line up middle points in hair and head and sew together stuffing as you go.
LEGS – Make 2 in Graphite
Ch 2
Round 1: 6 SC in 2nd Ch from hook [6].
Round 2: INC in each stitch [12].
Round 3: (SC, INC) 6 times [18].
Round 4: SC in BLOs [18].
Rounds 5-11: 7 rows SC [18 stitches per row].
Fasten off 1st leg. On 2nd leg do not fasten off. Continuing with the 2nd leg
Round 12: SC around both legs to join them [36].
Rounds 13-15: 3 rows SC, Change colors to Black [36 stitches per row].
Start stuffing here. Make sure you stuff each leg.
Round 14: SC row [36].
Round 15: (4 SC, DEC) 6 times [30].
Round 16: SC row [30].
Round 17: (3 SC, DEC) 6 times [24].
Round 18: SC row [24].
Round 19: (2 SC, DEC) 6 times [18].
Round 20: SC row [18].
Round 21: (SC, DEC) 6 times [12].
Fasten off. Sew to the bottom of the head.
ARMS – make 2
In Limelight, Ch 2
Round 1: 4 SC in 2nd chain from hook [4].
Round 2: SC row [4].
Round 3: (SC, INC) 2 times [6]
Rounds 4-6: 3 rows SC, Change colors to Black [6].
Rounds 7-11: 5 rows SC
Fasten off, tighten hole and sew to the sides of the body.
I also stepped out of my regular pattern and made this super cute Flareon. I love using a needle felting tool to attach the wonderful fluff.
I also started attaching labels to my handwoven scarves.
This scarf is made out of Knit Picks Chroma in Avalon with a purple cotton warp.
I’m also going to a charity function this coming weekend. I decided to donate a gift basket of all Drunken Aunt Wendy has to offer.
Now for your free Pattern. It is a new addition to my vegetable and fruit plush. Don’t forget to make up a Beetsy to have a friend. Remember, this is not tested. Use #drunkenauntwendy if you post on Instagram. I would love to see your stuff.
Materials
Worsted Weight Yarn
I love this yarn – Orange Neon
I love this yarn – Jelly Bean
I love this yarn – White
I love this yarn – Black
Size 18 mm eyes
Size E crochet hook
Polyfiberfill
Large Eye Needle
Abbreviations
SC – Single Crochet
HDC – Half Double Crochet
CH- Chain
FO – Fasten Off
SL ST – Slip Stitch
INC – Make two Single Crochet in Same Stitch
DEC – Single Crochet two stitches together
BLO – Back Loops Only
FLO – Front Loops Only
Note: Almost the entire project is worked in the round. Use a stitch marker or a scrap piece of yarn to mark the beginning of each row. Then you don’t have to count every row. Do not join unless instructed to.
Parentheses indicate a repeat. Repeat the stitches in the parentheses for the number of times indicated.
The bracketed number [] is the number of stitches at the end of each row.
I spread my increases out so there isn’t a seam on the finished piece. If you do not like this method, you can do regular increases.
See last page for alternative color options
If you have any questions, please feel free to email me at drunkenauntwendy@gmail.com.
CARROT
Carrot is worked in BLOS through this entire portion. He is also started at the bottom.
In Orange Neon, Ch 2
Round 1: 4 SC in 2nd Ch from hook [4].
Round 2: (INC, SC) 2 times [6].
Round 3: SC row [6].
Round 4: (INC, 2 SC) 2 times [8].
Round 5: SC row [8].
Round 6: (INC, 3 SC) 2 times [10].
Round 7: SC row [10].
Round 8: (INC, 4 SC) 2 times [12].
Round 9: SC row [12].
Round 10: (INC, 5 SC) 2 times [14].
Round 11: SC row [14].
Round 12: (INC, 6 SC) 2 times [16].
Rounds 13-14: 2 rows SC [16 per row].
Round 15: (INC, 7 SC) 2 times [18].
Rounds 16-17: 2 rows SC [18 per row].
Round 18: (INC, 8 SC) 2 times [20].
Rounds 19-20: 2 rows SC [20 per row].
Round 21: (INC, 9 SC) 2 times [22].
Rounds 22-23: 2 rows SC [22 per row].
Round 24: (INC, 10 SC) 2 times [24].
Rounds 25-26: 2 rows SC [24 per row].
Round 27: (INC, 11 SC) 2 times [26].
Rounds 28-29: 2 rows SC [26 per row].
Round 30: (INC, 12 SC) 2 times [28].
Rounds 31-32: 2 rows SC [28 per row].
Round 33: (INC, 13 SC) 2 times [30].
Rounds 34-35: 2 rows SC [30 per row].
LEAVES (Make 5)
In Jelly Bean, Ch 2.
Round 1: 6 SC in 2nd chain from hook [6].
Round 2: INC in each stitch [12]
Round 3: (SC, INC) 6 times [18]
Round 4: (SC, INC, SC) 6 times [24]
Rounds 5-6: 2 rows SC [24 stiches in each row]
Fold leaf in half. SC opening together stuffing as you go. [12].
Sew to the top of the Carrot.
EYES Make 2
In White, Ch 2
Round 1: 6 SC in 2nd chain from hook [6].
Round 2: INC in each stitch [12].
Round 3: (SC, INC) 6 times [18]
Rounds 4-6: 3 rows SC [18 stitches per row].
Place eyes in the center and start stuffing.
Round 7: (SC, DEC) 6 times [12].
Round 8: (DEC) 6 times [6].
Fasten off, weave the tail through the last stitches in Round 8 and pull up tight to close.
Sew to the Carrot.
Embroider Eyebrows and a sideways smirk in Black.
One completed Carrot.
If you haven’t signed up for my mailing list, you should. You’ll get a monthly newsletter with links to all patterns and the code in order to access the Exclusive Content.
Here at Drunken Aunt Wendy Designs, I’ve been continuing my crochet microbes series. Below you will find a pattern for Mr. Sa. He’s MRSA under the microscope. He’s got a cape because he’s a superbug. I think I’m going to have to crochet an antibiotic in order to fight off all these diseases.
But before we get to your free pattern, lets check in on everything else I have been up to.
I finished my gingham plaid scarf. I went a little crazy on the color scheme settling on Lime Green and Blush.
This one I made with worsted weight acrylic yarn. I don’t think I will use the same kind of yarn in the warp as it was a touch sticky in the heddle. The next scarf will be purple silk made out of lace weight yarn. It should have amazing drape.
Last week I also found a bonus sweater. What is a bonus sweater? Well it is a completely knitted wool cable sweater that just needed the arms sewn on. Exactly how many projects do I have going that I forgot I knitted a sweater. I mean seriously.
It is made out of Wool of the Andes Yarn in Sapphire Heather from Knit Picks. I’m a big fan of this site. The yarn is very reasonable and makes sweater knitting significantly cheaper. The pattern is called the Central Park Hoodie. It is one of my favorite patterns. I have knitted it a couple of times. The end project is super cozy. I did go up a size on the arms as my biceps are huge. (knitting apparently beefs them up, lol).
Free Crochet Pattern
Now what you have all been waiting for. Here’s the crochet pattern for Mr. Sa, the MRSA superbug.
Super MRSA
If you haven’t visited me before, the free patterns are not tested. Tested versions with lots of photos are available in my Etsy or Ravelry shops. If you make Mr. Sa, make sure to use #drunkenauntwendy so I can find it on social media. Don’t forget the other crocheted microbes, Anthrax and Mr. Sniffles.
Materials
Worsted Weight Yarn
I love this yarn in Old Leaf
I love this yarn in Black
12 mm Safety eyes
Size E crochet hook
Polyfiberfill
Large Eye Needle
Gauge is not important for this project unless you have purchased a kit. Using the right size hook is important to ensure you have enough yarn.
Abbreviations
SC – Single Crochet
HDC – Half Double Crochet
DC- Double Crochet
CH- Chain
FO – Fasten Off
SL ST – Slip Stitch
INC – Make two Single Crochet in Same Stitch
DEC – Single Crochet two stitches together
BLO – Back Loops Only
Note: Entire project is worked in the round. Use a stitch marker or a scrap piece of yarn to mark the beginning of each row. Then you don’t have to count every row. Do not join unless instructed to.
Parentheses indicate a repeat. Repeat the stitches in the parentheses for the number of times indicated.
The bracketed number [] is the number of stitches at the end of each row.
I spread my increases out so there isn’t a seam on the finished piece. If you do not like this method, you can do regular increases.
If you have any questions, please feel free to email me at drunkenauntwendy@gmail.com.
BODY and HEAD (Make 5)
On the last one, stop halfway through and insert eyes and embroider face.
In Old Leaf
Ch 2
Round 1: 6 SC in 2nd Chain from hook [6].
Round 2: INC in each stitch [12].
Round 3: (SC, INC) 6 times [18].
Round 4: (SC, INC, SC) 6 times [24].
Round 5: (3 SC, INC) 6 times [30].
Round 6: (2 SC, INC, 2 SC) 6 times [36].
Rounds 7-12: 6 rows SC [36 stitches per row].
Round 13: (4 SC, DEC) 6 times [30].
Round 14: (3 SC, DEC) 6 times [24].
Start stuffing here or place eyes and embroider face.
Round 15: (2 SC, DEC) 6 times [18].
Round 16: (SC, DEC) 6 times [12].
Fasten off. Sew three together in a triangle shape. Sew one below and the head on top.
CAPE – in Black
Note cape is worked back and forth. I don’t like to Ch 1 and turn on this on for a cleaner edge. If you want to ch 1 and turn that is fine.
Ch 13
Row 1: SC in 2nd Chain from hook and 11 remaining stitches [12].
Row 2: (2 HDC, INC) 4 times [8 SC, 8 HDC].
Row 3: SC row [16]
Row 4: (3 HDC, INC) 4 times [8 SC, 12 HDC].
Rows 5-6: 2 rows HDC [20 HDC per row].
Row 7: (4 HDC, INC) 4 times [8 SC, 16 HDC]
Rows 8-9: 2 rows HDC [24 HDC per row]
Row 10: (5 HDC, INC) 4 times [8 SC, 20 HDC]
Rows 11-12: 2 rows HDC [28 HDC per row].
Row 13: (6 HDC, INC) 4 times [8 SC, 24 HDC].
Rows 14-18: 5 rows HDC [32 stitches per row].
SC around the edges. Ch 26 at the top corners for the tie to attach the cape.
All Done! One Superbug.
If you haven’t joined my email mailing list, you should! I only send one or two emails a month so I’m not overloading your inbox. The emails include links to all the new patterns from the last newsletter and the codes to all my exclusive content.
If you follow me on Instagram, you have seen Clint and Lydia Chlamydia. I’ve also done an Sperm and Ovum, Adam and Eve. Those two have magnets to facilitate their attraction.
There has also been MRSA. He’s a super virus, hence the cape.
Super MRSA
I like my cuddly microbes. There has already been Mr. Sniffles, the cold virus.
Meet Anthrax. He’s a biohazard with a malicious sense of humor.
Cute Biohazard
Remember the patterns on my blog aren’t tested. Let me know if there are problems. If you make Anthrax make sure you use #drunkenauntwendy so I can find it.
Prefer a PDF?
This pattern can be completed using the 100% free version right here on this page. However, many people prefer the convenience of a printable, ad-free PDF. The PDF is available in my shop for a minimal fee.
Want to make him, but don’t have the supplies? There’s a kit!
Materials
Worsted Weight Yarn
I love this yarn – Amethyst (55 yds)
I love this yarn – Black (1 yd)
Size E crochet hook
Polyfiberfill
Large Eye Needle
Size 18 mm safety eyes
Red Spray Paint Glossy
Abbreviations
SC – Single Crochet
HDC – Half Double Crochet
CH- Chain
FO – Fasten Off
SL ST – Slip Stitch
INC – Make two Single Crochet in Same Stitch
DEC – Single Crochet two stitches together
BLO – Back Loops Only
FLO – Front Loops Only
Note: Almost the entire project is worked in the round. Use a stitch marker or a scrap piece of yarn to mark the beginning of each row. Then you don’t have to count every row. Do not join unless instructed to.
Parentheses indicate a repeat. Repeat the stitches in the parentheses for the number of times indicated.
The bracketed number [] is the number of stitches at the end of each row.
I spread my increases out so there isn’t a seam on the finished piece. If you do not like this method, you can do regular increases.
If you have any questions, please feel free to email me at drunkenauntwendy@gmail.com.
EYES
Spray paint eyes red. I use a clothespin to hold them. I recommend two coats.
BODY – in Amethyst
Body is worked as an oval. The increases go on the sides of the oval.
Ch 8
Round 1: SC in 2nd Ch from hook, SC for 5 stitches, 3 SC in last stitch, working in the unused loops from the first few stitches, 6 SC, 3 SC in the beginning loop [18].
Round 2: 6 SC, INC 3 times, 6 SC, INC 3 times [24].
Round 3: 6 SC, (SC, INC) 3 times, 6 SC, (SC, INC) 3 times [30].
Round 4: 6 SC, (SC, INC, SC) 3 times, 6 SC, (SC, INC, SC) 3 times [36].


 .
.