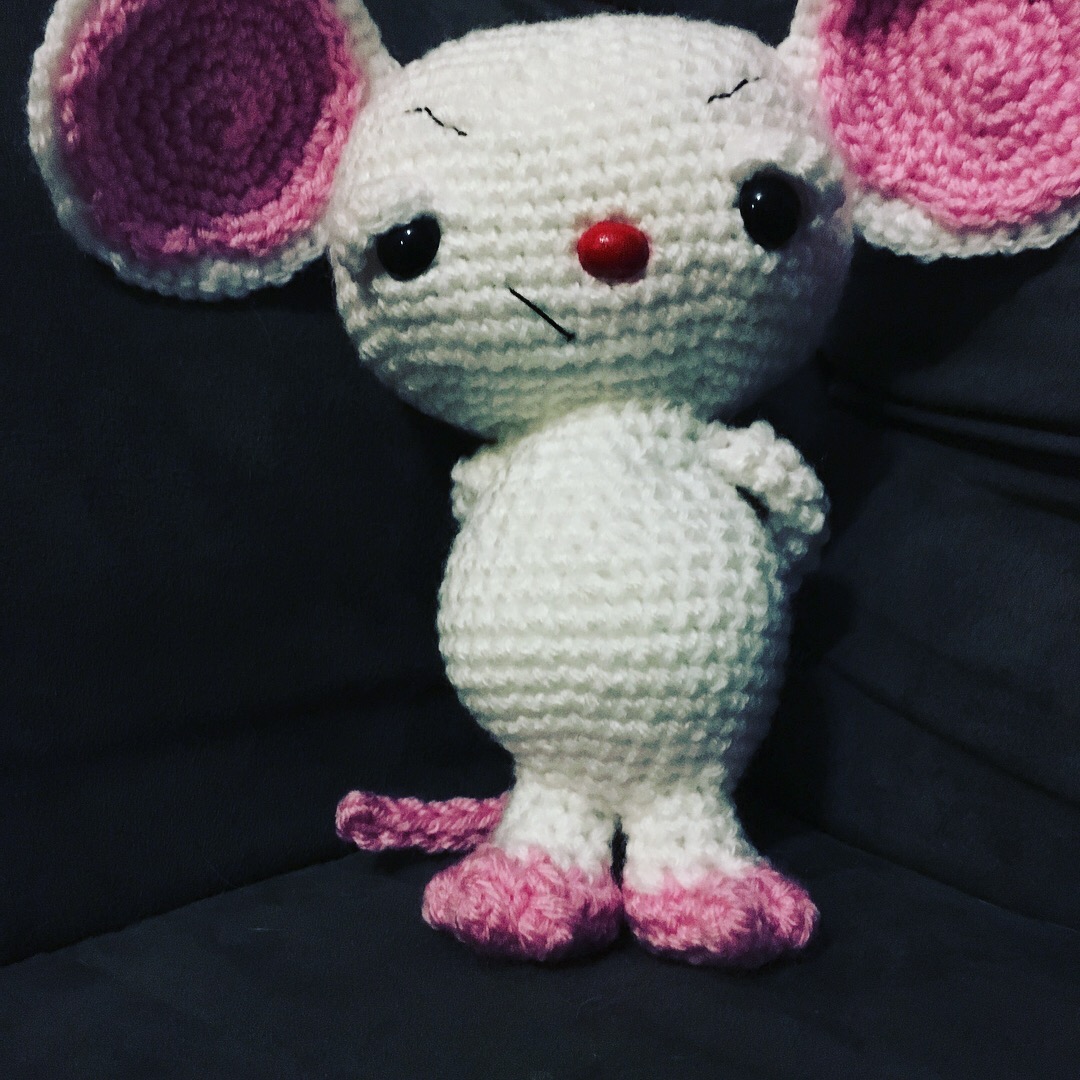
It’s time to take over the world. Brain is the next in my set of Animaniacs. Pinky, Yakko, Wakko and Dot are also available. How awesome is he? Again he isn’t tested. If you make him, make sure to use #drunkenauntwendy if you post it on Instagram. Then I can find your work and give you lots of likes!
The tested version will eventually available in my Etsy shop sans ads for a minimal fee. I will also try to get this set up as a kit as well.
Join my email mailing list for exclusive content. Pinky will only be available for mailing list member when he is done.

Materials
Worsted Weight Yarn
I love this yarn – White
I love this yarn – Pink
Embroidery Floss in Black
14 MM Safety Eyes
Oval Safety nose Spray painted Red (I used pink ones from Fresh Stitches)
Size E crochet hook
Polyfiberfill
Large Eye Needle
Abbreviations
SC – Single Crochet
HDC – Half Double Crochet
DC – Double Crochet
CH- Chain
FO – Fasten Off
SL ST – Slip Stitch
INC – Make two Single Crochet in Same Stitch
DEC – Single Crochet two stitches together
BLO – Back Loops Only
Puff Stitch –(Insert the hook in the stitch, yarn over, draw the yarn through the stitch) repeat 2 more times. You should have loops on your hook. Yarn over and draw through all 6 loops on the hook. Push the stitch out.
Note: Entire project is worked in the round. Use a stitch marker or a scrap piece of yarn to mark the beginning of each row. Then you don’t have to count every row. Do not join unless instructed to.
Parentheses indicate a repeat. Repeat the stitches in the parentheses for the number of times indicated.
The bracketed number [] is the number of stitches at the end of each row.
I spread my increases out so there isn’t a seam on the finished piece. If you do not like this method, you can do regular increases.
If you have any questions, please feel free to email me at drunkenauntwendy@gmail.com.
Spray Paint the Nose before you start crocheting to give them time to dry. I recommend 2 coats to get even coverage. I find Krylon in a Satin Finish gives me the best results.
EYELIDS – in White (make 2)
Ch 2
Row 1: 4 SC in 2nd Chain from hook [4].
Row 2: Ch 1, turn, (SC, INC) 2 times [6].
Fasten off leaving a long tail and set aside to sew to face when instructed.
HEAD – in White
The head is made by doing an oval increase. Sometimes it helps to mark where your increases are going to go with a spare piece of contrasting yarn. Just note that the first row is worked on both sides of the starting chain. The face is then embroidered on before you finish the head and stuff him.
Ch 8
Round 1: SC in 2nd Ch, SC in next 5 stitches. 3 SC in last stitch. Working in the unused loops from the chain, SC 6, 3 SC in last chain. [18].
Round 2: [6 SC, (INC) 3 times] repeat bracket one more time [24].
Round 3: [6 SC, (SC, INC) 3 times] repeat bracket one more time [30].
Round 4: [6 SC, (SC, INC, SC) 3 times] repeat bracket one more time [36].
Round 5: [6 SC, (3 SC, INC) 3 times] repeat bracket one more time [42].
Round 6: [6 SC, (2 SC, INC, 2 SC) 3 times] repeat bracket one more time [48].
Round 7: [6 SC, (5 SC, Inc) 3 times] repeat bracket one more time. [54]
Rounds 8-15: SC in each stitch for 8 rows [54 stitches per row].
Insert the safety eyes btw rows 10 & 11. Approximately 11 stitches apart.
Place the nose halfway between the eyes one row down.
Place the eyelids slanted over the safety eyes and sew in place.
Using the embroidery floss, embroider eyebrows.
The mouth is optional. I did it because my nose ended up being off center.
Round 16: (7 SC, DEC) 6 times [48].
Round 17: (6 SC, DEC) 6 times [42].
Round 18: (5 SC, DEC) 6 times [36].
Round 19: (4 SC, DEC) 6 times [30].
Start stuffing
Round 20: (3 SC, DEC) 6 times [24].
Round 21: (2 SC, DEC) 6 times [18].
Round 22: (SC, DEC) 6 times [12].
Round 23: DEC 6 times [6].
Fasten off. Leave a long tail. Thread tail through the stitches in Round 23. Pull up tight to close the hole.
OUTER EAR (Make 2)
In White, Ch 2
Round 1: 6 SC in 2nd Chain from hook [6].
Round 2: INC in each stitch [12].
Round 3: (SC, INC) 6 times [18].
Round 4: (SC, INC, SC) 6 times [24].
Round 5: (3 SC, INC) 6 times [30].
Round 6: (2 SC, INC, 2 SC) 6 times [36].
Round 7: (5 SC, INC) 6 times [42].
Fasten off and leave a long tail for sewing.
INNER EAR (Make 2)
In Pink, Ch 2
Round 1: 6 SC in 2nd Chain from hook [6].
Round 2: INC in each stitch [12].
Round 3: (SC, INC) 6 times [18].
Round 4: (SC, INC, SC) 6 times [24].
Round 5: (3 SC, INC) 6 times [30].
Round 6: (2 SC, INC, 2 SC) 6 times [36].
Fasten off and leave a long tail for sewing. Attach with the wrong sides together. Be careful sewing so that the pink doesn’t show through on the other side.
Attach ears high on the sides of the head. You may want to pin them in place to check placement before sewing them on.
FEET (Make 2)
Note you will make two feet and attach them pursuant to the instructions for the body. You will fasten off the first one and not the
second one. These are also done with an oval increase.
In Pink, Ch 5
Round 1: SC in 2nd Ch, SC in next 2 stitches. 3 SC in last stitch. Working in the unused loops from the chain, SC 3, 3 SC in last chain. [12].
Round 2: 3 SC, INC 3 times, 6 SC [18].
Round 3: 3 SC, (Puff Stitch, SC) 3times, 6 SC [12 SC, 3 Puff Stitches].
Round 4: 3 SC, 3 DEC, 6 SC [12]. Change colors to White.
Round 5: (SC, DEC) 4 times [8].
Rounds 6-7: 2 rows SC [8 SC per row].
Fasten off the first one. Do not fasten off the second leg and proceed to the instructions for the body.
BODY (In White)
Making sure both feet are facing the same direction:
Round 1: SC around first leg and then around second leg to join legs together [16].
Round 2: (3 SC, INC) 4 times [20].
Round 3: (2 SC, INC, 2 SC) 4 times [24].
Round 4: (3 SC, INC) 6 times [30].
Round 5: SC row [30].
Round 6: (4 SC, INC) 6 times [36].
Rounds 7-9: 3 Rows SC [36 stitches per row].
Round 10: (4 SC, DEC) 6 times [30].
Round 11: SC row [30].
Round 12: (3 SC, DEC) 6 times [24].
Start Stuffing
Rounds 13-14: 2 rows SC [24 stitches per row].
Round 15: (2 DC, DEC) 6 times [18].
Rounds 16-17: 2 rows SC [18].
Fasten off. Stuff firmly and attach to the bottom of the head.
ARMS (Make 2)
In Pink Ch 2:
Round 1: 8 SC in 2nd Chain from hook [8].
Round 2: SC row [8].
Round 3: (DEC, 2 SC) 2 times [6].
Round 4: (DEC, SC) 2 times [4]. Change Colors to White.
Rounds 5-14: 10 rows SC [4 stitches per row.
Fasten off and sew to the body right under the head. Then attach the hands together behind the body to give him his pondering look.

TAIL in Pink
3 stitch crochet Icord for 13 rows.
Fasten off and sew to back of body.
Stick with the Icord, it is fiddly, but works out. Promise.
Now go take over the world with Brain.

Hi my husband loves pinky and brain I’m doing pinky starting on head it calls for 18sts I count 17 in the 1st row…. Ch 8 sc 2nd and next 5 3sc in the last opp side sc 5 3sc last adds up to 17
You are right. It is SC 6 in on the opposite side. Thank you for letting me know and I updated the patterns.