If you follow me on Facebook and/or Instagram, you know I have been creating Yakko this week.
This is the initial pattern with the smaller face piece. Hopefully when I make his brother, Wakko and the Warner sister, Dot, I’ll get it right. Then they can run around the Warner Movie Lot.
He looks a lot cuter with his body.
I haven’t tested this pattern at all. Please let me know if there are any issues with the pattern or suggestions or recommendations.Yakko Pattern
Next week I will be crocheting items from other designers. I like to try other patterns so I can see different takes on things and different ways to make my crochet creatures come to life.
The next few free patterns will be from Animaniacs. Let me know what you think my series after that should be. I was thinking Princess Bride characters. Andre the Giant as Fezzik as a plush doll could be the cutest thing ever.
In order to prevent boredom, I decided I would try something new and/or different at least once a month. The new projects will cover knitting, weaving, cross stitch, etc. Hopefully, I will be a touch more consistent with posting.
This week I started the Antarkis shawl by Janina Kallio. The pattern is available on Ravelry and you get updates as she changes the pattern. I’m still working from the original because I like that one.
If you look close you can see the sparkles in the yarn. Obviously, this hasn’t been blocked yet as it is still on the needles. The yarn has been in my stash for a long time and I’m glad to finally get to use it for something.
Make sure to follow me on Instagram for updates to what I am doing and working on. I am also trying to add more kits to my Etsy shop so make sure you check in.
I know it has been forever. I’ve been working on all sorts of new things. If you don’t follow me on Instagram, you should. I am finally getting used to the platform and getting a lot better at it.
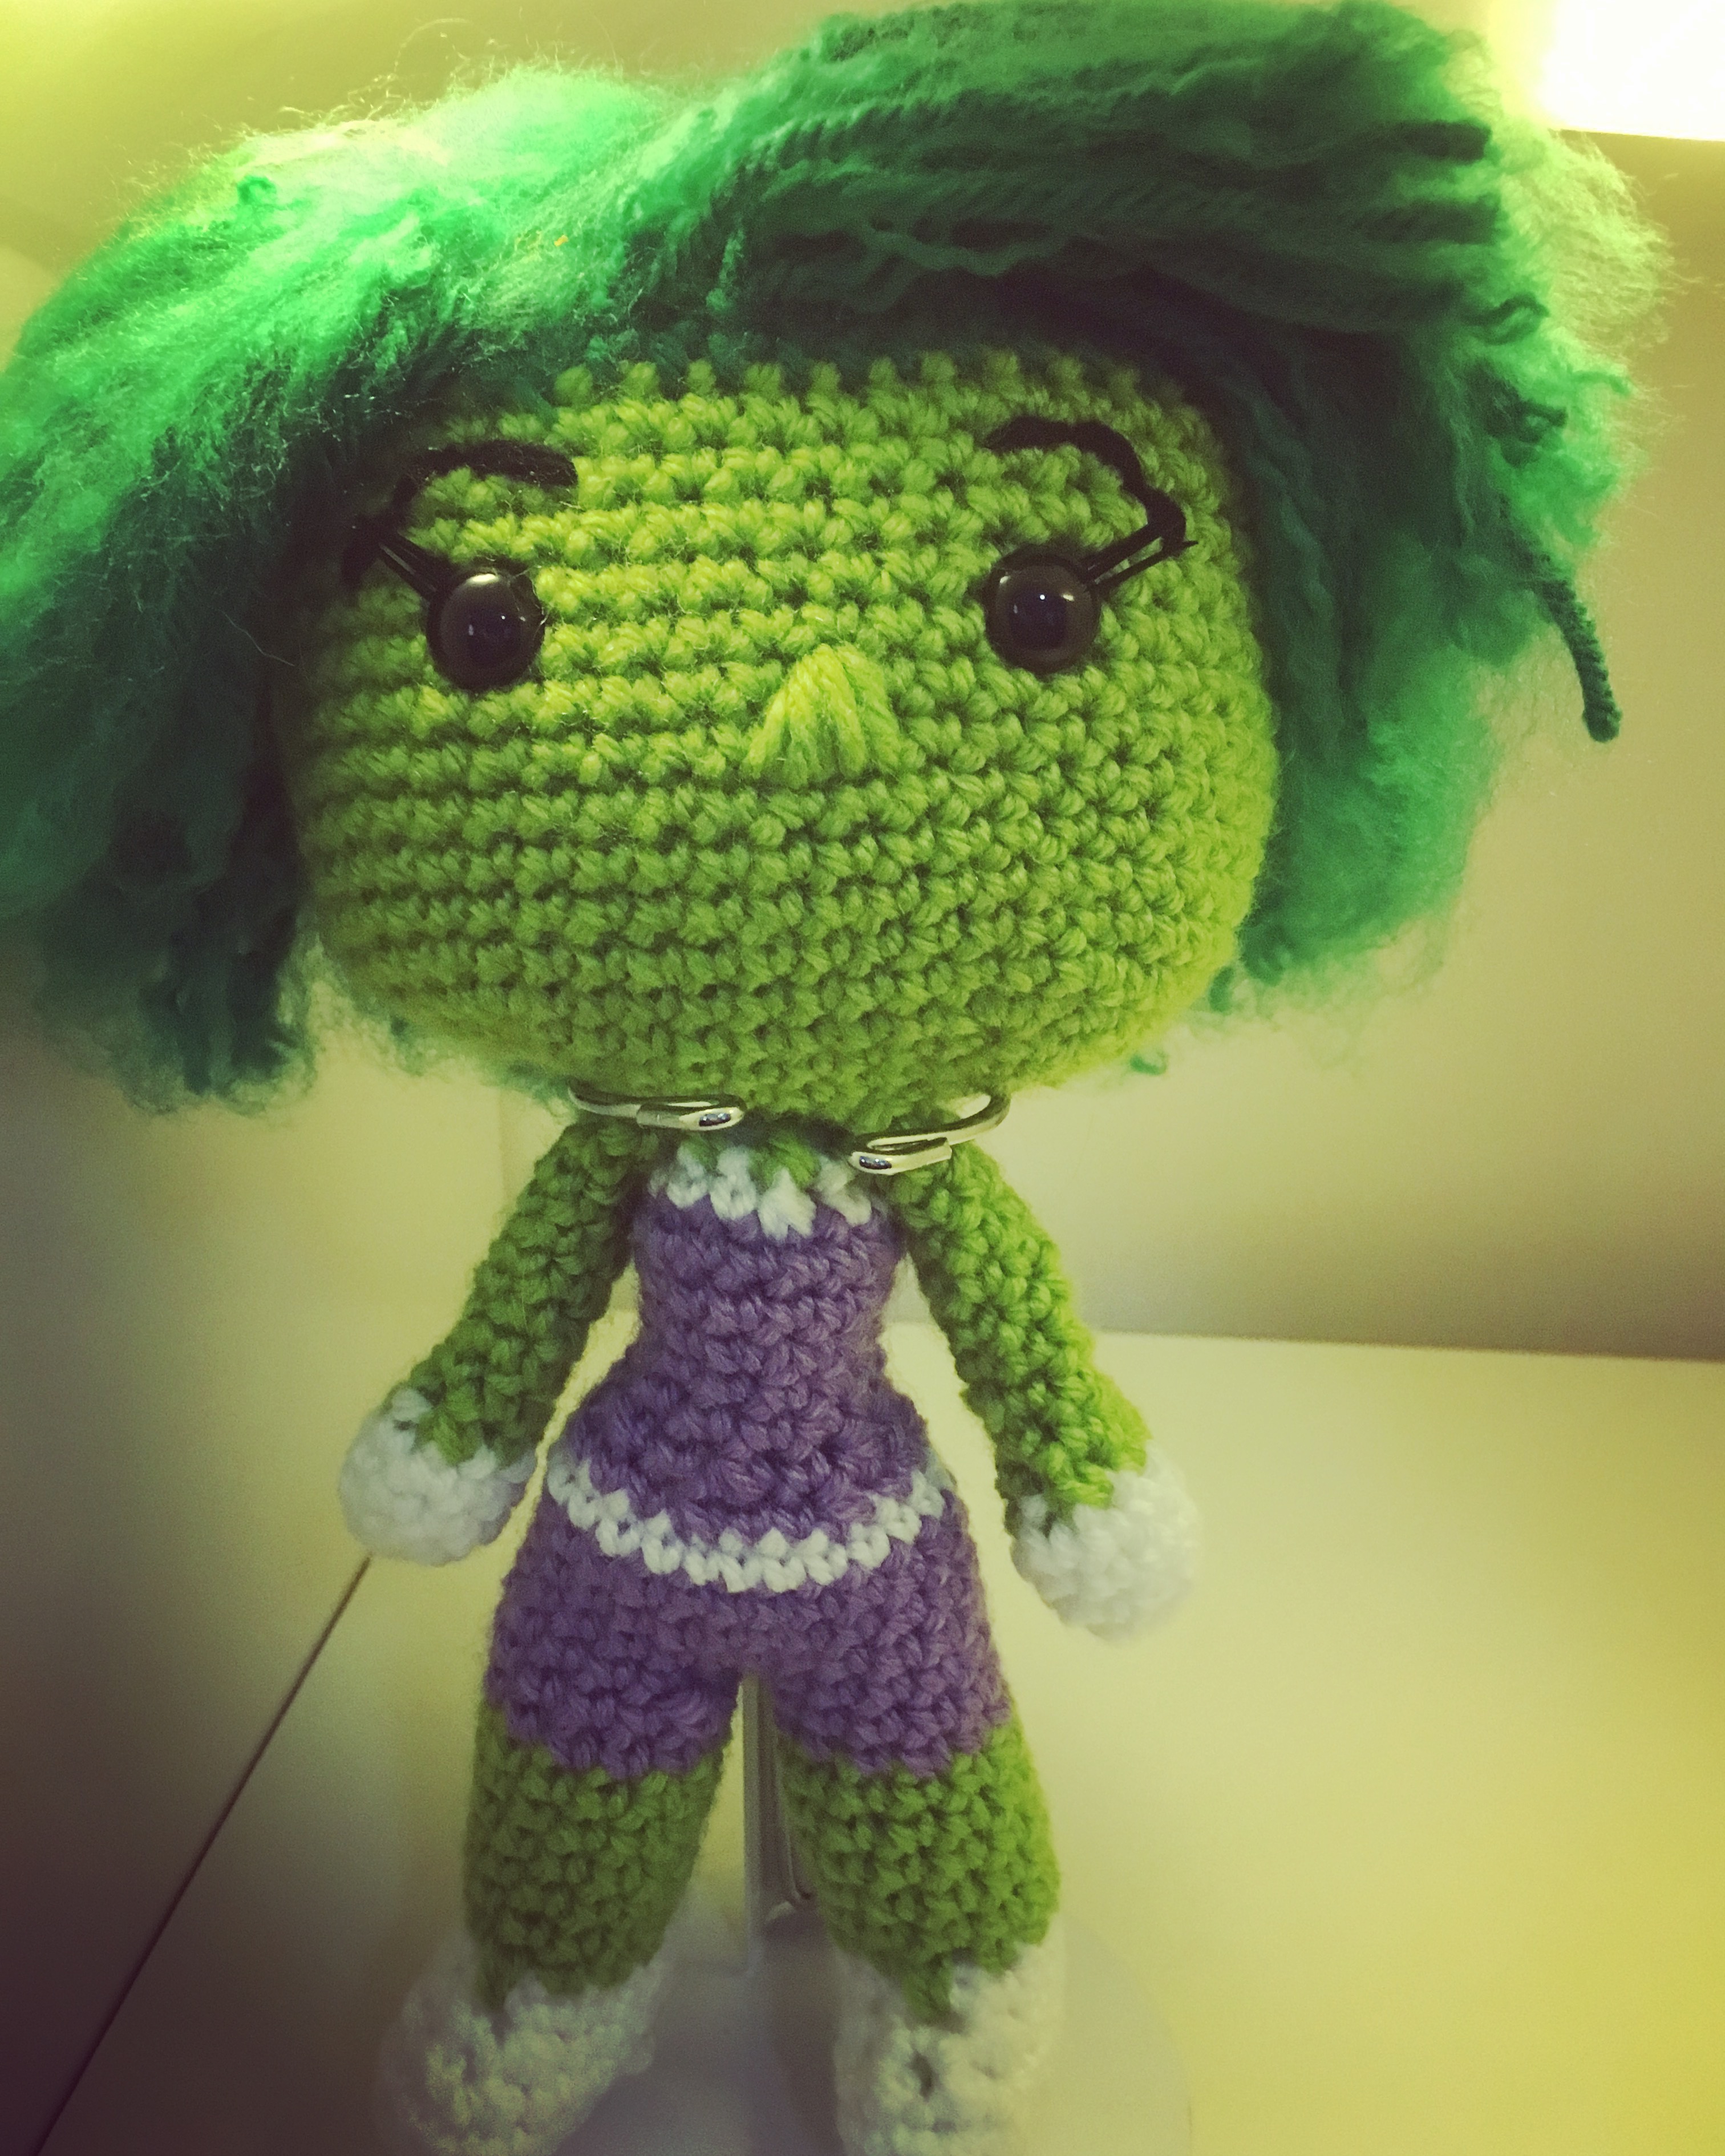
Now for the main event: SHE-HULK!
I love comic book ladies and feel they are underrepresented in the crochet world.
Look at that face. I used my eyelash technique, because it is my favorite. I may run out of doll lashes soon. Also her booty shorts are just the cutest.
The pattern is available below. I have not tested it. I think her boobs need to be bigger. When I test it, I will try that part. I also have not calculated the yardage for the different colors. If you run into problems or errors, please contact me or leave a comment. Make sure to use #drunkenauntwendy if you post on Instagram so I can find it.
Materials
Worsted Weight Yarn
I love this yarn – Limelight
I love this yarn – Amethyst
I love this yarn – Jelly Bean
I love this yarn – Black
I love this yarn – White
12 mm Safety Eyes
Doll Eyelashes
Size E crochet hook
Slicker Brush
Needlefelting tool
Polyfiberfill
Large Eye Needle
Abbreviations
SC – Single Crochet
HDC – Half Double Crochet
CH- Chain
FO – Fasten Off
SL ST – Slip Stitch
INC – Make two Single Crochet in Same Stitch
DEC – Single Crochet two stitches together
BLO – Back Loops Only
Note: Entire project is worked in the round. Use a stitch marker or a scrap piece of yarn to mark the beginning of each row. Then you don’t have to count every row. Do not join unless instructed to.
Parentheses indicate a repeat. Repeat the stitches in the parentheses for the number of times indicated.
The bracketed number [] is the number of stitches at the end of each row.
I spread my increases out so there isn’t a seam on the finished piece. If you do not like this method, you can do regular increases.
If you have any questions, please feel free to email me at drunkenauntwendy@gmail.com.
Cut two sections of 3 doll lashes and glue to the underside of the eyes. Use a strong glue. I use E6000. Set aside to dry while you work on the head.
HEAD – in Limelight
The head is made by doing an oval increase. Sometimes it helps to mark where your increases are going to go with a spare piece of contrasting yarn. Just note that the first row is worked on both sides of the starting chain. The face is then embroidered on before you finish the head and stuff her.
Ch 8
Round 1: SC in 2nd Ch, SC in next 5 stitches. 3 SC in last stitch. Working in the unused loops from the chain, SC 5, 3 SC in last chain. [18].
Round 2: [6 SC, (INC) 3 times] repeat bracket one more time [24].
Round 3: [6 SC, (SC, INC) 3 times] repeat bracket one more time [30].
Round 4: [6 SC, (SC, INC, SC) 3 times] repeat bracket one more time [36].
Round 5: [6 SC, (3 SC, INC) 3 times] repeat bracket one more time [42].
Round 6: [6 SC, (2 SC, INC, 2 SC) 3 times] repeat bracket one more time [48].
Rounds 7-17: SC in each stitch for 11 rows [48 stitches per row].
Fasten off. Insert eyes 4 rows down from the open edge 9 stitches apart. Make sure the eyelashes are where you want them before you put the washers on for the eyes.
Embroider nose in limelight with three long straight stitches coming out of a center point to create a triangle.
Using black, embroider eyebrows using a backstich.
Make sure you tie all the tails off inside the head to prevent unraveling later.
HAIR – in Jelly Bean
Ch 8
Round 1: SC in 2nd Ch, SC in next 5 stitches. 3 SC in last stitch. Working in the unused loops from the chain, SC 5, 3 SC in last chain. [18].
Round 2: [6 SC, (INC) 3 times] repeat bracket one more time [24].
Round 3: [6 SC, (SC, INC) 3 times] repeat bracket one more time [30].
Round 4: [6 SC, (SC, INC, SC) 3 times] repeat bracket one more time [36].
Round 5: [6 SC, (3 SC, INC) 3 times] repeat bracket one more time [42].
Round 6: [6 SC, (2 SC, INC, 2 SC) 3 times] repeat bracket one more time [48].
Rounds 7-8: SC in each stitch for 2 rows [48 stitches per row].
Fasten off leaving a long tail for sewing.
Stuff the head and sew on the hair continuing to stuff as you go.
Cut several 8 inch pieces of jelly bean to attach as hair. You can make the hair longer if you wish.
Attach the hair by folding the piece of hair in half, pulling the loop through and securing the open ends. Attach in a line on the left side of her head for the part. Attach on the other side of the line. Attach throughout the head. Using a slicker brush, go through the hair causing the yarn to unravel. This can take upwards of an hour depending on how many strands of hair you use. Then using the needlefelting tool, style the hair.
FEET (Make 2)
In White
Ch 5
Round 1: SC in 2nd Ch, SC in next 2 stitches. 3 SC in last stitch, working in the unused loops from the chain, SC 3, 3 SC in last chain. [12].
Round 2: [3 SC, (INC) 3 times] repeat bracket one more time [18].
Round 3: SC in BLOs [18].
Round 4: SC 3 times, DEC 3 times, 9 SC [15].
Round 5: 2 SC, 2 DEC, 9 SC [13].
Round 6: SC row [13]. Change Colors to limelight
Round 7: 3 SC, Spike Stich, 9 SC [12 SC, 1 spike stitch].
Round 8: DEC, 11 SC [12]
Rounds 9-12: 4 rows SC [12 stitches per row] change colors to amethyst
Rounds 12-13: 2 rows SC [12 stitches per row].
Fasten off the first leg.
Do not fasten off leg number 2, follow the instructions below for leg number 2.
Round 13: SC around stitches in leg number one and then around the stitches in leg number 2 [24]. Using the tail from leg number one, sew up any gaps that may have resulted at the join.
Stuff legs and continue crocheting in the round.
Rounds 14-16: SC in each stitch for 3 rows. Change color to white in last stitch. [24 stitches per row].
Round 17: SC row, change color to Amethyst in last stitch [24].
Round 18: (2 SC, DEC) 6 times [18].
Round 19: (SC, DEC) 6 times [12].
Rounds 20-21: 2 rows SC [12 stitches per row].
Round 22: (2 SC, INC) 4 times [16].
Rounds 23-24: 2 rows SC, Change colors to White in last stitch [16].
Round 25: (2 SC, DEC) 4 times, change color to Green in last stitch [12].
Round 26: DEC 6 times [6].
Round 27: SC row [6].
Fasten off and sew to head.
ARMS (make 2)
In White
Ch 2
Round 1: 6 SC in 2nd Ch from hook [6].
Round 2: (SC, INC) 3 times [9].
Rounds 3-4: 2 rows SC, change colors to limelight in the last stitch [9 stitches per row].
Round 5: (SC, DEC) 3 times [6].
Rounds 6-14: 9 rows SC [6 stitches per row].
Fasten off. Sew to the sides of body and to the head.
I’ve updated Helga. Hopefully she will be clearer to read now and easier to understand.
The kit should be available on Etsy by the end of today.
For an ad free .pdf format of this pattern buy now
Materials
I love this yarn – Greybeard (95 yds)
I love this yarn – Peacock, Amethyst or Hot Rose (2 yds)
Vanna’s Choice – Beige (7 yds)
12 mm Safety eyes
12 mm safety animal noses
Size E crochet hook
Large eye blunt needle
Polyfiberfill
Abbreviations
SC – Single Crochet
Ch- Chain
INC – SC 2 stitches into same stitch
DEC – SC two stitches together
BLO – Back loops only
LS – Loop Stitch
TC – Triple crochet
DC – Double Crochet
Gauge – Gauge is not important for this project, but if you are making it from the kit, you should use the right size needle to ensure you don’t run out of yarn.
Notes:
Parentheses indicate a repeat. Repeat the stitches in the parentheses for the number of times indicated.
The bracketed number [] is the number of stitches at the end of each row.
I spread my increases out so there isn’t a seam on the finished piece. If you do not like this method, you can do regular increases.
Crochet section is worked in partly in the round. Use a stitch marker or a scrap piece of yarn to mark the beginning of each row. Then you don’t have to count every row. Do not join unless instructed to.
If you have any questions, please feel free to email me at drunkenauntwendy@gmail.com.
BODY
In Beige
Ch 2
Round 1: In 2nd Ch from hook, SC 4 [4].
Round 2: INC 4 times [8].
Round 3: INC, 7 SC [9].
Round 4: INC, 8 SC [10].
Round 5: (INC, 4 SC) 2 times [12].
Round 6: (INC, SC) 6 times [18].
Round 7: SC Row [18].
Round 8: (SC, INC, SC) 6 times [24].
Round 9: (3 SC, INC) 6 times [30].
Fasten off.
Insert nose in the center of round 1.
Place eyes between rows 6 and 7, 5 to 6 stitched apart.
With the wrong side facing (inside of the head), find the bottom center. Count back five and join gray with a slip stitch.
There will be stitches at the bottom that are not done in loop stitch to keep the bottom of Helga flat.
Unless otherwise instructed, the Increases in the parenthesis with LS should be done as a Loop Stitch.
Round 10: (4 SC, INC) 2 times (4 LS, INC) 4 times [12 SC, 24 LS].
Round 11: (5 SC, INC) 2 times (5 LS, INC) 4 times [14 SC, 28 LS].
Round 12: 14 SC, 28 LS.
Round 13: Repeat row 12.
Round 14: DEC, 10 SC, DEC, 28 LS [12 SC, 28 LS].
Round 15: DEC, 8 SC, DEC, 28 LS [10 SC, 28 LS].
Round 16: 10 SC, 28 LS
Rounds 17-20: Repeat round 16 4 times [10 SC, 28 LS per round].
Round 21: DEC, 6 SC, DEC, 28 LS [8 SC, 28 LS].
Round 22: 8 SC, 28 LS.
Rounds 23-25: Repeat Round 22 3 times [8 SC, 28 LS per row].
Start Stuffing
Round 26: 4 SC, DEC, 2 SC remaining decreases are done in loop stitch 2 LS, DEC (4 LS, DEC) 4 times [7 SC, 23 LS].
Round 27: 3 SC, DEC, 2 SC remaining decreases are done in loop stitch LS, DEC (3 LS, DEC) 4 times [6 SC, 18 LS].
Round 28: 2 SC, DEC, 2 SC remaining decreases are done in loop stitch DEC (2 LS, DEC) 4 times [5 SC, 13 LS].
Round 29: (LS, DEC) 6 times [12 LS].
Round 30: DEC 6 times [6 SC].
Fasten off and thread yarn through last round and pull up tight to close.
If you wish to have an ad free .pdf, please check out my Ravelry or Etsy Shops.
I am working on updating all my patterns and creating kits. There will be new free patterns eventually.
Oh and I got two of the Zoomigurumi books for Mother’s Day. I am dividing my time between making all those super cute patterns and working on my own.
It’s been a fun week. I had a craft fair last Saturday that kept me pretty busy tagging and setting up. My dad made me some awesome shelves to display my stuff. Due to work, my husband stained them.
Now I have to make bags to protect the dulcimers my dad has been making as payment. That’s my plan for tomorrow afternoon. My daughter decided it was fun to be the Easter Bunny. She had a great time in that suit and even posed for a picture with her dad.
Seriously, she’s 14, posing with dad is her least favorite thing. At least the rabbit ears make her taller than him.
I also decided to play with resin to make some necklaces/keychains.
Sadly, the resin for the first set of ten refused to harden. I hate it when the resin gets all soupy. Thankfully, my second set of ten was perfect and order was restored to my world.
I also got this book from the library.
I can’t stop myself. I have made the flamingo, the camel
and I am working on the alligator.
Don’t judge me as he is propped up against a wine bottle.
I’m trying to get as many done as I can as I have to take it back to the library soon.
Oh! MCAL. Here’s the next part. It starts right where last week’s ended.
Round 24: (7 SC, DEC) 6 times [48].
Round 25: (6 SC, DEC) 6 times [42].
Round 26: (5 SC, DEC) 6 times [36].
Round 27: (4 SC, DEC) 6 times [30].
Round 28: (3 SC, DEC) 6 times [24].
Start stuffing here.
Round 29: (2 SC, DEC) 6 times [18].
Round 30: (SC, DEC) 6 times [12].
Round 31: DEC 6 times [6].
Fasten off. Leave a piece for sewing. Thread string through last 6 stitches and pull up tight to close opening.
Any guesses what it is yet?
Here’s the instructions for the feet.
FEET (Make 2) – in orange neon
Ch 4 Round 1: SC in 2nd Ch, SC in next 2 stitches. 3 SC in last stitch, working in the unused loops from the chain, SC 2, 3 SC in last chain. [12]. Round 2: 3 SC, 3 INC, 3 SC, 3 INC [18].Round 3: 3 SC (SC, INC) 3 times, 3 SC (SC, INC) [24]. Round 4: SC in BLO [24]. Round 5: 2 SC, 5 DEC, 3 SC, 3 DEC, SC [14]. Round 6: SC row [14].
Stuff foot Round 7: DEC 7 times [7]. Round 8: 5 SC, DEC [6]. Rounds 9-11: 3 rows SC [6 stitches per row].
Stuff legs firmly and sew to bottom of the body. The legs need to be stuffed firmly.
My apologies. Work went a little insane last Friday right when I was getting ready to post this first part of the pattern. Then it kept going until today. Actually, I am still supposed to be making phone calls, but I needed a breather.
What are your thoughts on pictures? I don’t want to give it away, but I would love to see progress posts. I’ll put mine on Facebook.
I’ve already made some edits to the pattern. Please let me know if there is anything you think needs changing or clarified.
Notes:
Parentheses indicate a repeat. Repeat the stitches in the parentheses for the number of times indicated.
The bracketed number [] is the number of stitches at the end of each row.
I spread my increases out so there isn’t a seam on the finished piece. If you do not like this method, you can do regular increases.
Crochet section is worked in partly in the round. Use a stitch marker or a scrap piece of yarn to mark the beginning of each row. Then you don’t have to count every row. Do not join unless instructed to.
If you have any questions, please feel free to email me at drunkenauntwendy@gmail.com.
EYES (Make 2) – in white
The eyes are made by doing an oval increase. Sometime it helps to mark where your increases are going to go with a spare piece of contrasting yarn. Just note that the first row is worked on both sides of the starting chain.
Ch 4
Round 1: SC in 2nd Ch, SC in next stitch. 3 SC in last stitch. Working in the unused loops from the chain, SC 2, 3 SC in last chain. [10].
Round 2: 2 SC, 3 INC, 2 SC, 3 INC [16].
Fasten off. You will insert your 10.5 mm eyes through the white eyes and through the orange body when you insert them and sew them down. Posts of eyes will be off center.
BODY – in orange neon
Ch 2
Round 1: 6 SC in 2nd Ch from hook [6].
Round 2: INC in each stitch [12].
Round 3: (SC, INC) 6 times [18].
Round 4: (SC, INC, SC) 6 times [24].
Round 5: (3 SC, INC) 6 times [30].
Round 6: (2 SC, INC, 2 SC) 6 times [36].
Round 7: (5 SC, INC) 6 times [42].
Round 8: (3 SC, INC, 3 SC) 6 times [48].
Round 9: (7 SC, INC) 6 times [54].
Rounds 10-23: 14 rows SC [54 stitches per row].
Insert eyes 6 stitches apart between rows 14-15. Sew down the whites of the eyes.
I am so sorry. This was supposed to be up over a week ago, but I got sick, then my husband got sick. Basically, we have been a walking plague these past two weeks.
I reworked the Champagne Cork Ornaments for Easter.
One chick and his hoppers!Look at those tails!
Sheldon was finally tested and typed.
Sheldon assembled!
He even got new colors. I’m also working on more kits.
Sheldon in kit form.
I don’t like having to buy a ton of yarn just to make one little thing. Kits are perfect so I have just enough. I simply can’t throw away unused yarn. I have little fiddly bits all over the place.
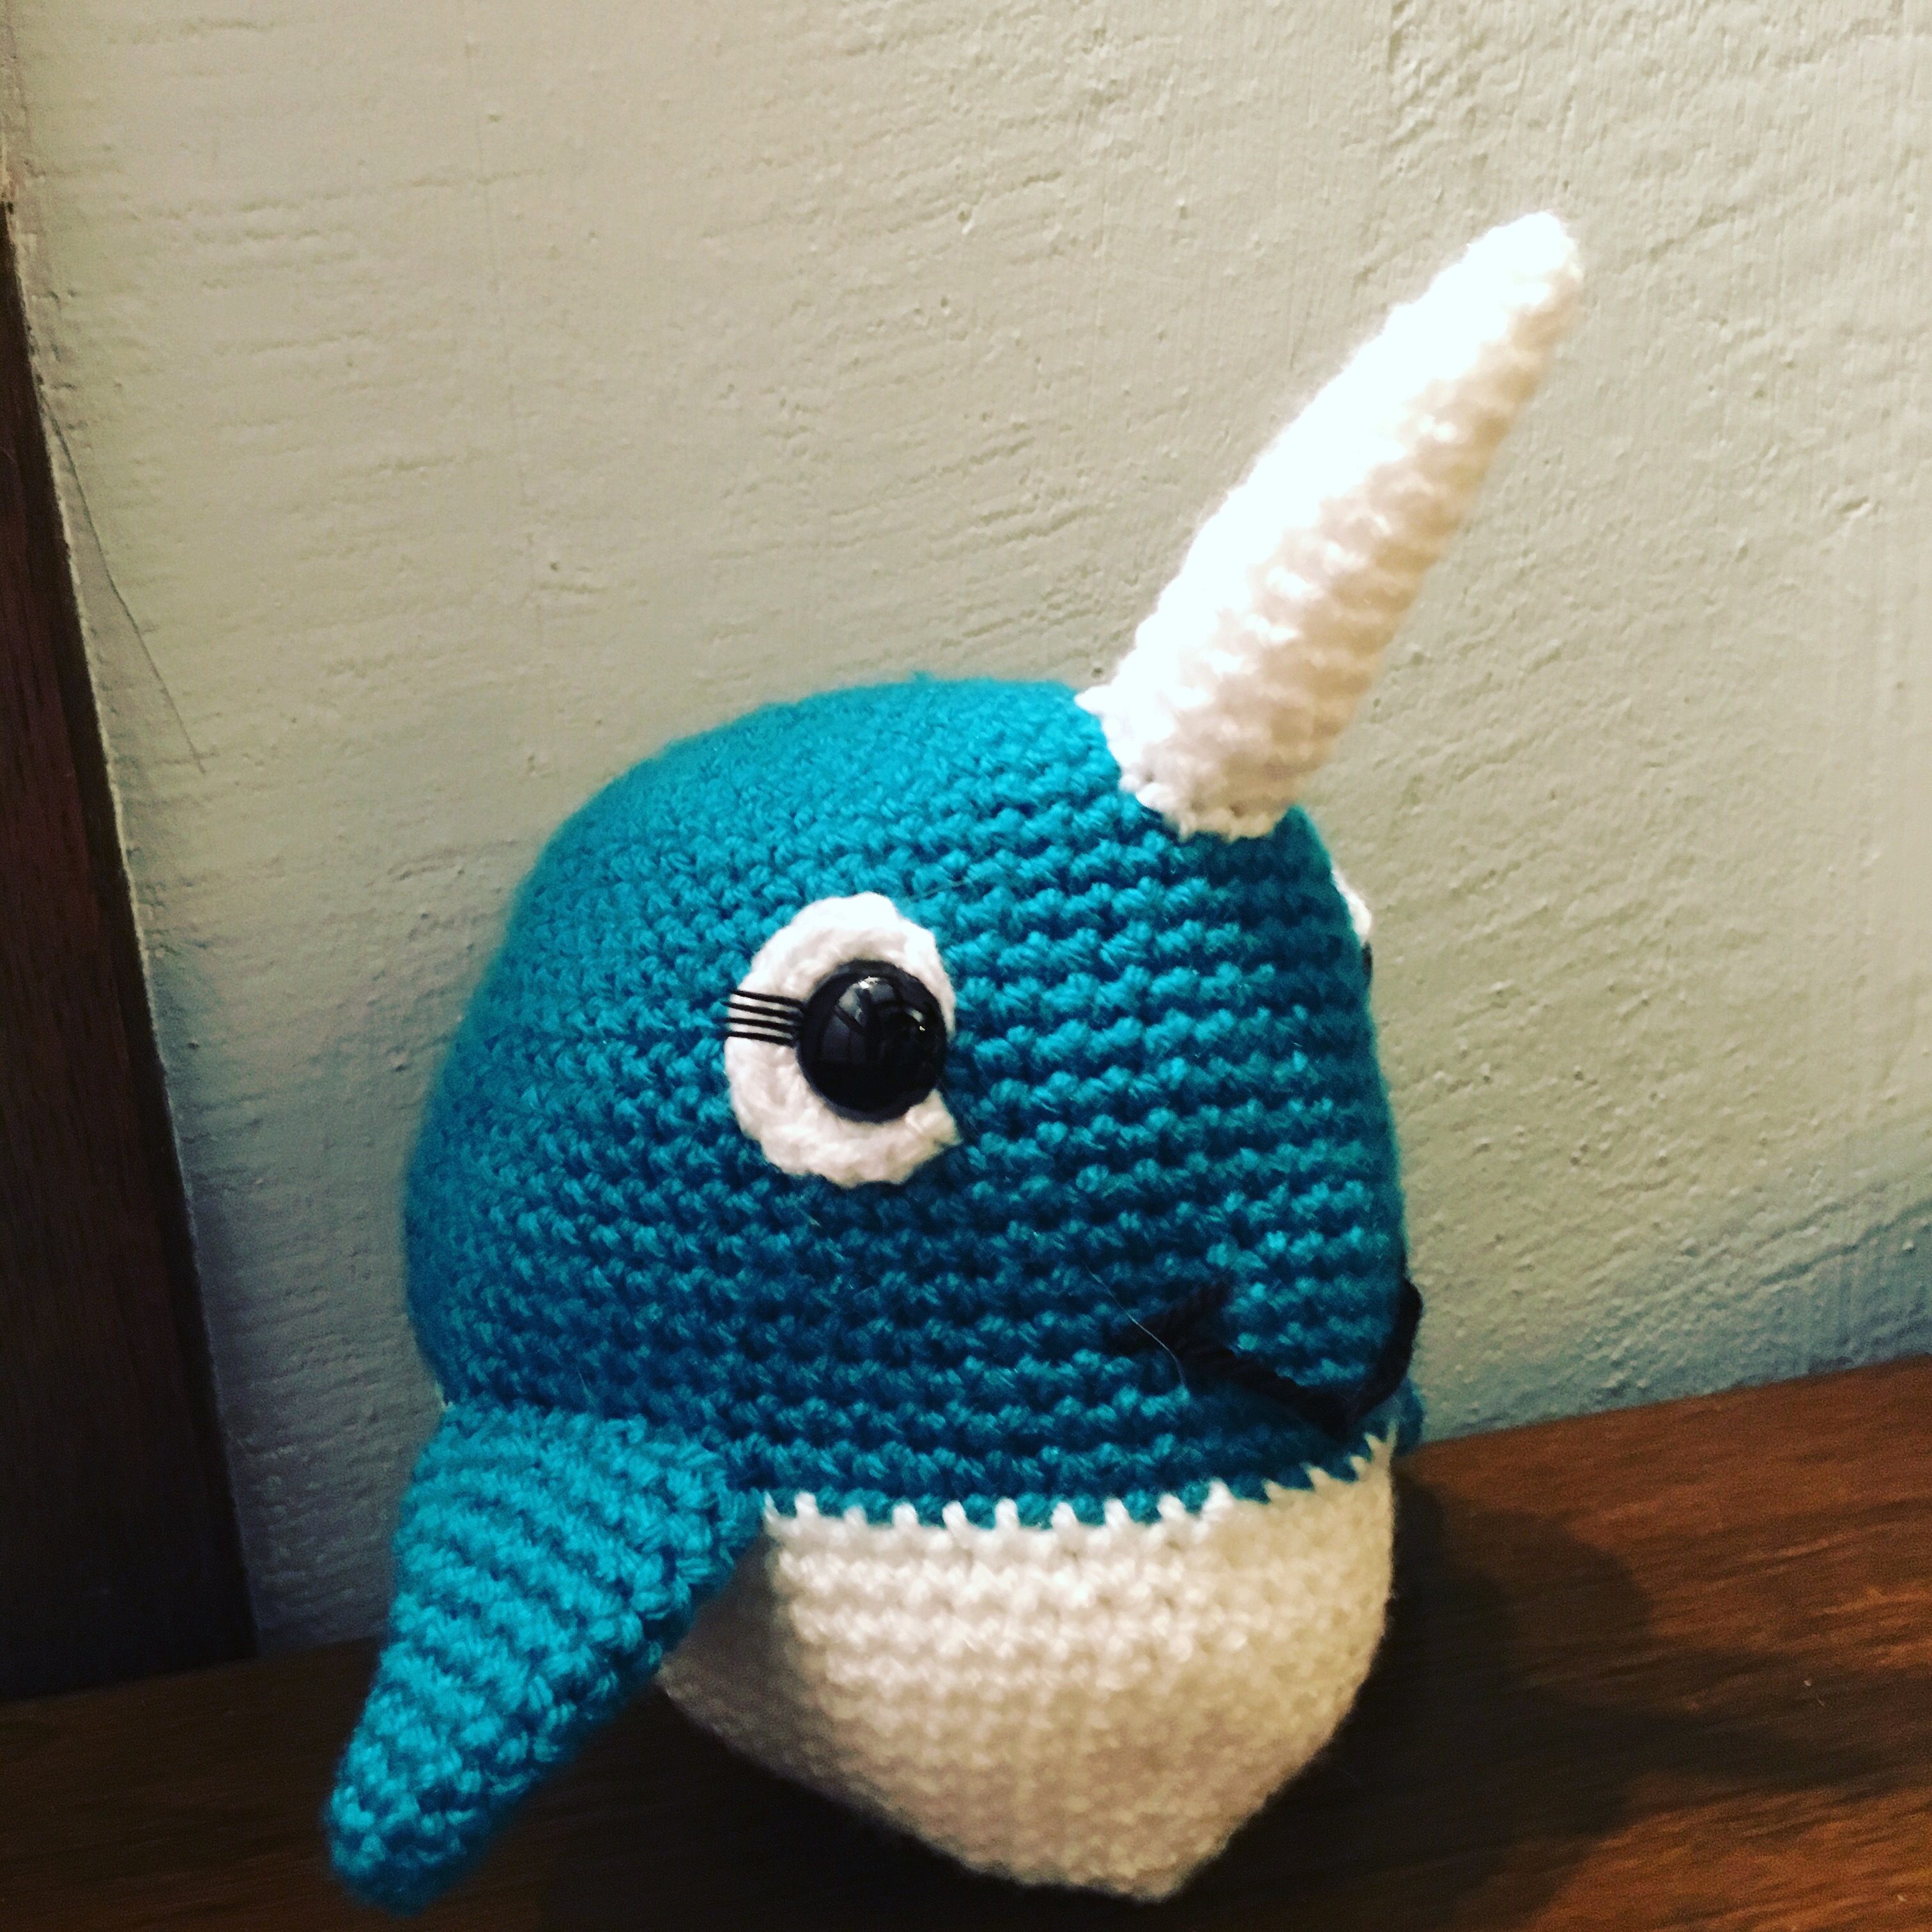
Cecilia has been reworked and will soon be available as a pattern.
All eyelashes and charm.
She’s part of my cuddly aquarium series.
Oh Mystery Crochet A-long, Ha! This pattern has been posted, but it has not been tested. There were some great guesses on Facebook. I’m excited to try a lot of the suggestions, especially Bob Ross. He just would be a fun little plushie to sit on my desk and mellow me out.
Here’s how this will work. Today I’ll post the materials and on Friday I’ll post the first part of the pattern. It might be super obvious who we are making as soon as I tell the materials, but I hope this will be fun.
Materials
I love this yarn – Orange Neon
I love this yarn – White
10.5 m Safety eyes
Size E crochet hook
Large eye blunt needle
Polyfiberfill
This year, I want to try something new each month. I need to branch out with new crafts and work my brain. This month, I chose string art. It was a challenge. The first board I bought wouldn’t hold any nails. I hammer them in, they fall out. Then the backing fell off. Disaster.
I decided to try again with a pine board.
First it was boring without any color. I decided staining would take to long so I just grabbed a tube of acrylic paint (paynes gray) and using a lot of water with a big brush, liberally applied it to the board.
Then it was the very tedious prep work. All the tutorials I read ahead of time didn’t warn me about this.
1st you put down your pattern.
I just used scotch tape to hold it down. It pulled my finish up a little, but the strings hid it.
Then you start nailing. I did put down a towel to protect my table.
And nailing,
And nailing.
I had to use tweezers to hold the nails as i could get them close enough otherwise. These were tiny finishing nails 1/2 inch long. Make sure your tweezers have a flat part to hold the nails. My other pair of tweezers didn’t have this and the nails kept slipping. However, my mom is still working on hers and she says needlenose pliers are the way to go.
Finally done with the prep. It took about two hours to hammer in all those nails.
The heart is off center for artistic reasons and to encompass the part of the state with my little town.
Using #10 white crochet thread, I started string.
This was the fun part. I would recommend counting the nails in your border and dividing that number by the ones in the heart so you know how many repeats per heart nail. It would probably give your finished piece more consistency. But …. it was finally the fun part so I eyeballed it.
Just keep stringing!
When I got all the way around, I tied off the thread. Glued it down with some epoxy 6000, and cut off the ends. While stringing, I found pushing the thread down close to the board kept my tension right.
Finished! I need to put a picture hanger on the back, but it’s all done.
Next month, I think I’m going to try cupcake flash drive keychains. It’s made from sculpey.
I added a few new hat colors inspired by Harry Potter Houses.
Reminder tomorrow is the last day to vote for Beebs, Clyde, Mango and Tango and Sparky and Frostina. Please help me out and vote.
But really you are probably here for the free pattern.
Polliwag was interesting. I learned how to make a 2 color spiral and a crochet I-cord.
Enjoy!
Materials
Worsted Weight Yarn
I love this yarn – Medium Blue
I love this yarn – Soft Pink
I love this yarn – White
I love this yarn – Black
Size E crochet hook
Polyfiberfill
Large Eye Needle
Abbreviations
SC – Single Crochet
HDC – Half Double Crochet
CH- Chain
FO – Fasten Off
SL ST – Slip Stitch
INC – Make two Single Crochet in Same Stitch
DEC – Single Crochet two stitches together
BLO – Back Loops Only
FLO – Front Loops Only
Note: Almost the entire project is worked in the round. Use a stitch marker or a scrap piece of yarn to mark the beginning of each row. Then you don’t have to count every row. Do not join unless instructed to.
Parentheses indicate a repeat. Repeat the stitches in the parentheses for the number of times indicated.
The bracketed number [] is the number of stitches at the end of each row.
I spread my increases out so there isn’t a seam on the finished piece. If you do not like this method, you can do regular increases.
See last page for alternative color options
If you have any questions, please feel free to email me at drunkenauntwendy@gmail.com.
BODY – in Medium Blue
CH 2
Round 1: 6 SC in 2nd CH from hook [6].
Round 2: INC in each stitch [12].
Round 3: (SC, INC) 6 times [18].
Round 4: (SC, INC, SC) 6 times [24].
Round 5: (3 SC, INC) 6 times [30].
Round 6: (2 SC, INC, 2 SC) 6 times [36].
Rounds 7-11: 5 rows SC [36 stitches per row].
Round 12: (5 SC, INC) 6 times [42].
Rounds 13-18: 6 rows SC [42 stitches per row].
Round 19: (3 SC, INC, 3 SC) 6 times [48].
Rounds 20-26: 7 rows SC [48 stitches per row].
Round 27: (6 SC, DEC) 6 times [42].
Round 28: (5 SC, DEC) 6 times [36].
Round 29: (4 SC, DEC) 6 times [30].
Round 30: (3 SC, DEC) 6 times [24].
Start stuffing
Round 31: (2 SC, DEC) 6 times [18].
Round 32: (SC, DEC) 6 times [12].
Round 33: DEC 6 times [6].
Fasten off thread tail through stitches from last round and pull up tight to close hole.
FEET (Make 2) in Medium Blue
Ch 4
Round 1: SC in 2nd Ch, SC in next 2 stitches. 3 SC in last stitch, working in the unused loops from the chain, SC 2, 3 SC in last chain. [12].