I ran a poll on Instagram asking what I should design next. The choice was overwhelmingly Sweet Treats. One of these days, I will get to make the Crocheted Cocktails.
Here’s your free pattern. Make sure to use #drunkenauntwendy if you post on Instagram.
Materials
Yarn in Tan, Pink, Red
Embroidery Floss in Black
Size E Crochet Hook
Poly fiberfill
Glue if you want
Large eye blunt needle
Abbreviations
Ch – Chain
SC – Single Crochet
INC – 2 Single Crochet in designated stitch
DEC – Single Crochet 2 stitches together
DC – Double Crochet
Gauge is not important for this project unless you have purchased a kit. Using the right size hook is important to ensure you have enough yarn.
Notes: Almost the entire project is worked in the round. Use a stitch marker or a scrap piece of yarn to mark the beginning of each row. Then you don’t have to count every row. Do not join unless instructed to.
Parentheses indicate a repeat. Repeat the stitches in the parentheses for the number of times indicated.
The bracketed number [] is the number of stitches at the end of each row.
I spread my increases out so there isn’t a seam on the finished piece. If you do not like this method, you can do regular increases.
If you have any questions, please feel free to email me at drunkenauntwendy@gmail.com.
CONE
In Tan, Ch 2
Round 1: 6 SC in 2nd Chain from hook [6].
Round 2: (INC, 2 SC) 2 times [8].
Round 3: (INC, 3 SC) 2 times [10].
Round 4: (INC, 4 SC) 2 times [12].
Round 5: (INC, 5 SC) 2 times [14].
Round 6: (INC, 6 SC) 2 times [16].
Round 7: (INC, 7 SC) 2 times [18].
Round 8: (INC, 8 SC) 2 times [20].
Round 9: (INC, 9 SC) 2 times [22].
Round 10: (INC, 10 SC) 2 times [24].
Round 11: (INC, 11 SC) 2 times [26].
Round 12: (INC, 12 SC) 2 times [28].
Round 13: (INC, 13 SC) 2 times [30].
Round 14: (INC, 14 SC) 2 times [32].
Round 15: (INC, 15 SC) 2 times [34].
Round 16: (INC, 16 SC) 2 times [36].
Fasten off. Leave a long tail for sewing.
Stuff and sew to Ice cream when it is done.
ICE CREAM
In Pink,
CH 2
Round 1: 6 SC in 2nd Chain from hook [6].
Round 2: INC in each stitch [12].
Round 3: (SC, INC) 6 times [18].
Round 4: (SC, INC, SC) 6 times [24].
Round 5: (3 SC, INC) 6 times [30].
Round 6: (2 SC, INC, 2 SC) 6 times [36].
Round 7: (5 SC, INC) 6 times [42].
Rounds 8-15: 8 rows SC [42 stitches in each row].
Round 16: (DEC, 5 SC) 6 times [36].
Round 17: (Sk stitch, 5 DC in next stitch, Sk Stitck, SC) around.
Fasten off and leave a long tail for sewing.
Using embroidery floss, embroider the face using the picture for reference. Double up to make the features show up better.
CHEEKS (Make 2)
In Red
Ch 2
Round 1: 4 SC in 2nd Ch from hook [4]. Slip stitch to join making a circle.
Round 2: INC in each stitch around, slip stitch to join [12].
Round 3: In FLOs (3 DC in 1st Stitch, Slip stitch in next stitch) 6 times, [6 DC, 6 Slip Stitch].
I’ve been making a bunch of Ms. Prickles for an upcoming craft fair. My son decided he needed to sketch a Cactus for me to make.
Mom – make me this.
I did as I was asked. Here’s Casey Cactum, another addition to my collection of Cacti.
As always, this pattern is not tested, if you find any errors, let me know.
Please use #drunkenauntwendy if you make him so I can find him.
Here’s your pattern:
Materials
Yarn in Tan, Lime Green, Sky Blue, Hot Pink
Embroidery Floss in Black
Size E Crochet Hook
2.5 inch Terra Cotta Pots
Poly fiberfill
Glue if you want
Large eye blunt needle
Abbreviations
Ch – Chain
SC – Single Crochet
INC – 2 Single Crochet in designated stitch
DEC – Single Crochet 2 stitches together
DC – Double Crochet
FLO – Front loops only
BLO – Back loops only
Gauge is not important for this project unless you have purchased a kit. Using the right size hook is important to ensure you have enough yarn.
Notes: Almost the entire project is worked in the round. Use a stitch marker or a scrap piece of yarn to mark the beginning of each row. Then you don’t have to count every row. Do not join unless instructed to.
Parentheses indicate a repeat. Repeat the stitches in the parentheses for the number of times indicated.
The bracketed number [] is the number of stitches at the end of each row.
I spread my increases out so there isn’t a seam on the finished piece. If you do not like this method, you can do regular increases.
If you have any questions, please feel free to email me at drunkenauntwendy@gmail.com.
BASE
In Tan, Ch 2
Round 1: 6 SC in 2nd Chain from hook [6].
Round 2: INC in each stitch [12].
Round 3: (SC, INC) 6 times [18].
Round 4: (SC, INC, SC) 6 times [24].
Round 5: (3 SC, INC) 6 times [30].
Round 6: (2 SC, INC, 2 SC) 6 times [36].
Round 7: SC row in BLOs [36].
Round 8: (DEC, 4 SC) 6 times [30]
Round 9: (DEC, 3 SC) 6 times [24].
Round 10: (DEC, 2 SC) 6 times [18].
Round 11: (DEC, SC) 6 times [12].
Stuff
Round 12: DEC 6 times in BLO.
Fasten off. Using a long tail sew up opening. Once you have sewn on the body stuff into the pot. You can glue it in if you want. I recommend gluing it in to keep it in place.
BODY
In LimeCH 2
Round 1: 6 SC in 2nd Chain from hook [6].
Round 2: INC in each stitch [12].
Round 3: (SC, INC) 6 times [18].
Round 4: (SC, INC, SC) 6 times [24].
Round 5: (3 SC, INC) 6 times [30].
Round 6: (2 SC, INC, 2 SC) 6 times [36].
Round 7: (5 SC, INC) 6 times [42].
Rounds 8-15: 8 rows SC [42 stitches in each row].
Round 16: (DEC, 5 SC) 6 times [36].
Round 17: (DEC, 4 SC) 6 times [30].
Round 18: (DEC, 3 SC) 6 times [24].
Fasten off and leave a long tail for sewing.
Using embroidery floss, embroider the face using the picture for reference. Double up to make the features show up better.
Using Hot Pink,
Embroider Cheeks using straight stitches.
Thread tail through the last year to close up the bottom a little.
Stuff firmly. Sew to Base.
FLOWER
In Sky Blue
Ch 2
Round 1: 6 SC in 2nd Ch from hook [6].
Round 2: INC in each stitch around, slip stitch to join [12].
Round 3: In FLOs (3 DC in 1st Stitch, Slip stitch in next stitch) 6 times, [6 DC, 6 Slip Stitch].
I had this odd idea to add horns to headbands. We are going to a Anime Comic Con this summer, so really I was thinking of an easy cosplay for myself.
So far I have come up with 4 different types. I haven’t got my daughter to pose with all the headbands.
Here’s me in my first set, before I finished them.
Here’s the first one finished. They were immediately annexed by my teenager.
Here’s your free pattern for the last set of horns. Enjoy. The others will be up eventually. Please use #drunkenauntwendy if you make them and post on Instagram.
Materials
Worsted Weight Yarn
I love this yarn – Pink
I love this yarn – Neon Blue
Black Plastic Headband
Size E crochet hook
Polyfiberfill
Large Eye Needle
Abbreviations
SC – Single Crochet
CH- Chain
FO – Fasten Off
SL ST – Slip Stitch
INC – Make two Single Crochet in Same Stitch
DEC – Single Crochet two stitches together
BLO – Back Loops Only
Note: Entire project is worked in the round. Use a stitch marker or a scrap piece of yarn to mark the beginning of each row. Then you don’t have to count every row. Do not join unless instructed to.
Parentheses indicate a repeat. Repeat the stitches in the parentheses for the number of times indicated.
The bracketed number [] is the number of stitches at the end of each row.
I spread my increases out so there isn’t a seam on the finished piece. If you do not like this method, you can do regular increases.
If you have any questions, please feel free to email me at drunkenauntwendy@gmail.com.
HORNS (Make 2)
Ch 2, in Neon Blue
Round 1: 4 SC in 2nd Ch from hook [4].
Round 2: INC in 1st Stitch, 3 SC [5].
Round 3: INC, 4 SC [6].
Round 4: INC, 5 SC [7].
Round 5: INC, 6 SC [8].
Round 6: INC, 7 SC [9].
Round 7: INC, 8 SC [10].
Round 8: Add pink, alternate SC in pink and blue for the row [10]. Drop Blue at the end.
Round 9: INC, 9 SC [11].
Round 10: INC, 10 SC [12].
Round 11: INC, 11 SC [13].
Round 12: INC, 12 SC [14].
Round 13: INC, 13 SC [15].
Round 14: INC, 14 SC [16].
Round 15: In BLOS, DEC 8 times [8].
Fasten off leaving a long tail for sewing.
Thread tail through the last row and pull up tight to close. Using the tail, attach the horns to the headband with the horns pointing backwards. Use several straight stitches to secure the horns.
I love making cork ornaments. I’ve been trying to expand and come up with new ideas. I promise, I did not drink all these bottles of Champagne by myself.
4-H is upon us here in Ohio. The kids take rabbits. We will be getting their 4-H rabbits soon. In honor of the rabbits, here are some super cute rabbit Cork Ornaments.
Materials
Worsted Weight Yarn
I love this yarn – Pink
I love this yarn – White
Champagne Cork
Screw eyes
Ribbon
Black Sharpie
Pink Sharpie
1 inch pompom maker or a fork
Epoxy 6000
Gauge: is not important for this project
Abbreviations
SC – Single Crochet
CH- Chain
FO – Fasten Off
SL ST – Slip Stitch
INC – Make two Single Crochet in Same Stitch
DEC – Single Crochet two stitches together
BLOs – Back Loops Only
FLOs – Front loops only
Note: Hats are worked in the round. Use a stitch marker or a scrap piece of yarn to mark the beginning of each row. Then you don’t have to count every row. Do not join unless instructed to.
Parentheses indicate a repeat. Repeat the stitches in the parentheses for the number of times indicated.
The bracketed number [] is the number of stitches at the end of each row.
I spread my increases out so there isn’t a seam on the finished piece. If you do not like this method, you can do regular increases.
If you have any questions, please feel free to email me at drunkenauntwendy@gmail.com.
TAIL
Wrap a 1” pompom maker with white yarn to make a full pompom. Glue to the back of cork.
HAT
In Pink
Ch 2
Round 1: 6 SC in 2nd Ch from hook [6]
Round 2: (INC) 6 times [12].
Round 3: (INC, SC) 6 times [18].
Rounds 4-6: 3 rows SC [18 stitch per row].
Fasten off.
EARS (make 2)
In Pink, Chain 8
Slip Stitch in 2nd Chain from hook, SL, 4 SC, 3 HDC in last stitch, working in the unused stitches from the first stitches, 4 SC, 2 SL. Fasten off. Leave a long tail for sewing. Attach to hat.
Attach screw eye to top of cork.
Cut 6 inch section of ribbon. Thread ribbon through the screw eye and tie to hold it in place. Place the hat over the cork, pulling the ribbon through the hat. Here you can glue the hat in place to keep it from slipping.
Using the Pink Sharpie draw a small triangle for the nose.
Using the Black Sharpie draw two circles for eyes and a small mouth.
This quarter I have taken up beading. It was really hard to start. Having the proper tools definitely makes it easier. I highly recommend using the right tools and amazon in order to make progress. Uploading images is proving difficult today. Make sure you check out what I have been up to on Instagram.
Meet Betty the Yeti. I created her for a contest. I didn’t win, but I adore her.
This caused me to start making all sorts of mythical/urban legend creatures. Make sure you check out Chtulu and Mothman.
She is made with Bernat Blanket Yarn which is what gives it the super soft snuggliness.
I’ve created a video tutorial for this pattern. You can follow along. For a written pattern
I’m still beading and working on the new ami-along from amigurumipatterns.net. It is a princess and her elf friend. I will post pictures when I’m done. It is nowhere near as large as last month’s 2 foot tall pirate bear.
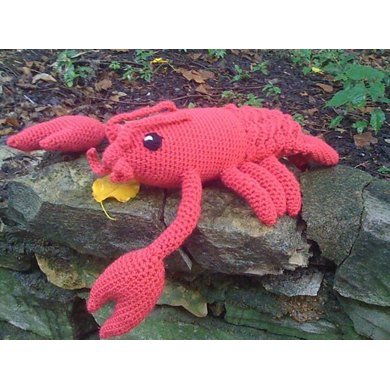
Lucy is next in the Cuddly Aquarium Collection. She’s in the testing process now. Let me know if I should do a video of how to do the claws. The other members of the Cuddly Aquarium include Louie the Shrimp and Gus the Baby Platypus. If you are a member of my mailing list you have access to even more from my Cuddly Aquarium series.
Lucy is a sassy lobster. She doesn’t appreciate being called a bottom feeder and she absolutely loved SNLs Diner Lobster sketch this week. Make her in any color. I think, blue, green or purple would be fun. Make sure to #drunkenauntwendy if you post a picture of your completed Lucy.
Materials
Size D Crochet Hook
Vanna’s Choice Baby Cheery Cherry (two skeins)
Scraps of white and black
Tips
Use a piece of yarn in a contrasting color to mark the beginning of every row.
Abbreviations
SC – Single Crochet
DC – Double Crochet
INC – 2 single Crochet in the same stitch DEC – Single crochet two stitches together SLST – Slip Stitch
BLO – back loops only
BODY
1. SC 6 in magic ring
2. INC in each stitch
3. SC Row
4. (SC 1, INC) 6 times
5. SC row
6. (SC 2, INC) 6 times
7. SC Row
8. (SC 3, INC) 6 times
9. SC ROW
10. (SC 4, INC) 6 times
11. SC Row
12. (SC 5, INC) 6 times
13. (SC 6, INC) 6 times
14-31 SC each Row
32. (SC5, DEC) 6 times
33. SC Row
34. (SC 4, DEC) 6 times
35. SC Row
36. SC Row BLO
37-39 3 rows SC
40. SC Row BLO
41-43 SC Row
44-59 Repeat Rows 40-43 four times
Stuff
SC opening together
PLATING ON TAIL
On main body using the unworked loops, join yarn at the approximate halfway point. SC, *Skip 1, DC 5 in next stitch, Skip 1, SC* Repeat 3 more times. NOTE does not go all the way around.
Repeat for every row of unworked loops. Sew in ends.
TAIL (make 3)
1. 4 SC in magic ring
2. INC in each stitch
3-4. SC Rows
5. (INC, SC 3) twice
6-7. SC Rows
8. (INC, SC 4) twice
9-10. SC Rows
11. (INC, SC 5) twice
12-13. SC Rows
14. (INC, SC 6) twice
15-16 SC Rows
Join with SL ST, Fasten Off.
Sew overlapping to bottom of lobster tail. LEGS – (make 6)
1. 4sc in magic ring
2. inc in each stitch around
3. single crochet through BLO
4-7 SC
8 2 dec, sc, 2 inc, sc
9 SC row
10-13 repeat 8 and 9, twice
14-15 SC rows
Fasten off and join to side of body three on each side as in the picture. CLAW – (make 2)
Claw is initially made in two parts and then single crocheted together before you finish the base
Large part of claw.
1. 2sc into magic ring
2. inc in each stitch (4)-
3. inc, 3sc (5)
4. inc, 4sc (6)
5. inc, 5sc (7)
6. inc, 6sc (8)
7. inc, 7sc (9)
8. inc, 8 sc (10)
9. inc, 9 sc (11)
10. inc, 10 sc (12)
11. inc, 11 sc (13)
12. inc, 12 sc (14)
13. inc, 13 sc (15)
14. inc, 14 sc (16)
15. inc, 15 sc (17)
fasten off
small part of claw
1. 2sc into magic ring
2. inc in each stitch (4)-
3. inc, 3sc (5)
4. inc, 4sc (6)
5. inc, 5sc (7)
6. inc, 6sc (8)
7. inc, 7sc (9)
8. inc, 8 sc (10)
9. inc, 9 sc (11)
do not fasten off.
Base
1. Single crochet join with one stitch to side of big claw, continue sc row around claw to other side, single crochet join on far side (should be a two stitch gap) finish the row in single crochet (27 stitches)
2. SC Row, sew gap between two parts of claw together, start stuffing
3-7. SC Rows
4. *3sc, dec* around, sc remaining stitches (should be 3)
5. SC row
6. *2sc, dec* around sc remaining stitches
7. SC row
8. *1sc, dec* around, sc remaining stitches
9. SC row
10. dec around
fasten off, stuff and sew up opening.
ARMS (make two – these connect the claws to the body.
1. 4 sc
2. INC each stitch around
3-10. SC Rows
11. (DEC) twice, SC, (INC) twice SC
12-13. SC Rows
14. (DEC) twice, SC, (INC) twice SC
15-16. SC Rows
17. (DEC) twice, SC, (INC) twice SC
18-19. SC Rows
Joins with still stitch, Fasten off. Stuff. Sew closed part to claws. Sew open part to sides of body
SMALL ANTENNAE (make 2) Chain 11, Turn SC 10
Sew to the front of the face sticking forward like feelers.
LARGE ANTENNAE (Make 2) Chain 21, Turn, SC 20
Sew above small antennae aiming towards the rear of the lobster. Then tack down the other end leaving space to sew the eyes under.
EYES (Make 2)
SC 6 in magic ring, pull tight and join with a SL ST.
Embroider a fleck of white on the eye and sew to the top of the head under and slightly outside the large antennae.
For tested patterns, completed plush and kits, feel free to visit my Esty Shop.
I took a week off to take the kids on Vacation for Spring Break. Then I was behind when it comes to typing patterns.
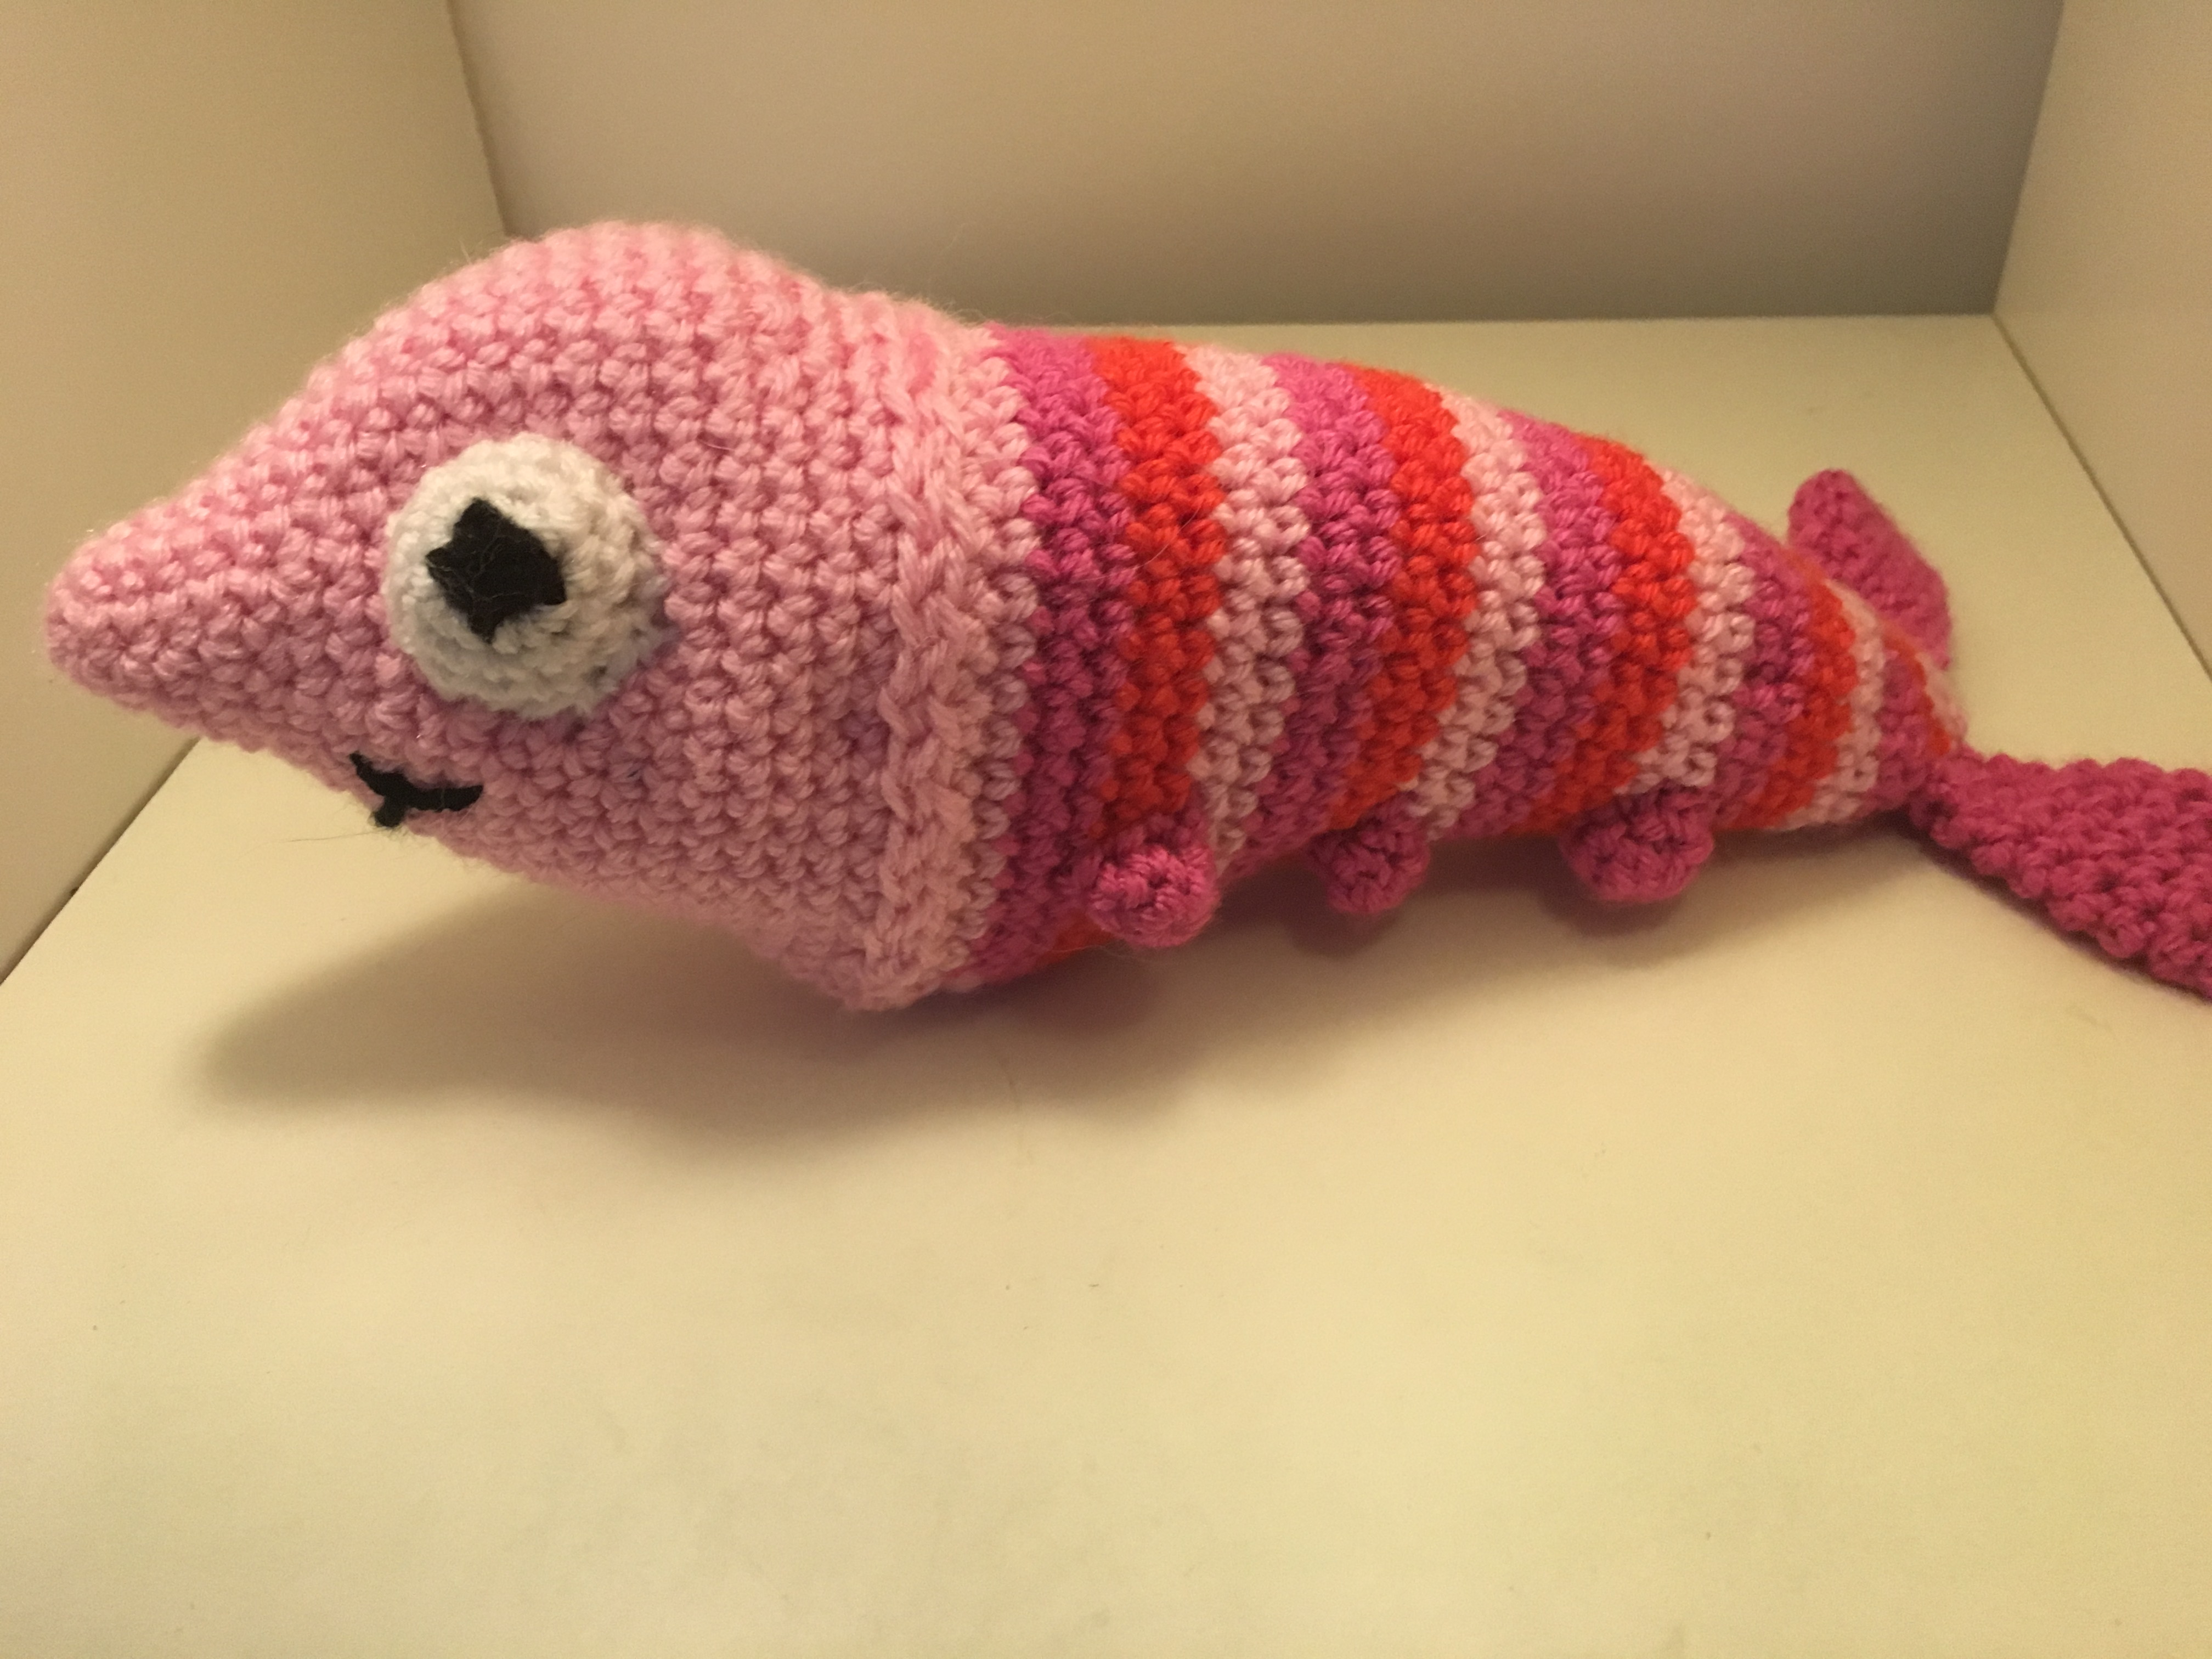
This is a new addition to my Cuddly Aquarium collection. I love when I get requests to make creatures I had never thought of. Follow me on Instagram @drunkenauntwendy for what I am currently working on.
Louie isn’t tested. Let me know if you have issues.
Reminder my mailing list is how you get exclusive content so sign up to make sure you never miss a pattern.
Materials
Worsted Weight Yarn
I love this yarn – Pink
I love this yarn – Orange
I love this yarn – Hot Pink
I love this yarn – Black
I love this yarn – White
Size E crochet hook
Polyfiberfill
Large Eye Needle
Abbreviations
SC – Single Crochet
HDC – Half Double Crochet
CH- Chain
FO – Fasten Off
SL ST – Slip Stitch
INC – Make two Single Crochet in Same Stitch
DEC – Single Crochet two stitches together
BLO – Back Loops Only
FLO – Front Loops Only
Note: Almost the entire project is worked in the round. Use a stitch marker or a scrap piece of yarn to mark the beginning of each row. Then you don’t have to count every row. Do not join unless instructed to.
Parentheses indicate a repeat. Repeat the stitches in the parentheses for the number of times indicated.
The bracketed number [] is the number of stitches at the end of each row.
I spread my increases out so there isn’t a seam on the finished piece. If you do not like this method, you can do regular increases.
If you have any questions, please feel free to email me at drunkenauntwendy@gmail.com.
EYES (make 2)
In Black, Ch 2
Round 1: 4 SC in 2nd CH from hook, change color to white [4].
Round 2: INC in each stitch [8].
Round 3: (INC, SC) 4 times [12].
Round 4: SC row [12].
Lightly stuff
Fasten off, leave a long tail for sewing. Set aside to attach to the head.
HEAD
In pink, CH 2
Round 1: 6 SC in 2nd CH from hook [6].
Round 2: (2 SC, INC) 2 times [8].
Round 3: (3 SC, INC) 2 times [10].
Round 4: (4 SC, INC) 2 times [12].
Round 5: SC row [12].
Round 6: (SC, INC) 6 times [18].
Round 7: SC row [18].
Round 8: (SC, INC, SC) 6 times [24].
Round 9: SC Row [24].
Round 10: (3 SC, INC) 6 times [30].
Rounds 11-12: 2 rows SC [30 stitches per row]
Round 13: (2 SC, INC, 2 SC) 6 times [36].
Round 14: (5 SC, INC) 6 times [42]
Rounds 15-17: SC in each stitch for 4 rows [42 stitches per row]
Round 18: 7 SC, 7 INC, 11 SC, 7 DEC, 3 SC. [42]
Rounds 19-21: SC in each stitch for 3 rows [42 stitches per row].
Round 22: (5 SC, DEC) 6 times [36].
Fasten off leave a long tail for sewing.
Stuff. Place where you would like to put the eyes and run a thread from one side to the other and pull up tight to create divots for the eyes.
Sew the eyes on and embroider a mouth in black.
BODY
Note: Body is worked 2 rows of each color in the following order. Hot Pink, Pink and Orange.
Starting with Hot Pink, Ch 2
Round 1: 6 SC in 2nd Chain from hook [6].
Round 2: INC in each stitch [12]. Change color to Pink.
Round 3: INC, 11 SC [13].
Round 4: INC, 12 SC [14]. Change color to Orange.
Round 5: INC, 13 SC [15].
Round 6: INC, 14 SC [16]. Change color to Hot Pink
Round 7: INC, 15 SC [17].
Round 8: INC, 16 SC [18]. Change color to Pink
Round 9: INC, 17 SC [19].
Round 10: INC, 18 SC [20]. Change color to Orange
Round 11: INC, 19 SC [21].
Round 12: INC, 20 SC [22]. Change color to Hot Pink
Round 13: INC, 21 SC [23].
Round 14: INC, 22 SC [24]. Change color to Pink
Round 15: INC, 23 SC [25].
Round 16: INC, 24 SC [26]. Change color to Orange
Round 17: INC, 25 SC [27].
Round 18: INC, 26 SC [28]. Change color to Hot Pink
Round 19: INC, 27 SC [29].
Round 20: INC, 28 SC [30]. Change color to Pink
Round 21: INC, 29 SC [31].
Round 22: INC, 30 SC [32]. Change color to Orange
Round 23: INC, 31 SC [33].
Round 24: INC, 32 SC [34]. Change color to Hot Pink
Round 24: INC, 33 SC [35].
Round 25: INC, 34 SC [36]. Change color to Pink
Rounds 26-27: 2 row SC [36 stitches per row]
Fasten off. Stuff and sew to head.
FEET (Make 6)
In Hot pink, Ch 2
Round 1: 6 SC in 2nd chain from hook [6].
Round 2: SC row [6].
Fasten off and sew evenly spaced to the sides of the body.
TAIL (make 2)
In Hot Pink, Ch 2
Round 1: 6 SC in 2nd chain from hook [6].
Round 2: INC in each stitch [12].
Round 3: SC row [12].
Round 4: (DEC, 4 SC) 2 times [10].
Round 5: SC row [10].
Round 6: (DEC, 3 SC) 2 times [8].
Round 7: SC row [8].
Round 8: (DEC, 2 SC) 2 times [6].
Round 9: SC row [6].
Fasten off and flatten. Sew to the bottom of the body.
I hope you have been following along with me on Instagram as I continue with my Princess Bride obsession.
As you wish
Inconceivable
I’ve been working on this fabulous wool scarf on my loom. I love how it turned out.
Warping the Plaid
Beginning the plaid
All done!
I am also participating in a crochet along. Meet Jose.
He’s a giant pirate bear. Right now, he’s 20 inches tall. I’ve run out of stuffing and already have had to go purchase more yarn. This thing is huge.
Free Pattern
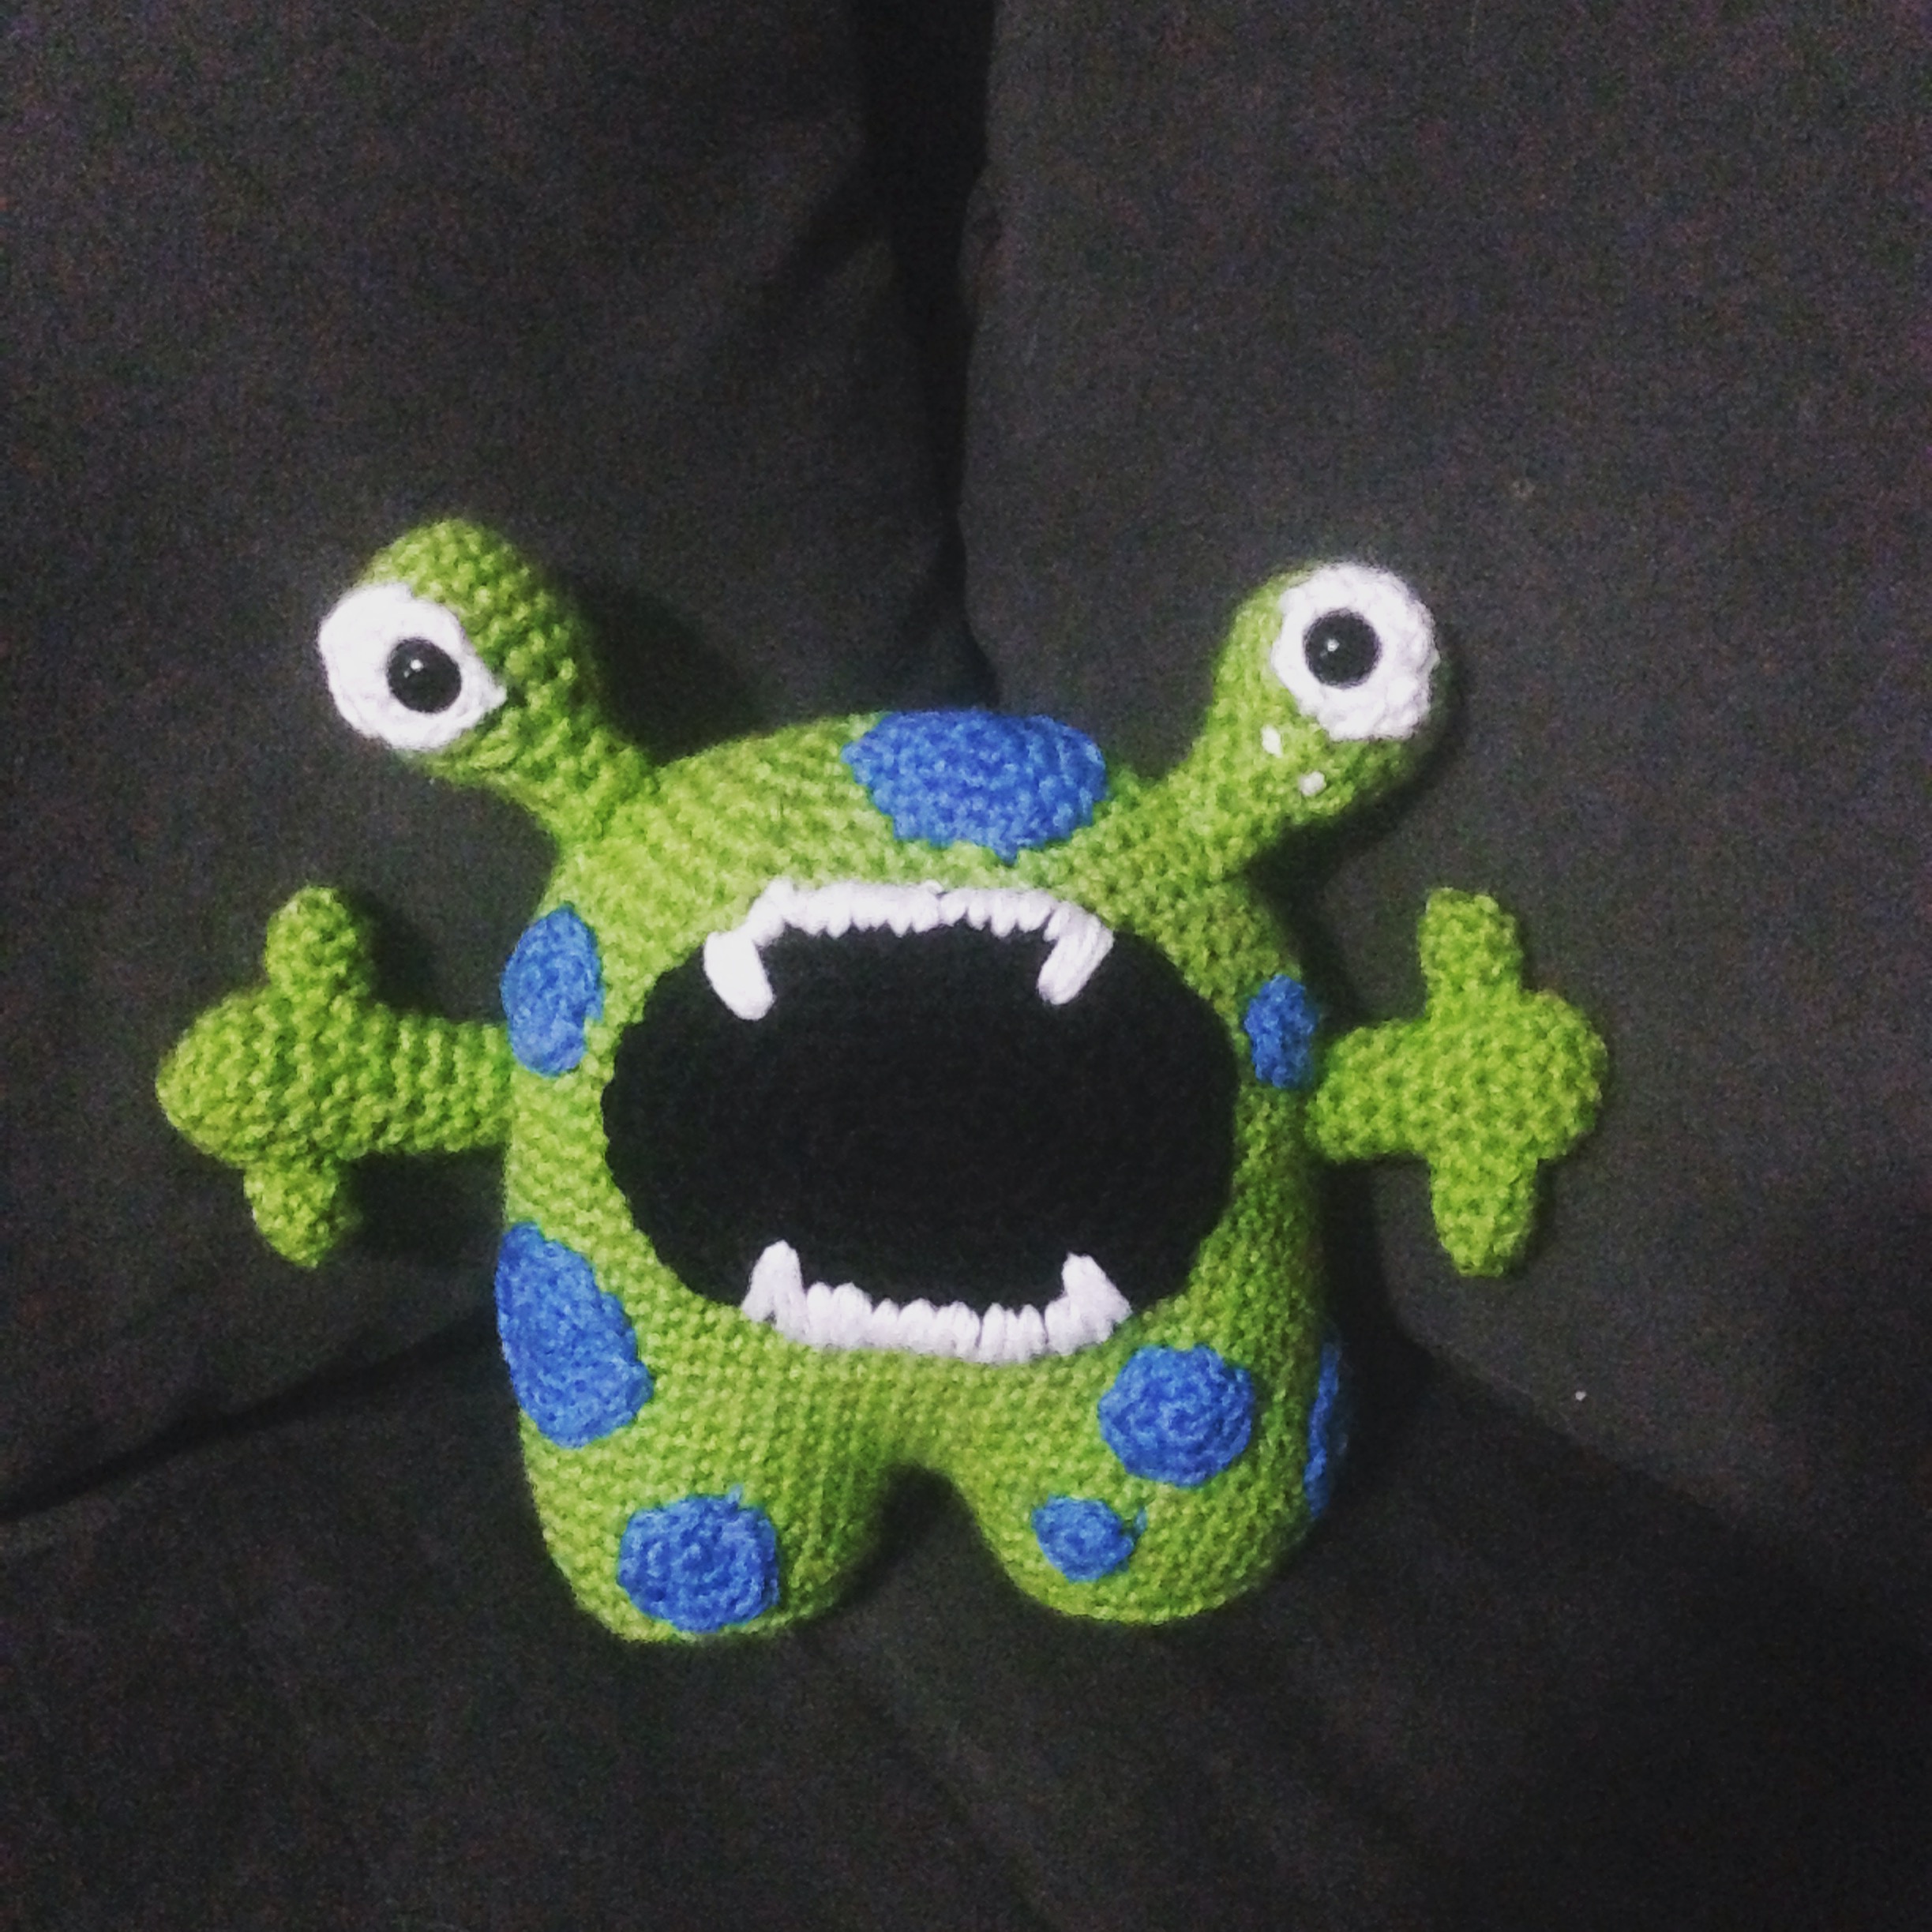
Awhile back I made a super cute monster that just wants a hug.
This is Clyde.
Make sure to use #drunkenauntwendy if you post on Instagram.
Materials
Worsted Weight Yarn
I love this yarn – Limelight
I love this yarn – Blue Neon
I love this yarn – Tropical Pink
Sport Weight Yarn
I love this cotton – White
I love this cotton – Black
12 MM Safety Eyes
Size E crochet hook
Polyfiberfill
Large Eye Needle
Abbreviations
SC – Single Crochet
CH- Chain
FO – Fasten Off
SL ST – Slip Stitch
INC – Make two Single Crochet in Same Stitch
DEC – Single Crochet two stitches together
BLO – Back Loops Only
Note: Entire project is worked in the round. Use a stitch marker or a scrap piece of yarn to mark the beginning of each row. Then you don’t have to count every row. Do not join unless instructed to.
Parentheses indicate a repeat. Repeat the stitches in the parentheses for the number of times indicated.
The bracketed number [] is the number of stitches at the end of each row.
I spread my increases out so there isn’t a seam on the finished piece. If you do not like this method, you can do regular increases.
If you have any questions, please feel free to email me at drunkenauntwendy@gmail.com.
BODY – in Limelight
The body is made by crocheting the legs first and then crocheting them to create the rest of the body.
(Leg 1)
CH 2
Round 1: 6 SC in 2nd CH from hook.
Round 2: (INC) 6 times [12].
Round 3: (SC, INC) 6 times [18].
Round 4: (SC, INC, SC) 6 times [24].
Round 5: (3 SC, INC) 6 times [30].
Round 6: In BLO, SC Row [30].
Rounds 7 – 9: SC in each stitch around for 3 rows [30 stitches per row].
Fasten off leg 1.
(Leg 2)
Repeat leg 1. Do not fasten off. Go straight to Round 10.
Round 10: Single crochet around Leg 2 and then around Leg 1 (60 stitches). Note: This combines the two legs together and sets up the body. You may need to sew up the space between the two legs.
Rounds 11 – 28: SC in each stitch for 18 rows [60 stitches per row].
Round 29: (DEC, 8 SC) 6 times [54].
Round 30: SC Row [54].
Round 31: (DEC, 7 SC) 6 times [48].
Round 32: SC row [48].
Round 33: (DEC, 6 SC) 6 times [42].
Round 34: (DEC, 5 SC) 6 times [36]. Start stuffing. Make sure you stuff firmly enough to hold the shape, but not too firmly that you stretch your stitches
Round 35: (DEC, 4 SC) 6 times [30].
Round 36: (DEC, 3 SC) 6 times [24].
Round 37: (DEC, 2 SC) 6 times [18].
Round 38: (DEC, 1 SC) 6 times [12].
Round 39: (DEC) 6 times [6]
FO leaving a long tail. Thread tail through last 6 stitches and pull up tight to close hole.
EYES – Make 2
Note: Eyes are made in two separate pieces. Whites and then the bases.
In White, CH 2
Round 1: 6 SC in 2nd Chain from hook,.
Round 2: (INC) 6 times [12].
Fasten off.
In Limelight
Round 1: 6 SC in 2nd Chain from hook,.
Round 2: (INC) 6 times [12].
Round 3: (INC, 1 SC) 6 times [18].
Rounds 4 – 7: SC in each stitch for 4 rows. [18 stitches per row].
Round 8: (DEC, 1 SC) 6 times [12].
Place the white on the base and insert the plastic eye. The eye shouldn’t be placed in the dead center but slightly offset. Make sure they are in the right place for each eye. Stuff eye and continue stuffing.
Round 9: (DEC) 6 times [6].
Rounds 10-12: SC in each stitch for 3 rows. [6 stitches per row].
Stuff the stem well.
FO leaving a long tail. Sew whites of the eyes down first. Use tail to sew to body along the top of head.
ARMS – Make 2
Central piece
In Limelight, Ch 2
Round 1: 6 SC in 2nd CH from hook
Round 2: (INC) 6 times [12].
Round 3-6: SC in each stitch for 4 rows. [12 stitches per row].
Round 7: (SC, DEC) 4 times, [8]
Round 8-11: SC in each stitch for 4 rows. [8 stitches per row].
Fasten off, leave a long tail
Fingers – make 2 per arm
In Limelight, Ch 2
Round 1: 6 SC in 2nd CH from hook
Round 2-3: SC in each stitch for 2 rows. [6 stitches per row].
Round 4: 2 stitches SC (this is not a complete row.
FO leaving a long tail. Stuff and sew to the central piece. Sew arm to the body below the first row of increases.
MOUTH
Ovals are worked in the round. Just note that the first row is worked on both sides of the starting chain. See pictures for help.
In Black, Ch 5
Round 1: SC in 2nd Ch, SC in next 2 stitches. 3 SC in last stitch. Working in the unused loops from the chain, SC3, 3 SC in last chain. [12]
Round 2: [3 SC, (INC) 3 times] repeat bracket one more time [18].
Round 3: [3 SC, (SC, INC) 3 times] repeat bracket one more time [24].
Round 4: [3 SC, (SC, INC, SC) 3 times] repeat bracket one more time [30].
Round 5: [3 SC, (3 SC, INC) 3 times] repeat bracket one more time [36].
Round 6: [3 SC, (2 SC, INC, 2 SC) 3 times] repeat bracket one more time [42].
Round 7: [3 SC, (5 SC, INC) 3 times] repeat bracket one more time [48].
Fasten off and sew to the body.
Using white doubled over; embroider teeth on the mouth making longer teeth in the corners and short teeth between them.
LARGE SPOTS –Make 5
In Blue Neon
CH 2
Round 1: 6 SC in 2nd CH from hook.
Round 2: (INC) 6 times [12].
Round 3: (SC, INC) 6 times [18].
Fasten off and sew to the body
MEDIUM SPOTS – Make 5
In Blue Neon
CH 2
Round 1: 6 SC in 2nd CH from hook.
Round 2: (INC) 6 times [12].
Fasten off and sew to the body
SMALL SPOTS – Make 5
In Blue Neon
CH 2
Round 1: 6 SC in 2nd CH from hook
Fasten off and sew to the body

 I ran a poll on Instagram asking what I should design next. The choice was overwhelmingly Sweet Treats. One of these days, I will get to make the Crocheted Cocktails.


 .
.