Magby – Free Crochet Pattern

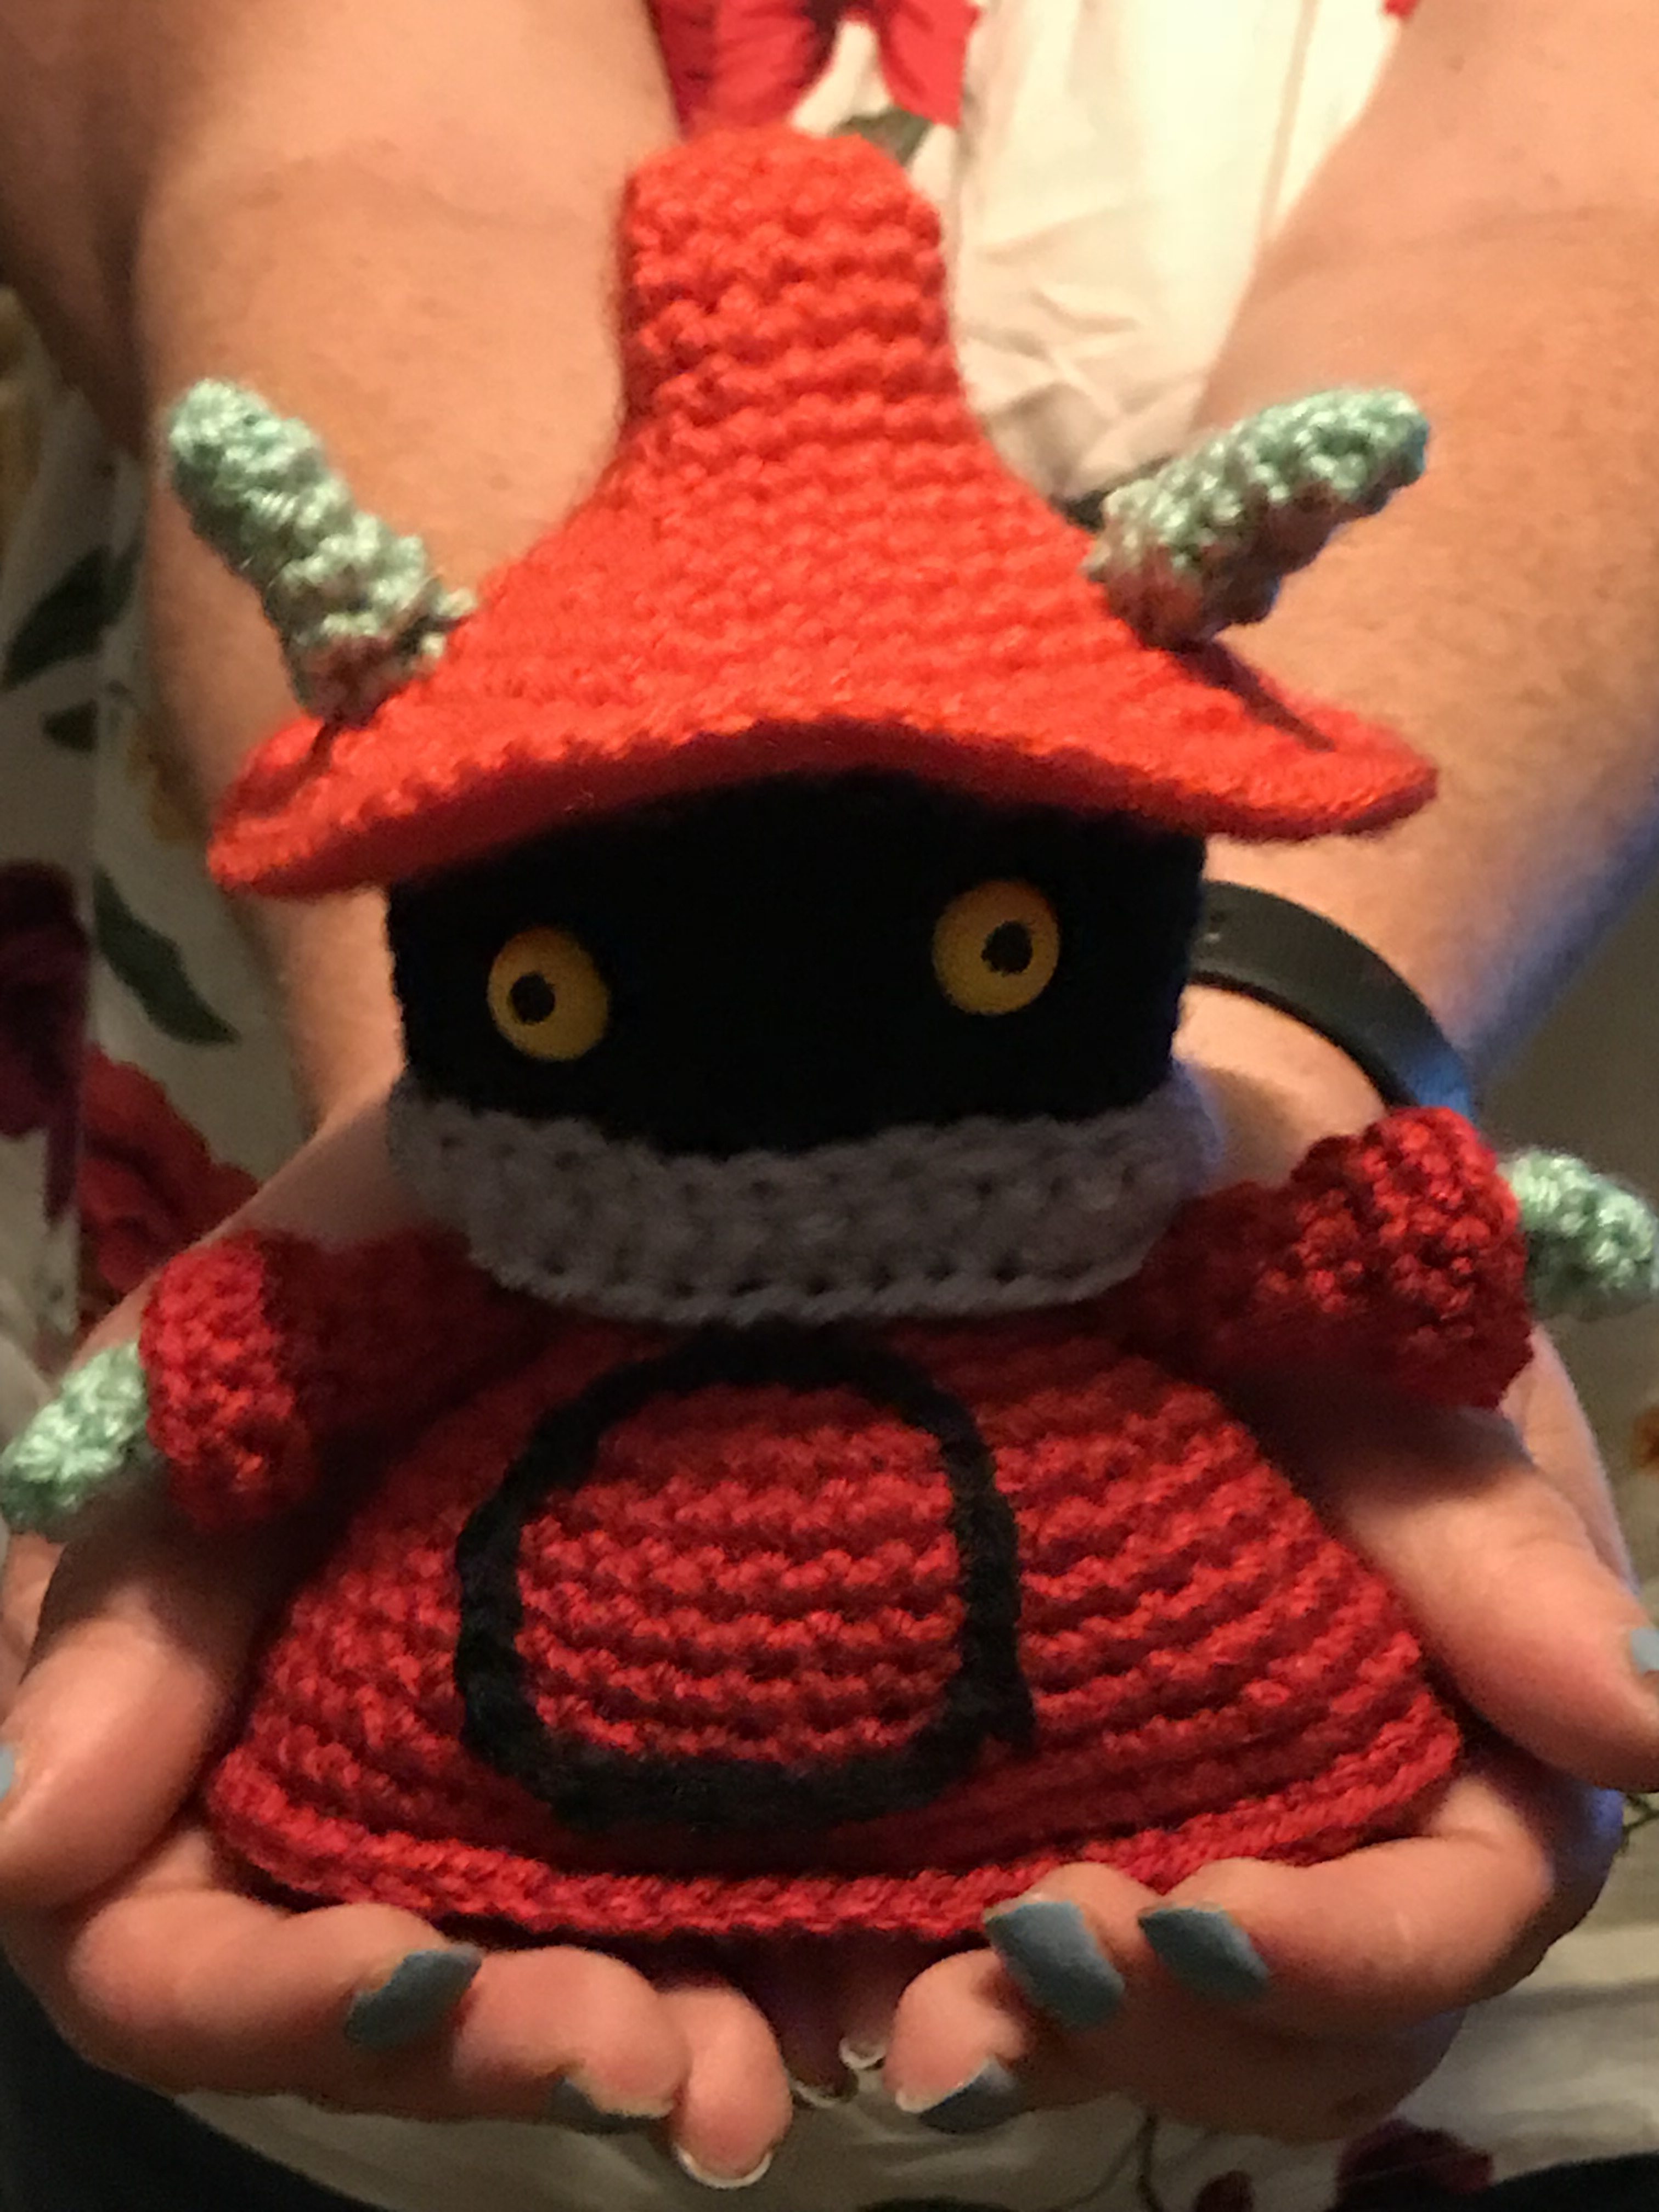
If you follow me on Instagram, or here, you may have seen my weird obsession with Pokemon and by bizarre desire to Crochet them all. Well the newest one that has been finally typed is Magby.

I have so many patterns to type and so many patterns to video. I have a lot of work set up for me. But for now, enjoy this free pattern of Magby. As always, when the patterns are free, they aren’t tested. If you have problems, let me know, but please be nice about it. Use the #drunkenauntwendy or tag me if you post your work. I would love to see it.

Feel free to check out my shop or my video tutorials for more patterns.

MAGBY

© DrunkenAuntWendyDesigns

Materials

Worsted Weight Yarn

Red (165 yds)

Yellow (10 yds)

Black (3 yds)

White (1 yd)

12 MM eyes

Size E crochet hook

Polyfiberfill

Large Eye Needle

Abbreviations

SC – Single Crochet

HDC – Half Double Crochet

CH- Chain

FO – Fasten Off

INC – Make two Single Crochet in Same Stitch

DEC – Single Crochet two stitches together

BLO – Back Loops Only

Note: Almost the entire project is worked in the round. Use a stitch marker or a scrap piece of yarn to mark the beginning of each row. Then you don’t have to count every row. Do not join unless instructed to.

Parentheses indicate a repeat. Repeat the stitches in the parentheses for the number of times indicated.

The bracketed number [] is the number of stitches at the end of each row.

I spread my increases out so there isn’t a seam on the finished piece. If you do not like this method, you can do regular increases.

If you have any questions, please feel free to email me at drunkenauntwendy@gmail.com.

BODY and HEAD

In Red

CH 2

Round 1: 6 SC in 2nd CH from hook [6].

Round 2: INC in each stitch [12].

Round 3: (INC, SC) 6 times [18].

Round 4: (SC, INC, SC) 6 times [24].

Round 5: (INC, 3 SC) 6 times [30].

Round 6: (2 SC, INC, 2 SC) 6 times [36].

Round 7: (INC, 5 SC) 6 times [42].

Round 8: (3 SC, INC, 3 SC) 6 times [48].

Rounds 9-16: 8 rows SC [48 stitches per row].

Round 17: (DEC, 6 SC) 6 times [42].

Rounds 18-19: 2 Rows SC [42 stitches per row]

Round 20: (DEC, 5 SC) 6 times [36].

Rounds 21-22: 2 rows SC [36 stitches per row].

Round 23: (DEC, 4 SC) 6 times [30]

Round 24: SC row [30].

Round 25: (DEC, 3 SC) 6 times [24].

Round 26: SC row, Change to Black in last stitch [24].

Round 27: (DEC, 2 SC) 6 times [18].

Start stuffing

Round 28: SC row, Change color to Red [18].

Round 29: SC row [18].

Round 30: (2 SC, INC) 6 times [24].

Rounds 31-32: 2 rows SC, [24 stitches per row].

Round 33: (3 SC, INC) 6 times [30].

Round 34: (2 SC, INC, 2 SC) 6 times [36].

Rounds 35-41: 7 rows SC [36 stitches per row].

If using Safety eyes place them now.

Approximately 3-4 rows down from Round 41, 6 stitches in between.

Round 42: In BLOs, (4 SC, DEC) 6 times [30].

Round 43: (3 SC, DEC) 6 times [24].

Round 44: (2 SC, DEC) 6 times [18].

Round 45: (SC, DEC) 6 times [12].

Round 46: DEC 6 times [6].

FO, Thread yarn through last round and pull up tight to close hole.

HAIR/TOP OF HEAD Make 6

In Red, ch 2

Round 1: 6 SC in 2nd CH from hook [6].

Round 2: INC in each stitch [12].

Round 3: (INC, SC) 6 times [18].

Round 4: (SC, INC, SC) 6 times [24].

Rounds 5-7: 3 rows SC [24 stitches per row].

Start stuffing

Round 8: (2 SC, DEC) 6 times [18].

Round 9: (SC, DEC) 6 times [12].

FO. Leave the last row slightly open. Sew to the Flat part of the head.

BEAK

In Yellow, Ch 2

Round 1: 6 SC in 2nd CH from hook [6].

Round 2: in BLOS, SC row [6].

Round 3: (INC, 2 SC) 2 times [8].

Round 4: SC row [8].

Round 5: (INC, 3 SC) 2 times [10].

FO. Sew to the face below the eyes.

BELLY PATCH

In Yellow, Ch 2

Round 1: 6 SC in 2nd CH from hook [6].

Round 2: INC in each stitch [12].

Round 3: (INC, SC) 6 times [18].

Round 4: (SC, INC, SC) 6 times [24].

Round 5: (INC, 3 SC) 6 times, Slip stitch to next stitch. [30].

Rest is worked back and forth.

Row 6: Turn, 3 SC, Slip stitch into next stich from Round 5. [3]

Row 7: Turn, SC, DEC. [2]

Row 8: Turn, Ch 3. Into 2nd ch from hook, Slip Stitch, SC in next stitch on CH, into Round 5, DEC. [3].

FO, Leave a very long tail for sewing. Sew to the stomach of the body with the point facing up.

TAIL

In Red, Ch  2

Round 1: 4 SC in 2nd Ch from hook [4].

Round 2: SC row [4].

Round 3: (INC, SC) 2 times [6].

Round 4: SC row [6].

Round 5: (INC, 2 SC) 2 times [8].

Round 6: SC row [8].

Round 7: (INC, 3 SC) 2 times [10].

Round 8:  SC row [10].

Round 9: (INC, 4 SC) 2 times [12].

Round 10: SC Row [12].

FO. Sew to the back of the body.

ARMS make 2

In Red, Ch 2

Round 1: 6 SC in 2nd CH from hook [6].

Round 2: (INC, 2 SC) 2 times [8].

Rounds 3-10: 8 rows SC [8 rows SC].

FO. Do Not stuff. Sew to the side of the body under the black row.

Using White Embroider claws to the end of each arm.

FEET make 2

Feet are created using an oval increase. The increases are on each side.

In Red, Ch 8

Round 1: SC in 2nd Ch from Hook, 5 SC, 3SC in last CH, Using the unused loops from the first 6 crochet, SC 6, 3 SC in starting curve [18].

Round 2: { 6 SC, 3 INC} 2 times [24].

Round 3: {6 SC, (SC, INC) 3 times} 2 times [30].

Round 4: In BLOs, SC row [30].

Rounds 5-7:  3 rows SC [30 stitches per row].

Round 8: 6 SC, (SC, DEC) 3 times, 15 SC [27].

Round 9: 6 SC, 3 DEC, 15 SC [24].

Round 10: (2 SC, DEC) 6 times [18].

Round 11: (SC, DEC) 6 times [12].

Stuff foot

Round 12: (SC, DEC) 4 times [8].

Rounds 13-16: 4 rows SC [8 stitches per row].

FO. Don’t stuff legs. Sew to the bottom of the body.

Using White Embroider two claws on each foot.

Annabelle Horror Mini – Free Pattern

In the Conjuring Universe there’s a super creepy doll. She’s possessed by the spirit of Annabelle and allegedly malicious.

That’s okay, this version isn’t possessed she’s just cute. New to the Horror Mini Series I present Annabelle. She’s a quick crochet and great scrap buster. Remember, this pattern isn’t tested.

Annabelle

© DrunkenAuntWendyDesigns

Creepy Annabelle Doll

Materials


Yarn

White (16 yds)

Red  (3 yds)

Yellow Fuzzy (10 yds)

Beige (12 yds)

Other

Black Embroidery floss

12 mm safety eyes

Matte Dry Blue nail polish
Size E crochet hook

Large eye blunt needle

Polyfiberfill

Abbreviations

SC – Single Crochet

DC – Double Crochet

Ch- Chain
INC – SC 2 stitches into same stitch

DEC – SC two stitches together
BLO – Back loops only

FLO – Front Loops only

Gauge – Gauge is not important for this project, but if you are making it from the kit, you should use the right size needle to ensure you don’t run out of yarn.

Notes:

Parentheses indicate a repeat. Repeat the stitches in the parentheses for the number of times indicated.

The bracketed number [] is the number of stitches at the end of each row.

I spread my increases out so there isn’t a seam on the finished piece. If you do not like this method, you can do regular increases.

Crochet section is worked in partly in the round. Use a stitch marker or a scrap piece of yarn to mark the beginning of each row. Then you don’t have to count every row. Do not join unless instructed to.

If you have any questions, please feel free to email me at drunkenauntwendy@gmail.com.

EYES

Using the matte nail polish, paint eyes and set aside.

DRESS

In White, Ch 2
Round 1: 6 SC in 2nd Ch from hook [6].
Round 2: INC in each stitch [12].
Round 3: (SC, INC) 6 times [18].
Round 4: (SC, INC, SC) 6 times [24].

Round 5: (3 SC, INC) 6 times [30].

Round 6: SC in BLOS [30].

Round 7: (3 SC, DEC) 6 times [24]

Round 8: SC row [24]

Round 9: (2 SC, DEC) 6 times [18]

Round 10: SC row [18].

Start Stuffing

Round 11: (SC, DEC) 6 times, Change Colors to Red in last stitch [12].

Rounds 11-12: 2 rows SC, Change colors to white in last stitch [12 stitches per row]

Rounds 13-14: 2 rows SC [12 Stitches per row]

Round 15: (SC, INC) 6 times [18].

Rounds 16-17: 2 rows SC [18 stitches per row].

Fasten off.

Using Red Yarn, Embroider a large red V above the waistline.

HEAD

In Beige, Ch 2
Round 1: 6 SC in 2nd Ch from hook [6].
Round 2: INC in each stitch [12].
Round 3: (SC, INC) 6 times [18].
Round 4: (5 SC, INC) 3 times [21].

Round 5: (6 SC, INC) 3 times [24].

Rounds 6-8: 3 rows SC [24 stitches each row].

Stop here and insert safety eyes, don’t put the backs on yet.

Using the Black Embroidery Floss embroider 4 tiny lines around each eye. Put backs on.

Round 9: (6 SC, DEC) 3 times [21].

Round 10: (5 SC, DEC) 3 times [18].

Using black Embroidery floss, embroider a straight line for a mouth. Make two small stitches perpendicular to the mouth line to finish mouth. Tie off inside head.

Round 11: (SC, DEC) 6 times [12].

Round 12: DEC 6 times [6].

Fasten off. Attach to Body.

HAIR

Attach hair creating a part. Cut the front for bangs, divide the back and create 2 braids.

Voila

Georgie – Free Crochet Pattern

Georgie – mini monsters

© DrunkenAuntWendyDesigns

I read this book when I was in 6th grade. I’ve been reading crazy stuff for a long time. Had to read the book before I watched the 80s mini-series.

There are patterns for both versions of Pennywise. You can make them both.

Materials

Yarn in Yellow, Green, Beige and Brown

Red Marker

12 mm safety eyes
Size E crochet hook

Large eye blunt needle

Polyfiberfill

Abbreviations

SC – Single Crochet

Ch- Chain
INC – SC 2 stitches into same stitch

DEC – SC two stitches together


Gauge – Gauge is not important for this project, but if you are making it from the kit, you should use the right size needle to ensure you don’t run out of yarn.

Notes:

Parentheses indicate a repeat. Repeat the stitches in the parentheses for the number of times indicated.

The bracketed number [] is the number of stitches at the end of each row.

I spread my increases out so there isn’t a seam on the finished piece. If you do not like this method, you can do regular increases.

Crochet section is worked in partly in the round. Use a stitch marker or a scrap piece of yarn to mark the beginning of each row. Then you don’t have to count every row. Do not join unless instructed to.

If you have any questions, please feel free to email me at drunkenauntwendy@gmail.com.

BODY

In Green, Ch 2
Round 1: 6 SC in 2nd Ch from hook [6].
Round 2: INC in each stitch [12].
Round 3: (SC, INC) 6 times [18].
Round 4: (SC, INC, SC) 6 times [24].

Round 5: (3 SC, INC) 6 times [30].

Round 6: SC row [30]. Change Color to yellow

Rounds 7-9: 2 Rows SC [30 stitches each row].

Round 10: (13 SC, DEC) 2 times [28].

Round 11: (5 SC, DEC) 4 times [24].

Round 12: (4 SC, DEC) 4 times [20].

Round 13: (8 SC, DEC) 2 times [18].

Fasten off. Stuff and set aside.

HEAD

In Beige, Ch 2
Round 1: 6 SC in 2nd Ch from hook [6].
Round 2: INC in each stitch [12].
Round 3: (SC, INC) 6 times [18].
Round 4: (5 SC, INC) 3 times [21].

Round 5: (6 SC, INC) 3 times [24].

Rounds 6-8: 3 rows SC [24 stitches each row].

Stop here and insert safety eyes, embroider eyebrows with brown yarn and start stuffing.

Round 9: (6 SC, DEC) 3 times[21].

Round 10: (5 SC, DEC) 3 times [18].

Round 11: (SC, DEC) 6 times [12].

Round 12: DEC 6 times [6].

Fasten off. Leave a long tail. Using tail thread through stitches from Round 12 and pull up tight to close the hole.

Attach to Body.

HOOD

The hood is made working back and forth not in the round.

In Yellow, Ch 21

Row 1: Sc in 2nd Chain from hook, 19 SC, Ch 1, turn [20].

Row 2: 20 SC, Ch 1, turn [20].

Row 3: 20 SC, Ch 1, turn [20].

Row 4: 20 SC, Ch 1, turn [20].

Row 5: 20 SC, Ch 1, turn [20].

Row 6: DEC, 16 SC, DEC, Ch 1, turn [18].

Row 7: DEC, DEC, 10 SC, DEC, DEC, Ch 1, turn [14].

Row 8: 14 SC, Ch 1, turn [14].

Row 9: 14 SC, Ch 1, turn [14].

Fold in half and SC one side closed [7].

Fasten off, Sew over head.

Finishing touches

Using Brown, make straight stitches on half of the face slanting sideways to act as his bangs.

Using the red marker, draw blood spatter and a large blood spot to act for arm that was ripped off. For accuracy his right arm was removed.,

All done.

Rosie Free Pattern

Crochet Rosie

Remember the Jetsons? Now, I’m not that old, the cartoon was re-released in the the 80s. Plus the movie was release in 1990. Tiffany was Judy! I know, that still makes me old. Anyway, I always wanted a robot maid. Sadly, they don’t actually exist. I tried a Roomba type floor sweeper, but it kept getting lost under the coffee table.

Anyway, I’ve been feeling a lot of nostalgia lately for the cartoons of my youth. Proven by Strawberry Shortcake.

I’m working on videos and typing lots and lots of patterns.

As always, the pattern hasn’t been tested. If you make her, use #drunkenauntwendy or tag me so I can see your take on my little creation. She’s a quick crochet, you should be able to get her done in about an evening.

Free Pattern

Materials

Sport Weight Yarn

Silver

Black

Sky Blue

White

Red Marker

Black Embroidery Floss

12 MM Safety Eyes

Size E crochet hook

Polyfiberfill

Large Eye Needle

Abbreviations

SC – Single Crochet

HDC – Half Double Crochet

DC- Double Crochet

TC – Triple Crochet

CH- Chain

FO – Fasten Off

SL – Slip Stitch

INC – Make two Single Crochet in Same Stitch

DEC – Single Crochet two stitches together

Note: Entire project is worked in the round. Use a stitch marker or a scrap piece of yarn to mark the beginning of each row. Then you don’t have to count every row. Do not join unless instructed to.

Parentheses indicate a repeat. Repeat the stitches in the parentheses for the number of times indicated.

The bracketed number [] is the number of stitches at the end of each round.

I spread my increases out so there isn’t a seam on the finished piece. If you do not like this method, you can do regular increases.

If you have any questions, please feel free to email me at drunkenauntwendy@gmail.com.

BODY In Black

Ch 2

Round 1: 6 SC in 2nd Chain from hook [6].

Round 2: INC in each stitch [12].

Round 3: (SC, INC) 6 times [18].

Round 4: (SC, INC, SC) 6 times [24].

Round 5: (3 SC, INC) 6 times [30].

Rounds 6-7: 2 rounds SC Change color to silver in last stitch [30 stitches per round].

Rounds 8-9: 2 rounds SC [30 stitches per round].

Round 10: (13 SC, DEC) 2 times [28].

Round 11: (5 SC, DEC) 4 times [24].

Start stuffing.

Round 12: (4 SC, DEC) 4 times [20].

Round 13: (8 SC, DEC) 2 times [18].

Rounds 14-15: 2 Rounds SC [18 stitches per round].

Fasten off

CHEST PIECE in Sky Blue

This section is worked back and forth, not in the round.

Ch 7

Row 1: SC in 2nd Chain from hook, 5 SC [6]

Row 2: Turn, 6 SC [6].

Row 3: Turn, 6 SC [6].

Row 4: Turn, 6 SC [6].

Fasten off.

Sew to center of body above the black section.

Use red marker and draw two buttons on the chest piece.

APRON in White

This section is worked back and forth, not in the round.

Ch 6

Row 1: INC in 2nd Chain from hook, INC 4 more times [10].

Row 2: Turn, INC in each stitch [20].

Fasten off

Sew to body above black over the chest piece.

COLLAR in White

This section is worked back and forth, not in the round.

Ch 19

Row 1: Starting in the 2nd chain from hook (SL, DC INC, SL) 6 times [12 DC, 12 SL]

Fasten off. Sew to top of body.

HEAD in Sky Blue

Ch 5

Round 1: SC in 2nd Ch from hook, 2 SC, 3 SC in last stitch, working on the other side of the 1st 3 stitches 3 SC, 3 SC in end [12].

Round 2: 3 SC, 3 INC, 3 SC, 3 INC [18].

Round 3: 3 SC (SC, INC) 3 times, 3 SC, (SC, INC) 3 times [24].

Round 4: 3 SC (SC, INC, SC) 3 times, 3 SC, (SC, INC, SC) 3 times [30].

Rounds 5-12: 8 rounds SC [30 stitches per row].

Insert Eyes, Using Black Embroidery Floss embroider eyelashes prior to attaching the backs to the eyes. Embroider the mouth as well.

Start Stuffing

Round 13: (3 SC, DEC) 6 times [24].

Round 14: (2 SC, DEC) 6 times [18].

Round 15: (SC, DEC) 6 times [12].

Round 16: DEC 6 times [6].

Fasten off. Thread tail through last round and pull up tight to close. Sew to body.

HAT in White

This section is worked back and forth, not in the round

CH 9

Row 1: Starting in 2nd Ch from hook, (HDC, DC, TC, DC, HDC in same stitch, SL) 4 times [8 HDC, 8 DC, 4 TC, 4 SL].

Fasten off. Sew to top of head.

HEADBOLTS in Red (Make 2)

Ch 2

Round 1: 6 SC in 2nd Ch from hook [6].

Round 2: SC round [6].

Round 3: DEC 3 times, change colors to black [3].

Rounds 4-6: 3 rounds SC [3]

Round 7: INC in each stitch [6].

Round 8: INC in each stitch [12].

Fasten off and sew to sides of head.

Free Crochet Pattern – Strawberry Shortcake

Crochet Strawberry Shortcake

I have so many patterns to type. I am working on it as my husband and I decided to build a wine bar from scratch and that is taking a lot of my time. I am also working on Youtube tutorials. The first one will be Cokie Nut. Alas, my day job gets in the way of actually shooting and editing videos, but I am plugging along.

One of the things that helps me with designing is trying other peoples patterns. Here’s Krakken Girl!

Krakken Girl

I think I should have made her hair a touch longer, but I loved the sweater and using wire for the tentacles. You can find her shop here. There are some really fun and funky patterns. I obviously don’t have time to make them all, but I can dream.

Anyway, the way the pattern instructed me to put the spots on the tentacles inspired me to try Strawberry Shortcake. I was having the hardest time figuring out how to put the strawberries on her hat. Then it hit me, red sharpie.

Remember Strawberry Shortcake? You don’t have to be old like me, there have been a ton of reboots.

Strawberry Shortcake Mini

As a child of the 80s, I wanted the Strawberry Shortcake toys so bad. Her and her gang besting the Purple Pieman definitely made it to my daily play time.

Here’s the free pattern. Remember free patterns have not been tested. There may be typos or issues. If you make her tag me using @drunkenauntwendy or #drunkenauntwendy so I can see your take.

Have fun.

Materials


Brava Sport Weight Yarn

Cotton Candy (22 yds)

Peapod (4 yds)

White (3 yds)

Cream (10 yds)

Red (15 yds)

12 mm safety eyes

Red Marker

Pink Marker

Black Embroidery floss
Size E crochet hook

Large eye blunt needle

Polyfiberfill

Abbreviations

SC – Single Crochet

Ch- Chain
INC – SC 2 stitches into same stitch

DEC – SC two stitches together
FLO – Front loops only

BLO – Back Loops only

Gauge – Gauge is not important for this project, but if you are making it from the kit, you should use the right size needle to insure you don’t run out of yarn.

Notes:

Parentheses indicate a repeat. Repeat the stitches in the parentheses for the number of times indicated.

The bracketed number [] is the number of stitches at the end of each round.

I spread my increases out so there isn’t a seam on the finished piece. If you do not like this method, you can do regular increases.

Crochet section is worked in partly in the round. Use a stitch marker or a scrap piece of yarn to mark the beginning of each round.  Then you don’t have to count every round. Do not join unless instructed to.

If you have any questions, please feel free to email me at drunkenauntwendy@gmail.com.

BODY

In Peapod, Ch 2
Round 1: 6 SC in 2nd Ch from hook, change color to white [6].
Round 2: INC in each stitch, change color to green [12].
Round 3: (SC, INC) 6 times, change color to white [18].
Round 4: (SC, INC, SC) 6 times, change color to green [24].

Round 5: (3 SC, INC) 6 times, change to red [30].

Round 6: SC row [30].

Round 7: SC in BLOS [30].

Rounds 8-9: SC Row [30 each round].

Round 10: (13 SC, DEC) 2 times [28]. Change Colors to Green

Round 11: (5 SC, DEC) 4 times [24].

Change colors back to Red

Round 12: (4 SC, DEC) 4 times [20].

Round 13: (8 SC, DEC) 2 times, change color to white [18].

Round 14: (SC, DEC) 6 times [12].

Fasten off. Stuff and set aside.

RUFFLE

In Red, join to the BLOS from Round 7, (Slip Stitch, HDC, 2 DC in next stitch, HDC, Sl) 6 times.

HEAD

In Cream, Ch 2
Round 1: 6 SC in 2nd Ch from hook [6].
Round 2: INC in each stitch [12].
Round 3: (SC, INC) 6 times [18].
Round 4: (5 SC, INC) 3 times [21].

Round 5: (6 SC, INC) 3 times [24].

Rounds 6-8: 3 rounds SC [24 stitches each round].

Stop here and insert safety eyes, between rounds 7 and 8, Embroider eyelashes before putting backs on.

Start Stuffing

Round 9: (6 SC, DEC) 3 times [21].

Round 10: (5 SC, DEC) 3 times [18].

Round 11: (SC, DEC) 6 times [12].

Round 12: DEC 6 times [6].

Fasten off.

Using pink marker draw on cheeks

Cut 4 inch sections of red yard to attach for the hair. Attach the hair around round 4 leaving face uncovered about 11 stitches. Attach more hair in rounds 6 and 8 to fill out the hair.

If you chose to add bangs attach yarn in a straight line across the portion you left uncovered. Trim them short after you put on the hat.

HAT

In Cotton Candy, Ch 2
Round 1: 6 SC in 2nd Ch from hook [6].
Round 2: INC in each stitch [12].
Round 3: INC in each stitch [24].
Round 4: INC in each stitch [48].

Rounds 5-9: 5 rounds SC [48 stitches per round].

Round 10: (DEC) 24 times [24].

Round 11: (2 SC, DEC) 6 times [18]

Round 12: (SC, DEC) 6 times [12]

This next section is work back and forth in rows

Row 13: 6 SC in FLOS [6]

Row 14: Ch 1, turn, (SC, INC) 3 times [9].

Row 15: turn, HDC, DC, HDC, SC, SL, SC, HDC, DC, HDC [9]

Fasten off. Weave in ends.

Sew to the top of the head.

Using red marker draw berries on the hat. Intersperse wherever you feel they need to be.

Other old cartoons have been on my work table.

Rosie

Orko – Free Crochet Pattern

Masters of the Universe

Masters of the Universe
Orko

I’m still working on typing up patterns. I am trying to build a bar in my little town, so I’ve been busy.

Here’s a throw back from another one of my favorite cartoons as a child.

Orko
© 2020DrunkenAuntWendyDesigns

Materials
Worsted Weight Yarn
I love this yarn – Orange
I love this yarn – Red
I love this yarn – Black
I love this yarn – Ocean
I Love this yarn – light purple
12 MM Safety Eyes Paint yellow with a black pupil, cover with varnish
Size E crochet hook
Polyfiberfill
Large Eye Needle

Abbreviations
SC – Single Crochet
HDC – Half Double Crochet
CH- Chain
FO – Fasten Off
SL ST – Slip Stitch
INC – Make two Single Crochet in Same Stitch
DEC – Single Crochet two stitches together
BLO – Back Loops Only
FLO – Front Loops Only

Puff Stitch –(Insert the hook in the stitch, yarn over, draw the yarn through the stitch) repeat 2 more times. You should have loops on your hook. Yarn over and draw through all 6 loops on the hook. Push the stitch out.

Note: Entire project is worked in the round. Use a stitch marker or a scrap piece of yarn to mark the beginning of each row. Then you don’t have to count every row. Do not join unless instructed to.

Parentheses indicate a repeat. Repeat the stitches in the parentheses for the number of times indicated.

The bracketed number [] is the number of stitches at the end of each row.

I spread my increases out so there isn’t a seam on the finished piece. If you do not like this method, you can do regular increases.

If you have any questions, please feel free to email me at drunkenauntwendy@gmail.com.

Before starting, paint your safety eyes yellow leaving a black pupil. Cover with a clear varnish.

HEAD – in BLACK
The head is made by doing an oval increase. Sometimes it helps to mark where your increases are going to go with a spare piece of contrasting yarn. Just note that the first row is worked on both sides of the starting chain. The face is then embroidered on before you add the hair and stuff him.

Ch 5
Round 1: SC in 2nd Ch, SC in next 2 stitches. 3 SC in last stitch. Working in the unused loops from the chain, SC 3, 3 SC in last chain. [12]
Round 2: [3 SC, (INC) 3 times] repeat bracket one more time [18].
Round 3: [3 SC, (SC, INC) 3 times] repeat bracket one more time [24].
Round 4: [3 SC, (SC, INC, SC) 3 times] repeat bracket one more time [30].
Round 5: [3 SC, (3 SC, INC) 3 times] repeat bracket one more time [36].
Rounds 6-12: SC in each stitch for 7 rows [36 stitches per row].
Fasten off. Note: This flat edge is where you attach the hat.
Insert Eyes 4 rows down from the flat edge 7-8 stitches apart.

HAT – in Orange

Ch 2
Round 1: 4 SC in 2nd Chain from hook [4].
Round 2: (INC, SC) 2 times [6].
Rounds 3-4: 2 rows SC [6 stitches per row].
Round 5: (INC, 2 SC) 2 times [8].
Rounds 6-7: 2 rows SC [8 stitches per row].
Round 8: (INC, 3 SC) 2 times [10].
Round 9: SC Row [10].
Round 10: (INC, 4 SC) 2 times [12].
Round 11: SC row [12].
Round 12: (INC, 5 SC) 2 times [14].
Round 13: (INC, 6 SC) 2 times [16].
Round 14: (INC, 7 SC) 2 times [18].
Round 15: (2 SC, INC) 6 times [24].
Round 16: (3 SC, INC) 6 times [30].
Round 17: (2 SC, INC, 2 SC) 6 times [36].
Round 18: (5 SC, INC) 6 times [42].
Round 19: (3 SC, INC, 3 SC) 6 times [48].
Round 20: (7 SC, INC) 6 times [54].
Round 21: (4 SC, INC, 4 SC) 6 times [60].
Round 22: (9 SC, INC) 6 times [60].
Round 23: (5 SC, INC, 5 SC) 6 times [72].
Fasten off . Stuff head and sew hat to his head.

EARS in Ocean (Make 2)
Ch 2
Round 1: 4 SC in 2nd Chain from hook [4].
Round 2: (INC, SC) 2 times [6].
Rounds 3-4: 2 rows SC [6 stitches per row].
Round 5: (INC, 2 SC) 2 times [8].
Round 6: SC row [8].
Fasten off, fold in half and sew to each side of the hat.

BODY in Red
Ch 5
Round 1: SC in 2nd Chain from hook, 2 SC, 3 SC in last stitch, working on the other side of the chain, 3 SC, 3 SC in the end. [12].
Round 2: [3 SC (INC) 3 times] twice [18].
Round 3: [3 SC, (INC, SC) 3 times] twice [24].
Rounds 4-5: 2 rows SC [24 stitches per row.
Round 6: (INC, SC) 12 times [36].
Rounds 7-10: 4 rows SC [36 stitches per row].
Round 11: (INC, SC) 18 times [54]
Rounds 12-13: 2 rows SC [54].
Round 14: SC in FLOs [54].
Fasten off.
Sew head to top

ARMS Make 2 starting in Ocean
Ch 2
Round 1: 4 SC in 2nd Chain from hook [4].
Round 2: Sc row [4].
Round 3: 3 SC, Puff Stitch [4].
Round 4: (INC, SC) 2 times [6].
Round 5: SC row, Change Colors to red in last stitch [6].
Round 6: SC in BLOs [6]
Rounds 7-10: 4 rows SC [6 stitches per row].
Fasten off

Sleeve – attach to unused loops from Round 6.
Round 1: INC in each stitch [12]
Round 2: SC row [12].
Fasten off.

Attach arms to body. Weave in all ends.

SCARF in Light Purple
Ch 33
Row 1: Sc in 2nd Chain from hook, SC in remaining 31 stitches
Row 2: Ch 1, turn, 32 HDC
Fasten off.
Attach around neck.


Melvin Moose – Free Crochet Pattern

Crocheted Moose Pattern

I have a full series of these egg shaped animals planned. I have already posted Bandit. My mom was oddly afraid of Moose when I was younger. Of course this means we bought her lots of moose. I thought Melvin would be a nice addition to her collection.

Meet Melvin the Moose. Crocheted Moose Pattern

This pattern is not tested. If you have issues, please let me know.

Materials
Worsted Weight Yarn
Essential Acrylics – Chocolate
Multicolored white and beige
I love this yarn – Black
24 MM Safety Eyes
Size E crochet hook
Polyfiberfill
Large Eye Needle

Abbreviations
SC – Single Crochet
HDC – Half Double Crochet
DC – Double Crochet
TC – Triple Crochet
CH- Chain
FO – Fasten Off
SL ST – Slip Stitch
INC – Make two Single Crochet in Same Stitch
DEC – Single Crochet two stitches together
BLO – Back Loops Only
Puff Stitch –(Insert the hook in the stitch, yarn over, draw the yarn through the stitch) repeat 2 more times. You should have loops on your hook. Yarn over and draw through all 6 loops on the hook. Push the stitch out.

Note: Entire project is worked in the round. Use a stitch marker or a scrap piece of yarn to mark the beginning of each row. Then you don’t have to count every row. Do not join unless instructed to.

Parentheses indicate a repeat. Repeat the stitches in the parentheses for the number of times indicated.

The bracketed number [] is the number of stitches at the end of each row.

I spread my increases out so there isn’t a seam on the finished piece. If you do not like this method, you can do regular increases.

If you have any questions, please feel free to email me at drunkenauntwendy@gmail.com.
BODY
In Chocolate, Ch 2
Round 1: 6 SC in 2nd Chain from hook [6].
Round 2: INC in each stitch [12].
Round 3: (SC, INC) 6 times [18].
Round 4: (SC, INC, SC) 6 times [24].
Round 5: (3 SC, INC) 6 times [30].
Round 6: (2 SC, INC, 2 SC) 6 times [36].
Rounds 7-10: 4 rows SC [36 stitches per row].
Round 11: (5 SC, INC) 6 times [42].
Rounds 12-15: 4 rows SC [42 stitches per row].
Place eyes between 11-12.
Round 16: (3 SC, INC, 3 SC) 6 times [48].
Rounds 17-20: 4 rows SC [48 stitches per row]
Round 21: (7 SC, INC) 6 times [54].
Rounds 22-29: 8 rows SC [54 stitches per row].
Round 30: SC in each stitch [54].
Round 31: (7 SC, DEC) 6 times [48].
Round 32: (6 SC, DEC) 6 times [42].
Round 33: (5 SC, DEC) 6 times [36].
Round 34: (4 SC, DEC) 6 times [30].
Start stuffing
Round 35: (3 SC, DEC) 6 times [24].
Round 36: (2 SC, DEC) 6 times [18].
Round 37: (SC, DEC) 6 times [12].
Round 38: DEC 6 times [6].
Fasten off. Leave a long tail. Thread tail through stitches from Round 34 and pull up tight to close hole. Weave in ends.

HORNS (make 2)
Large Part
In Multi, Ch 2
Round 1: 6 SC in 2nd Chain from hook [6].
Round 2: INC in each stitch [12].
Rounds 3-14: 12 rows SC [12 stitches per row].
Round 15: DEC 6 times [6].
Fasten off. Do not stuff. Fold flat.

Small parts (Make 3 per horn).
Round 1: 8 SC in 2nd Chain from hook [8].
Rounds 2-8: 7 rows SC [8 stitches per row].
Fasten off. Fold flat sew to large part. Attach horns to the head.

MUZZLE
In Multi, Ch 5
Round 1: SC in 2nd Chain from hook, SC 2, 3 SC in last stitch. Using unworked loops from the first stitches, SC 3, 3 SC in last stitch. [12].
Round 2: 3 SC (3 INC), 3 SC, (3 INC) [18].
Round 3: 3 SC, (INC, SC) 3 times, 3 SC, (INC, SC) 3 times [24].
Rounds 4-5: 2 rows SC [24 stitches per row].
Fasten off. Embroider two nostrils in black and a smile. Stuff and attach to body.

Adam the Sperm

Crochet Sperm

Last week I posted Eve. She has a magnet in her that will attach to Adam the Sperm.  One trick with this little guy: Make sure your magnets are turned the right way so they attract instead of repel. Crochet Sperm

Materials
Worsted Weight Yarn
I love this yarn in White (62 yds)
Black Embroidery Floss
9 mm Safety eyes
Strong Magnet
Size E crochet hook
Polyfiberfill
Large Eye Needle
Abbreviations
SC – Single Crochet
HDC – Half Double Crochet
DC- Double Crochet
CH- Chain
FO – Fasten Off
SL – Slip Stitch
INC – Make two Single Crochet in Same Stitch
DEC – Single Crochet two stitches together
BLO – Back Loops Only

Note: Entire project is worked in the round. Use a stitch marker or a scrap piece of yarn to mark the beginning of each row. Then you don’t have to count every row. Do not join unless instructed to.

Parentheses indicate a repeat. Repeat the stitches in the parentheses for the number of times indicated.

The bracketed number [] is the number of stitches at the end of each row.

I spread my increases out so there isn’t a seam on the finished piece. If you do not like this method, you can do regular increases.

If you have any questions, please feel free to email me at drunkenauntwendy@gmail.com.

BODY
In White
Ch 2
Round 1: 6 SC in 2nd Chain from hook [6].
Round 2: INC in each stitch [12].
Round 3: SC row [12].
Round 4: (SC, INC) 6 times [18].
Round 5: SC row [18].
Round 6: (SC, INC, SC) 6 times [24].
Round 7: (3 SC, INC) 6 times [30].
Rounds 8-15: 8 rows SC [30 stitches per row].
Round 16: (3 SC, DEC) 6 times [24].
Stop here. Place eyes. Using Black Embroidery Floss, Embroider a eyebrows. Place Magnet in the nose. Make sure you check the polarity so it attracts to the Ovum not repels. Start stuffing.
Round 17: (2 SC, DEC) 6 times [18].
Round 18: (SC, DEC) 6 times [12].
Round 19: (SC, DEC) 4 times [8].
Rounds 20-23: 4 rows SC [8 stitches per row].
Round 24: DEC, DEC, SC, INC, INC, SC [8].
Rounds 25-34: 10 rows SC [8 stitches per row].
Round 35: (DEC, 2 SC) 2 times [6]
Round 36: (DEC, SC) 2 times [4].
Round 37: (DEC) 2 times [2].
Fasten off and weave in the ends.

Mystique – Free Crochet Pattern

Crochet Pattern Mystique

I am working on my Drunken Care Bears. They are super cute. I’m making a Wino Bear.

I haven’t had as much time as I like to keep up with all my ideas. I think I have some crafting ADD. I can’t focus on one thing at a time. I love to do all types of crafts.

Next up, air plant cork magnets and soaps. These have an ulterior purpose as I will be selling them at the vacant space where my new bar is going. (Maybe the bar is what is taking up all my time).

Anyway, I have been focusing on female pop culture characters. You voted on Instagram for the Marvel Universe. I decided on Mystique.

I think I have finally perfected that hourglass figure typical to most comic book characters.

Crochet Pattern Mystique

One of my favorite characters from the X-Men. I love Mystique. I got the beads from the Bead Chest. I think the really add to the finished doll.

Remember that these patterns are not tested. If you have a problem, please let me know. Use #drunkenauntwendy if you make one an post a picture so I can find it and give you love.

Materials
Worsted Weight Yarn
I love this yarn – Blue Neon
I love this yarn – White
Vanna’s Choice – Rust
12 MM Safety Eyes Painted Yellow
Doll eyelashes
7 Skull Beads
Black Embroidery floss
E6000 epoxy
Size E crochet hook
Polyfiberfill
Large Eye Needle

Abbreviations
SC – Single Crochet
DC – Double Crochet
CH- Chain
FO – Fasten Off
SL ST – Slip Stitch
INC – Make two Single Crochet in Same Stitch
DEC – Single Crochet two stitches together
Puff Stitch –(Insert the hook in the stitch, yarn over, draw the yarn through the stitch) repeat 2 more times. You should have loops on your hook. Yarn over and draw through all 6 loops on the hook. Push the stitch out.
BLO – Back Loops Only
FLO – Front Loops Only

Note: Entire project is worked in the round. Use a stitch marker or a scrap piece of yarn to mark the beginning of each row. Then you don’t have to count every row. Do not join unless instructed to.

Parentheses indicate a repeat. Repeat the stitches in the parentheses for the number of times indicated.

The bracketed number [] is the number of stitches at the end of each row.

I spread my increases out so there isn’t a seam on the finished piece. If you do not like this method, you can do regular increases.

If you have any questions, please feel free to email me at drunkenauntwendy@gmail.com.

EYES

Before starting the head. Paint the eyes yellow. Once dry, clip a section of three lashes per eye. Glue to the flat portion of your safety eyes and set aside to dry.

HEAD in Blue Neon
Head is worked as an oval. The increases go on the sides of the oval.
Ch 8
Round 1: SC in 2nd Ch from hook, SC for 5 stitches, 3 SC in last stitch, working in the unused loops from the first few stitches, 6 SC, 3 SC in the beginning loop [18].
Round 2: 6 SC, INC 3 times, 6 SC, INC 3 times [24].
Round 3: 6 SC, (SC, INC) 3 times, 6 SC, (SC, INC) 3 times [30].
Round 4: 6 SC, (SC, INC, SC) 3 times, 6 SC, (SC, INC, SC) 3 times [36].
Round 5: 6 SC, (3 SC, INC) 3 times, 6 SC, (3 SC, INC) 3 times [42].
Round 6: 6 SC, (2 SC, INC, 2 SC) 3 times, 6 SC, (2 SC, INC, 2 SC) 3 times [48].
Rounds 7-17: 11 rows SC [48 stitches per row.
Fasten off.

Insert Eyes. Use a piece of blue to embroider nose with straight stitches.

Using Rust, embroider eyebrows above the eyes.

WIG CAP in Rust
Head is worked as an oval. The increases go on the sides of the oval.
Ch 8
Round 1: SC in 2nd Ch from hook, SC for 5 stitches, 3 SC in last stitch, working in the unused loops from the first few stitches, 6 SC, 3 SC in the beginning loop [18].
Round 2: 6 SC, INC 3 times, 6 SC, INC 3 times [24].
Round 3: 6 SC, (SC, INC) 3 times, 6 SC, (SC, INC) 3 times [30].
Round 4: 6 SC, (SC, INC, SC) 3 times, 6 SC, (SC, INC, SC) 3 times [36].
Round 5: 6 SC, (3 SC, INC) 3 times, 6 SC, (3 SC, INC) 3 times [42].
Round 6: 6 SC, (2 SC, INC, 2 SC) 3 times, 6 SC, (2 SC, INC, 2 SC) 3 times [48].
Fasten off leaving a long tail for sewing.

Stuff head and attach wig cap.

Attach one skull bead in center of head at the join line.

HAIR in Rust
Cut several pieces of hair 6 inches and 12 inches.

Using the 6 inch pieces, attach at the side of the head at the join. Work around the back of head in each stitch to the other side.

Using the 12 inch pieces, attach in two lines going straight back from the skull bead. Try to join them so there is a part. Attach the hair all the way to the end of the wig cap. Make more hair pieces as necessary to fill out the hair.

ARMS – Make 2 in white
Ch 2,
Round 1: 6 SC in 2nd Ch from hook [6].
Rounds 2-8: Sc for 7 rows [6 stitches per row]. Change color to Blue Neon in the last stitch.
Rounds 9-15: Sc for 7 rows [6 stitches per row].
Fasten off. Don’t stop. Set aside to sew to body letter.

FEET – Make 2, in white
Ch 5
Round 1: SC in 2nd Ch from hook, SC for 2 stitches, 3 SC in last stitch, working in the unused loops from the first few stitches, 3 SC, 3 SC in the beginning loop [12].
Round 2: 3 SC, INC 3 times, 3 SC, INC 3 times [18].
Round 3: Working in BLOs SC row [18].
Round 4: 3 SC, DEC in next 6 stitches, 6 SC [12].
Start stuffing feet.
Round 5: 2 SC, 3 DEC, 4 SC [9].
Rounds 6-9: 4 rows SC [9 Stitches per row]. Change colors to Blue neon in last stitch.
Round 10: SC in BLOs [9].
Rounds 11-15: 5 rows SC [9 Stitches per row]
Fasten off 1st leg and make second leg
Stuff as you go

BODY – continues from Body
Do not fasten off second leg.
Round 16: SC around each leg to join. [18].
Round 17: (2 SC, INC) 6 times [24].
Round 18: (3 SC, INC) 6 times [30].
Round 19: SC row [30].
Round 20: 7 SC (this is to move to the side. Adjust if necessary.) Change Color to White in the next stitch. SC remaining 22 stitches [23 white, 7 blue].
Round 21: 11 SC, 8 SC in BLOs, 8 SC, 3 SC in BLOS
Round 22: 5 SC in BLOS (DEC, 2 SC) 6 times, SC [24].
Round 23: (2 SC, DEC) 6 times [18].
Round 24: (SC, DEC) 6 times [12].
Rounds 25-27: 3 rows SC [12 stitches per row.
Round 28: (SC, INC) 6 times [18].
Round 29: (2 SC, INC) 6 times [24].
Rounds 30-31: 2 rows SC [24 stitches per row].
Round 32: (2 SC, DEC) 6 times [18]
Round 33: (SC, DEC) 6 times [12]
Round 34: SC row [12].
Fasten off
SKIRT in White
Front and back, Attach to unused loops from Rounds 21-22 with a slip stitch, SC in each stitch – 8 stitches per row. SC until you reach the length you desire. I stopped at the top of the boots but you can make it longer or shorter.

BELT
Using Black Embroidery thread, make a chain through the skulls. Go up through the first skull down through the second. Back up through the 1st, down the second, up through the 3rd skull, down through the 4th, up through the 3rd, down through the 4th. Up through the 5th, down through the 6th, back up through the 5th, down through the 6th. Work the thread back through all the stitches. Fasten off.

Sew to the waist right at the top of the skirt.

Bravo a small monster crochet pattern

Crochet Plush Monster

I’ve been busy this year focusing on my Animals from A-Z collection and pop culture female characters. Its hard to find crochet patterns I like for the ladies. There was a vote on Instagram for a character from the Marvel Universe  (Poor Buffy). I just go the supplies and finished another project so I’m really excited to get started. I hope everyone likes who I make. I’m not telling yet, watch Instagram to see.

I just recently Finished Cheetara. Crochet Cheetara Doll

This one was super fun to make. I think I made her hips a touch too big. I will see if I can fix that for when I test her. I also had trouble with making a tiny Thundercats logo. I’m still thinking of ideas to fix that. The spots ended up being easy. I just used a sharpie.

I also finished a Bad Decision Bear.

Don't Care Bear

She’s a Care Bear that is all grown up. I don’t know why the idea tickled me so much. I mean what is Drunken Aunt Wendy without a drunken Care Bear. She is adapted from ahookagurumi’s Don’t Care Bear Pattern. I really enjoy her stuff. You should check it out.

Now on to the free pattern. This is Bravo. He’s a little horned monster. This pattern works up great with just about any color for the body. I’ve had a lot of luck with self striping yarn too.


Crochet Plush Monster
I may be cute, but I’ll still eat you.

He’s super quick to make up and is really easy to personalize.

If you post him, make sure to use #drunkenauntwendy.

Materials
Knit Picks Variegated – Tropical (85 yds)

I love this yarn in White (12 yds)
I love this yarn in Black (1yd)
12 mm safety eyes
Size E crochet hook

Self Stick White Felt

Large eye blunt needle

Polyfiberfill

Abbreviations


SC – Single Crochet

Ch- Chain
INC – SC 2 stitches into same stitch

DEC – SC two stitches together
BLO – Back loops only

Gauge – Gauge is not important for this project, but if you are making it from the kit, you should use the right size needle to ensure you don’t run out of yarn.

Notes:

Parentheses indicate a repeat. Repeat the stitches in the parentheses for the number of times indicated.

The bracketed number [] is the number of stitches at the end of each row.

 I spread my increases out so there isn’t a seam on the finished piece. If you do not like this method, you can do regular increases.

 Crochet section is worked in partly in the round. Use a stitch marker or a scrap piece of yarn to mark the beginning of each row. Then you don’t have to count every row. Do not join unless instructed to.

 If you have any questions, please feel free to email me at drunkenauntwendy@gmail.com.

BODY

In Tropical, Ch 2
Round 1: 6 SC in 2nd Ch from hook [6].
Round 2: INC in each stitch [12].
Round 3: (SC, INC) 6 times [18].

Round 4: (SC, INC, SC) 6 times [24].
Round 5: (3 SC, INC) 6 times [30].
Round 6: (2 SC, INC, 2 SC) 6 times [36].
Round 7: (5 SC, INC) 6 times [42].
Round 8: (3 SC, INC, 3 SC) 6 times [48].
Rounds 9-20: 12 rows SC [48 stitches each row].
Round 21: (6 SC, DEC) 6 times [42].
Round 22: (5 SC, DEC) 6 times [36].
Round 23: (4 SC, DEC) 6 times [30].
Round 24: (3 SC, DEC) 6 times [24].
Start stuffing.
Round 25: (2 SC, DEC) 6 times [18].
Round 26: (SC, DEC) 6 times [12].
Round 27: DEC 6 times [6].
Fasten off and using the long tail sew the opening closed.

LEGS (make 2)

In Tropical, Ch 2
Round 1: 6 SC in 2nd Ch from hook [6].
Round 2: INC in each stitch [12].
Round 3: (SC, INC) 6 times [18].
Round 4: (SC, INC, SC) 6 times [24].
Round 5: SC in BLOs [24].
Rounds 6-7: 2 rows SC [24 stitches each row].
Fasten off, stuff and attach to the bottom on the ball.

FLOPPY ARMS (make 2)

In Tropical, Ch 2
Round 1: 6 SC in 2nd Ch from hook [6].
Round 2: INC in each stitch [12].
Rounds 3-16: SC for 14 rows [12 stitches each row].
Stuff just the bottom part of the arms. Fold in half and SC the opening closed.
Fasten off and sew to the in line with the legs between rows 10-11.

EYES (make 2)

In White, Ch 2
Round 1: 6 SC in 2nd Ch from hook [6].
Round 2: INC in each stitch [12].
Round 3: SC row [12].
Fasten off and leave a long tail for sewing.

Insert the safety eyes directly in the center of the crocheted eye.

Sew to body in line with the eyes.
HORNS (make 2)

In White, Ch 2
Round 1: 4 SC in 2nd Ch from hook [4].
Round 2: INC in 1st stitch, 3 SC [5].
Round 3: INC in 1st stitch, 4 SC [6].
Round 4: INC in 1st stitch, 5 SC [7].
Round 5: INC in 1st stitch, 6 SC [8].
Round 6-11: SC for 6 rows [8 stitches per row.

Fasten off and leave a long tail for sewing. Stuff and sew to the top of the head in line with the arms.

Embroider the mouth using a straight stitch. Add an angled stitch to the corners of the mouth.

Cut two long oval teeth out of the felt and stick on the monster with the tooth line over the teeth. Use fabric glue to make the bond stronger.