Cacti Carl – Free Pattern

Crocheted Cactus Pattern

I made a friend to go with Ms. Prickles. Remember her? She’s a super cute Cactus and she needed a friend.

These are the best plants for me as I really can’t kill them. My poor Cacti always get overwatered.

Remember, it isn’t tested. If there are problems or it is confusing, please let me know. Use #drunkenauntwendy if you post on Instagram.

Materials

I love this Yarn – black
I love this Yarn – Limelight
I love this Yarn – Sungold
2 12 mm safety eyes
Size E crochet hook
Small Terra Cotta Pots
Poly fiberfill
Large eye blunt needle

Abbreviations

Ch – Chain
SC – Single Crochet
INC – 2 Single Crochet in designated stitch
DEC – Single Crochet 2 stitches together
DC – Double Crochet
BLO – back loops only

Gauge is not important for this project unless you have purchased a kit. Using the right size hook is important to ensure you have enough yarn.

Notes: Almost the entire project is worked in the round. Use a stitch marker or a scrap piece of yarn to mark the beginning of each row. Then you don’t have to count every row. Do not join unless instructed to.

Parentheses indicate a repeat. Repeat the stitches in the parentheses for the number of times indicated.

The bracketed number [] is the number of stitches at the end of each row.

I spread my increases out so there isn’t a seam on the finished piece. If you do not like this method, you can do regular increases.

If you have any questions, please feel free to email me at drunkenauntwendy@gmail.com.

BASE
Use this base for all three cacti.
In Sungold, Ch 2
Round 1: 6 SC in 2nd Chain from hook [6].
Round 2: INC in each stitch [12].
Round 3: (SC, INC) 6 times [18].
Round 4: (SC, INC, SC) 6 times [24].
Round 5: (3 SC, INC) 6 times [30].
Round 6: SC row in BLOs [30].
Round 7: (DEC, 3 SC) 6 times [24].
Round 8: SC row [24].
Round 9: (DEC, 2 SC) 6 times [18].
Round 10: SC row [18].

Round 11: (DEC, SC) 6 times [12].
Round 12: SC row [12].
Stuff
Round 13: DEC 6 times in BLO.
Fasten off. Using a long tail sew up opening. Stuff into the pot. You can glue it in if you want.

Arms (make 2)
In Limelight CH 2
Round 1: 6 SC in 2nd Chain from hook [6].
Round 2: INC in each stitch [12].
Rounds 3-8: 6 rows SC [12 stitches per row.
Fasten off the first arm and then repeat Arm again, don’t fasten off the 2nd arm, continue below. Place one eye in each arm.
Stuff each arm and continue stuffing as you go.
Round 10: SC around each arm to join the pieces together. [24]
Rounds 11-12: 2 rows SC [24 stitches each row].
Rounds 13: (2 SC, DEC) 6 times [18].
Round 14: (SC, DEC) 6 time [12].
Rounds 15-18: 4 rows SC [12 stitches per row].
Fasten off. After you ensure it is stuffed firmly, sew it to the base in the pot.

Using the black, stitch on a smile.

Cacti Carl

Percy the Peacock – Free Pattern

Crochet Peacock Pattern

Have you met Percy. He’s a cute fun little peacock. I’m not sure I like the colors, I may have to change it a bit. Maybe next time.

If you make him, make sure to use #drunkenauntwendy so I can find it.

I hope everyone is having a great Friday and has fun weekend plans. While you can make Percy just fine with the below pattern, some people prefer an ad free .pdf. I have one available here.

Materials
Worsted Weight Yarn
Vanna’s Choice – Sapphire (A)
Vanna’s Choice – Kelly Green (B)
Vanna’s Choice – Eggplant (C)
Vanna’s Choice – Silver
Fun Fur – Deep Sea
Sport Weight yarn in white
7/16” Pearl Snaps in Purple
Size E crochet hook
Polyfiberfill
Large Eye Needle

Abbreviations
SC – Single Crochet
HDC – Half Double Crochet
CH- Chain
FO – Fasten Off
SL ST – Slip Stitch
CC – Change Color
INC – Make two Single Crochet in Same Stitch
DEC – Single Crochet two stitches together
BLO – Back Loops Only

Note: Entire project is worked in the round. Use a stitch marker or a scrap piece of yarn to mark the beginning of each row. Then you don’t have to count every row. Do not join unless instructed to.

Parentheses indicate a repeat. Repeat the stitches in the parentheses for the number of times indicated.

The bracketed number [] is the number of stitches at the end of each row.

I spread my increases out so there isn’t a seam on the finished piece. If you do not like this method, you can do regular increases.

If you have any questions, please feel free to email me at drunkenauntwendy@gmail.com.

EYES – Make 2 in White
Ch 2

Round 1: 6 SC in 2nd Ch from hook [6]. Join with a slip stitch and fasten off.

HEAD in Sapphire and Fun Fur
Ch 2

Round 1: 6 SC in 2nd Ch from hook [6]. Drop Fun Fur.
Round 2: INC in each stitch around [12].
Round 3: (SC, INC) 6 times [18].
Round 4: (SC, INC, SC) 6 times [24].
Round 5: (3 SC, INC0 6 times [30].
Round 6: SC row [30].
Round 7: (3 SC, DEC) 6 times [24].
Place eyes according to package instructions over the white eyes made with sport weight yarn. Fun fur marks the top of the head. Start stuffing.
Round 8: (2 SC, DEC) 6 times [18].
Round 9: (SC, DEC) 6 times [12].
Round 10: DEC 6 times [6].
Fasten off. Thread tail through last row and pull up tight to close hole.

BODY AND NECK in Sapphire
Ch 2

Round 1: 6 SC in 2nd Ch from hook [6].
Round 2: INC each stitch [12].
Round 3: (SC, INC) 6 times [18].
Round 4: (SC, INC, SC) 6 times [24].
Round 5: (3 SC, INC) 6 times [30].
Round 6: (2 SC, INC, 2 SC) 6 times [36].
Round 7: (5 SC, INC) 6 times [42].
Round 8: (3 SC, INC, 3 SC) 6 times [48].
Round 9: (7 SC, INC) 6 times [54].
Rounds 10-18: 9 rows SC [54 stitches per row].
Round 19: (7 SC, DEC) 6 times [48].
Round 20: (6 SC, DEC) 6 times [42].
Round 21: (5 SC, DEC) 6 times [36].
Round 22: (4 SC, DEC) 6 times [30].
Round 23: (3 SC, DEC) 6 times [24].
Start Stuffing.
Round 24: (2 SC, DEC) 6 times [18].
Round 25: (SC, DEC) 6 times [12].
Rounds 26-31: 6 rows SC [12 stitches per row].
Fasten Off. Stuff the neck firmly. Sew to the bottom of head.

BEAK – in Silver
Ch 2

Round 1: 4 SC 2nd Ch from hook [4].
Round 2: INC each stitch [8].
Round 3: SC row [8].
Fasten off. Sew to the front of the head between the two eyes.

WINGS – in Sapphire
Ch 2

Round 1: 6 SC in 2nd Ch from hook [6].
Round 2: INC each stitch [12].
Rounds 3-10: 8 rows SC [12 stitches per row].
Fasten off. Sew to sides of body.

TAIL
Make 2, the pieces will be joined together at the end. Note there are a lot of color changes in this. Run the unused yarn across the back of the piece. The loose strings will be hidden when the pieces are joined together. This part is not worked in the round.

With A, Ch 2
Row 1: 6 SC in 2nd Ch from hook, Ch 1, turn [6].
Row 2: (INC) 6 times. Ch 1, turn [12].
Row 3: SC row, Ch 1, turn [12].
Row 4: (SC, INC) 6 times, Ch 1, turn [18].
Row 5: SC Row, Ch 1, turn [18].
Row 6: (SC, INC, SC) 6 times, Ch 1, turn [24].
Row 7: SC, (CC to B, 2 SC, CC to A, 2 SC) 5 times, CC to B 2 SC, CC to A, SC in last stitch, Ch 1, turn. [24]
Row 8: SC, CC to B, SC, INC [cc to A, 2 SC, cc to B, SC, INC] repeat 5 times,

cc to A SC in last stitch, Ch1 1, turn [30].
Row 9: SC, CC to B, 3 SC [cc to A, 2 SC, cc to B, 3 SC] repeat 5 times, cc to A SC in last stitch, Ch1 1, turn [30].
Row 10: SC, CC to B, 2 SC, INC [cc to A, 2 SC, cc to B, 2 SC, INC] repeat 5 times, cc to A SC in last stitch, Ch1 1, turn [36].
Row 11: SC, CC to B, 4 SC [cc to A, 2 SC, cc to B, 4 SC] repeat 5 times, cc to A SC in last stitch, Ch1 1, turn [36].
Row 12: SC, CC to B, 3 SC, INC [cc to A, 2 SC, cc to B, 3 SC, INC] repeat 5 times, cc to A SC in last stitch, Ch1 1, turn [42].
Row 13: SC, CC to B, 5 SC [cc to A, 2 SC, cc to B, 5 SC] repeat 5 times, cc to A SC in last stitch, Ch1 1, turn [42].
Row 14 SC, CC to B, 4 SC, INC [cc to A, 2 SC, cc to B, 4 SC, INC] repeat 5 times, cc to A SC in last stitch, Ch1 1, turn [48].
Row 15: SC, CC to B, 6 SC [cc to A, 2 SC, cc to B, 6 SC] repeat 5 times, cc to A SC in last stitch, Ch1 1, turn [48]
Row 16: SC, CC to B, 5 SC, INC [cc to A, 2 SC, cc to B, 5 SC, INC] repeat 5 times, cc to A SC in last stitch, Ch1-, turn [54].
Row 17: SC, CC to B, 7 SC [cc to A, 2 SC, cc to B, 7 SC] repeat 5 times, cc to A SC in last stitch, Ch1 1, turn [54]
Row 18: SC, CC to B, 6 SC, INC [cc to A, 2 SC, cc to B, 6 SC, INC] repeat 5 times, cc to A SC in last stitch, Ch1 1, turn [60].
Row 19: SC, CC to B, 8 SC [cc to A, 2 SC, cc to B, 8 SC] repeat 5 times, cc to A SC in last stitch, Ch1 1, turn [60].
Row 20: SC, CC to B, 7 SC, INC [cc to A, 2 SC, cc to B, 7 SC, INC] repeat 5 times, cc to A SC in last stitch, Ch1 1, turn [66]
Row 21: SC, CC to B, 9 SC [cc to A, 2 SC, cc to B, 9 SC] repeat 5 times, cc to A SC in last stitch, Ch1 1, turn [66].
Row 22: SC, CC to B, 8 SC, INC [cc to A, 2 SC, cc to B, 8 SC, INC] repeat 5 times, cc to A SC in last stitch, Ch1 1, turn [72].
Row 23: SC, CC to B, 10 SC [cc to A, 2 SC, cc to B, 10 SC] repeat 5 times, cc to A SC in last stitch, Ch1 1, turn [72].
Row 24: SC, CC to B, 9 SC, INC [cc to A, 2 SC, cc to B, 9 SC, INC] repeat 5 times, cc to A SC in last stitch, Ch1 1, turn [78].
Row 25: SC, CC to B, 11 SC [cc to A, 2 SC, cc to B, 11 SC] repeat 5 times, cc to A SC in last stitch, Ch1 1, turn [78].

Fasten Off

With wrong sides facing, Join C at one edge of the tail and single crochet the arced side of the tail together
Row 1: Ch 1, turn; [sc, skip 2, 5dc in same stitch, skip 2] repeat
Row 2: 2. Ch 1, turn; slip stitch 3 stitches, [Sc, skip 2, 5dc in same stitch, skip 2] repeat across.

Fasten off
Sew bottom of tail together in A
Sew tail to back of peacock. You’ll need to put a few stitches to tack the tail so it stays upright.


Troika – The three eyed monster – Free Pattern

Amigurumi Monsters Free Patterns

Monsters, Monsters, Monsters.  I love monsters. Big monsters, little monsters, it really doesn’t matter.  Check the Monster category for lots of free monster patterns. There’s Clyde, Frank Cyclopstra, Sparky and Frostina, and many more.

Meet Troika. He’s got 3 eyes and quite the personality. I don’t know if the wings will actually lift him in the air, but he will try. If you make him use #drunkenauntwendy so I can find him.

Materials

Worsted Weight Yarn

I love this yarn – Ice Blue – 90 yds

I love this yarn – White – 25 yds

Red Heart Unforgettable – Parrot 10 yds

12 mm Safety Eyes (3)

White Felt

Craft Glue

Size E crochet hook

Polyfiberfill

Large Eye Needle


Gauge: is not important for this project


Abbreviations

SC – Single Crochet

HDC – Half Double Crochet

DC – Double Crochet

CH- Chain

FO – Fasten Off

SL ST – Slip Stitch

INC – Make two Single Crochet in Same Stitch

DEC – Single Crochet two stitches together


Note: Entire project is worked in the round. Use a stitch marker or a scrap piece of yarn to mark the beginning of each row. Then you don’t have to count every row. Do not join unless instructed to.


Parentheses indicate a repeat. Repeat the stitches in the parentheses for the number of times indicated.


The bracketed number [] is the number of stitches at the end of each row.


I spread my increases out so there isn’t a seam on the finished piece. If you do not like this method, you can do regular increases.


If you have any questions, please feel free to email me at drunkenauntwendy@gmail.com.


BODY – in Ice Blue


CH 2

Round 1: 6 SC in 2nd CH from hook.

Round 2: (INC) 6 times [12].

Round 3: (SC, INC) 6 times [18].

Round 4: (SC, INC, SC) 6 times [24].

Round 5: (3 SC, INC) 6 times [30].

Round 6: (2 SC, INC, 2 SC) 6 times [36].

Round 7: (5 SC, INC) 6 times [42].

Round 8: (3 SC, INC, 3 SC) 6 times [48].

Rounds 9 – 20:  SC in each stitch around for 12 rows [48 stitches per row].

Round 21: (DEC, 6 SC) 6 times [42].

Round 22: (DEC, 5 SC) 6 times [36].

Round 23: (DEC, 4 SC) 6 times in BLO [30].


Start stuffing here. Stuff firmly.

Round 24: (DEC, 3 SC) 6 times [24].

Round 25: (DEC, 2 SC) 6 times [18].

Round 26: (DEC, 1 SC) 6 times [12].

Round 27: (DEC) 6 times [6].


FO leaving a long tail. Thread tail through last 6 stitches and pull up tight to close hole.


BOTTOM RUFFLE – Ice Blue

Note: Ruffle is crocheted directly on to the body. You want to join so you can have the right side of work facing you. The increase is what causes the stitches to ruffle.


Round 1: Join with a slip stitch in one of the unused loops from Round 23. SC in each stitch around using the unused loops [30]

Round 2: INC in each stitch [60].

Round 3: (SC, INC) 30 times [90].

Fasten off.

WINGS (make 2) – Parrot
Note: Wings are worked back and forth not in the round
Ch 2
Round 1: SC in 2nd chain from hook, turn [1].
Round 2: Ch 1, 3 SC in 1st stitch, turn [3].
Round 3: Ch 1, INC, SC, INC, turn [5].
Round 4: Ch 1, INC, 3 SC, INC, turn [7].
Round 5: Ch 1, INC, 5 SC, INC, turn [9].
Round 6: Slip Stitch 3 stitches, SC, HDC, DC, DC, HDC, SC

Fasten off Leave a long tail for sewing.
Sew to the back of the monster as shown in the picture below.

HORN – White
Ch 2
Round 1: 4 SC in 2nd Ch from hook [4].
Round 2: SC in each stitch [4].
Round 3: (INC, SC) 2 times [6].
Round 4: SC in each stitch [6].
Round 5: (INC, 2 SC) 2 times [8].
Round 6: SC in each stitch [8].
Round 7: (INC, 3 SC) 2 times [10].
Round 8: SC in each stitch [10].
Round 9: (INC, 4 SC) 2 times [12].
Round 10: SC in each stitch [12].

Fasten off. Stuff with a pointed tool to get the stuffing in the tip of the horn. Sew to top of body around row 2.Amigurumi Monsters Free Patterns

Check out my Etsy shop for completed plush, tested patterns or kits.

Bunny Suit Ralphie – Free Pattern

Crocheted Ralphie from A Christmas Story

Halloween is over. It’s time to gear up for Christmas, or to just make super cute stuffed dolls because it is fun. Special bonus, he is not Fra-gee-lay.

Here’s Ralphie in his bunny suit because embarrassment is always the best. Remember he hasn’t been completely tested. If you post pictures use #drunkenauntwendy so I can find it. Make sure you click around my site to see all the fun patterns. 

Materials
Worsted Weight Yarn
I love this yarn – Pink
I love this yarn – Sungold
Vanna’s Choice – Beige
Black Embroidery floss
Size E crochet hook
Polyfiberfill
Large Eye Needle
Size 12 mm safety eyes

Abbreviations
SC – Single Crochet
HDC – Half Double Crochet
CH- Chain
FO – Fasten Off
SL ST – Slip Stitch
INC – Make two Single Crochet in Same Stitch
DEC – Single Crochet two stitches together
BLO – Back Loops Only
FLO – Front Loops Only

Special Stitches
Puff Stitch – (Insert hook, pull up a loop) repeat 3 times. 5 loops on hook. Yarn over and pull through all loops. Push the stitch out to make a bump on the right side of the fabric.

Note: Almost the entire project is worked in the round. Use a stitch marker or a scrap piece of yarn to mark the beginning of each row. Then you don’t have to count every row. Do not join unless instructed to.

Parentheses indicate a repeat. Repeat the stitches in the parentheses for the number of times indicated.

The bracketed number [] is the number of stitches at the end of each row.

I spread my increases out so there isn’t a seam on the finished piece. If you do not like this method, you can do regular increases.

If you have any questions, please feel free to email me at drunkenauntwendy@gmail.com.

HEAD
Note: Head is initially worked in an oval. The increases are worked only on the sides to maintain the shape.
In Beige
Ch 8
Round 1: SC in 2nd Ch from hook, SC in next 5 stitches. 3 SC in last stitch. Working in the unused loops SC 6. 3 SC in edge [18].
Round 2: 6 SC, 3 INC, 6 SC, 3 INC [24].
Round 3: 6 SC, (SC, INC) 3 times, 6 SC, (SC, INC) 3 times [30].
Round 4: 6 SC, (SC, INC, SC) 3 times, 6 SC, (SC, INC, SC) 3 times [36].

Round 5: in BLOS 7 SC, back to using both loops 2 SC, INC, 3 SC, INC, 3 SC, INC, 6 SC, (3 SC, INC) 3 times Change colors to pink. [42].
Round 6: Work entire row in BLOs, 6 SC, (2 SC, INC, 2 SC) 3 times, 6 SC, (2 SC, INC, 2 SC) 3 times [48].
Stop here, but don’t fasten off.
Cut 2 inch pieces of sungold. Attach to the unused loops from Round 5.
Place safety eyes on the edges of Round 1.
Using Beige and straight stitches embroider a nose.
Using Black Embroidery Floss, embroider glasses.
Rounds 7-13: 7 rows SC [48 stitches per row].
Round 14: (6 SC, DEC) 6 times [42].
Round 15: (5 SC, DEC) 6 times [36].
Round 16: (4 SC, DEC) 6 times [30].
Round 17: (3 SC, DEC) 6 times [24].
Start Stuffing
Round 18: (2 SC, DEC) 6 times [18].
Round 19: (SC, DEC) 6 times [12].
Round 20: DEC 6 times [6].
Fasten off. Thread tail through the loops from Round 19 and pull up tight to close opening.

Finishing Work.
Using Pink, Join with a slip stitch to the unused loops from Round 6. Make sure you are crocheting so the inside of your work faces towards the face.
2 Rounds SC [42 Stitches per row].
Join with a slip stitch.
Fasten off. Weave in ends.

BUNNY EARS (for suit) – Make 2
Note: Ears are worked in the round and then pressed flat.
In Pink, Ch 2
Round 1: 6 SC in 2nd Chain from hook
Round 2: INC in each stitch [12].
Rounds 3-5: 3 rows SC [12 stitches per row].
Round 6: (2 SC, DEC) 3 times [9].
Rounds 7-9: 3 rows SC [9 stitches per row].
Round 10: (SC, DEC) 3 times [6].
Rounds 11-13: 3 rows SC [6 stitches per row].
Fasten off. Fold flat and sew to top of head.

ARMS (Make 2)
In Pink, Ch 2
Round 1: 6 Sc in 2nd Chain from hook [6].
Round 2: SC row [6].
Round 3: SC, Puff Stitch, 4 SC [5 SC, 1 Puff Stitch].
Round 4: SC row
Round 5: (INC, 2 SC) 2 times [8].
Rounds 6-11: 6 rows SC [8 stitches per row].
Fasten off. Don’t stuff so they hang limply.

EARS FOR BUNNY SLIPPERS (Make 4).
In Pink
Ch 5
Row 1: SC in 2nd Chain from hook. SC in remaining 3 stitches [4].
Fasten off. You will sew to the feet prior to stuffing.

LEGS (Make 2).
Note you will make two legs. You will start with bunny slippers for feet. When you finish the 2nd leg don’t fasten off. Proceed to Body instructions. The slippers are also done following the oval increase method.
In Pink
Ch 5
Round 1: SC in 2nd Ch from hook, SC in next 2 stitches. 3 SC in last stitch. Working in the unused loops SC 3. 3 SC in edge [12].
Round 2: 3 SC, 3 INC, 3 SC, 3 INC [18].
Round 3: Working in BLOs, 3 SC, 3 DEC, 9 SC [15].
Round 4: 2 SC, DEC, SC, DEC, 8 SC [13].
Round 5: 11 SC, DEC [12]
Stop here and embroider eyes and nose with embroidery floss. Sew on ears.
Rounds 6-8: 3 row SC [12 stitches per row].
Stuff.
Fasten off first leg, make 2nd leg, don’t fasten off 2nd leg, proceed to body instructions.

BODY
Note body is worked in continuation. Both legs are now crocheted together.
Round 1: Make sure feet face the same direction when attaching them SC around both legs leaving one unworked stitch on each to make the feet face forward. [22]. Sew up hole between two legs.
Round 2: (INC, 10 SC) 2 times [24].
Round 3: (3 SC, INC) 6 times [30].
Rounds 4-7: 4 rows SC [30 stitches per row].
Round 8: (3 SC, DEC) 6 times [24].
Rounds 9-11: 3 rows SC [24 stitches per row].
Start stuffing.
Round 12: (2 SC, DEC) 6 times [18].
Rounds 13-14: 2 rows SC [18 stitches per row].
Round 15: (SC, DEC) 6 times [12].
Fasten off. Sew on arms. Sew to bottom of the head.

Ralphie is all done and ready to shoot his eye out.

Crocheted Ralphie from A Christmas Story

For completed plush, patterns and kits check out my Etsy Shop.

Amara – the love slug – Free Pattern

Crocheted pink slug drunken aunt wendy

Halloween is over. The remaining mini’s will be posted, but I’m not on a strict schedule any more. I will keep posting patterns as they are typed and try to keep to my current schedule of once or twice a week. Join the mailing list for exclusive content. There may be some patterns only available to members of my mailing list.

Without further ado, meet Amara the love slug. She’s a super cute slug with hearts in her eyes. She’s a part of my cuddle bugs collection even though she is not a bug. June the Lady Bug and Sargeant Spinner are also there. As always, the pattern hasn’t been tested. So if you have issues or anything is confusing, please feel free to drop me a comment or an email.

Crocheted pink slug drunken aunt wendy
Look how cute!

Materials

I love this yarn – Pink
I love this yarn – Red
I love this yarn – Black
12 mm heart shaped Safety eyes/noses
Size E crochet hook
Large eye blunt needle
Polyfiberfill

Abbreviations

SC – Single Crochet
DC – Double Crochet
Ch- Chain
SK – skip
INC – SC 2 stitches into same stitch
DEC – SC two stitches together
FLO – Front loops only

Gauge – Gauge is not important for this project, but if you are making it from the kit, you should use the right size needle to ensure you don’t run out of yarn.

Notes:
Parentheses indicate a repeat. Repeat the stitches in the parentheses for the number of times indicated.
The bracketed number [] is the number of stitches at the end of each row.

I spread my increases out so there isn’t a seam on the finished piece. If you do not like this method, you can do regular increases.

Crochet section is worked in mainly the round. Use a stitch marker or a scrap piece of yarn to mark the beginning of each row. Then you don’t have to count every row. Do not join unless instructed to.

If you have any questions, please feel free to email me at drunkenauntwendy@gmail.com.

BODY in pink
The body is made by doing an oval increase. Sometimes it helps to mark where your increases are going to go with a spare piece of contrasting yarn. Just note that the first row is worked on both sides of the starting chain.
Ch 11
Round 1: SC in 2nd Chain from the hook, SC in next 8 stitches, 3 SC in last stitch, working in the unused loops from the first 9 SC, SC 9, 3 SC in last stitch. [24].

Round 2: (9 SC, 3 INC) 2 times [30].
Round 3: {9 SC (SC, INC) 3 times} 2 times [36].
Round 4: {9 SC (SC, INC, SC) 3 times} 2 times [42].
Round 5: {9 SC (3 SC, INC) 3 times} 2 times [48].
Round 6: {9 SC (2 SC, INC, 2 SC) 3 times} 2 times [54].
Rounds 7-12: 6 rows SC [54 stitches per row]

Round 13: Working in the FLOs (SC, SK 1 stitch, 4 DCs in next stitch, SK 1 stitch) 13 times. Slip stitch to end row change colors to red. [13 shells made 52 DCs, 13 SC].

Round 14: SC in each DC stitch from the last row. Spike stitch in Single Crochet Stitches. Slip stitch to join. Fasten off.

Using Black Embroider a smile.

EYETENNAS (Make 2 in Pink).

Ch 2
Round 1: 6 SC in 2nd Chain from hook [6].
Round 2: INC in each stitch around [12].

Rounds 3-4: 2 rows SC [12 Stitches per row]
Insert eyes here.
Round 5: DEC 6 times [6].
Round 6: (DEC, SC) 2 times [4]
Rounds 7-8: 2 rows SC [4 stitches per row].
Fasten off and sew to body.

BOTTOM in red
See notes and pictures for body if this is confusing.
Ch 11
Round 1: SC in 2nd Chain from the hook, SC in next 8 stitches, 3 SC in last stitch,
working in the unused loops from the first 9 SC, SC 9, 3 SC in last stitch. [24].
Round 2: (9 SC, 3 INC) 2 times [30].
Round 3: {9 SC (SC, INC) 3 times} 2 times [36].
Round 4: {9 SC (SC, INC, SC) 3 times} 2 times [42].
Round 5: {9 SC (3 SC, INC) 3 times} 2 times [48].
Round 6: {9 SC (2 SC, INC, 2 SC) 3 times} 2 times [54].
Fasten off. Sew to body using the unused loops from Round 13. Stuff as you go.

Crocheted Slug pattern drunken aunt wendy

Visit my Etsy Page for patterns, kits and completed plush.

Bride of Frankenstein – Free Pattern

Drunken Aunt Wendy Bride of Frankenstein Crochet

Halloween is almost upon us. I’m done with the mini-monsters and I will be moving on to Mythical Creatures for an online contest. I’m still typing up the patterns on a regular basis. I’ll try to keep to my current schedule and post them regularly.

I’m also teaching myself how to make soap. It was a project with the kids that I am expanding on.

img_3403
Ohio State Soap is a must in my area
img_3397
Christmas Jello soap.

img_3392
Super cute owl soap.
img_3382
First soaps with the kids.

The goat’s milk soap doesn’t take the colors as well. I’m not sure whether I like the goat’s milk vs. the glycerin that is clearer so the colors are brighter. I am also adding scents, but very lightly as I don’t like strong scents.

Here’s your Bride of Frankenstein Pattern. Again it hasn’t been tested. Join the mailing list for exclusive content. Use #drunkenauntwendy if you make it so I can find it and give you crochet love.

IMG_3287

Materials
Worsted Weight Yarn
I love this yarn – Black
I love this yarn – Pistache
I love this yarn – White
Red floss
Black Floss
10.5 mm plastic safety eyes
Size E crochet hook
Polyfiberfill
Large Eye Needle

Abbreviations
SC – Single Crochet
HDC – Half Double Crochet
CH- Chain
FO – Fasten Off
SL ST – Slip Stitch
INC – Make two Single Crochet in Same Stitch
DEC – Single Crochet two stitches together
BLO – Back Loops Only

Note: Entire project is worked in the round. Use a stitch marker or a scrap piece of yarn to mark the beginning of each row. Then you don’t have to count every row. Do not join unless instructed to.

Parentheses indicate a repeat. Repeat the stitches in the parentheses for the number of times indicated.

The bracketed number [] is the number of stitches at the end of each row.

I spread my increases out so there isn’t a seam on the finished piece. If you do not like this method, you can do regular increases.

If you have any questions, please feel free to email me at drunkenauntwendy@gmail.com.

Attach to head pursuant to the instructions below.

HEAD – in Pistache
The head is made by doing an oval increase. Sometimes it helps to mark where your increases are going to go with a spare piece of contrasting yarn. Just note that the first row is worked on both sides of the starting chain. The face is then embroidered on before you finish the head and stuff her.

Ch 8
Round 1: SC in 2nd Ch, SC in next 5 stitches. 3 SC in last stitch. Working in the

unused loops from the chain, SC 5, 3 SC in last chain. [18].
Round 2: [6 SC, (INC) 3 times] repeat bracket one more time [24].
Round 3: [6 SC, (SC, INC) 3 times] repeat bracket one more time [30].
Round 4: [6 SC, (SC, INC, SC) 3 times] repeat bracket one more time [36].
Round 5: [6 SC, (3 SC, INC) 3 times] repeat bracket one more time [42].
Round 6: [6 SC, (2 SC, INC, 2 SC) 3 times] repeat bracket one more time [48].
Rounds 7-17: SC in each stitch for 11 rows [48 stitches per row].
Fasten Off. Place eyes between rows 13-14 approximately 8 stitches apart. Using black floss embroider eyebrows and eyelashes. Using red floss embroider a slightly crooked smile.

HAIR
In black, Ch 2
Round 1: 6 SC in 2nd Ch from hook [6].
Round 2: INC in each stitch [12].
Round 3: (INC, SC) 6 times [18].
Round 4: (SC, INC, SC) 6 times [24].
Round 5: (3 SC, INC) 6 times [30].
Round 6: (2 SC, INC, 2 SC) 6 times [36].
Round 7: (5 SC, INC) 6 times [42].
Round 8: (3 SC, INC, 3 SC) 6 times [48].
Rounds 9-16: 8 rows SC [48 stitches per row].
Fasten off. Attach to head at an angle, stuffing well. Using black, embroider a widow’s peak in the center of her forehead. Using White embroider lightning bolts on the side of the hair.

Bride of Frankenstein Crochet

DRESS
In white, Ch 2
Round 1: 6 SC in 2nd Ch from hook [6].
Round 2: INC in each stitch [12].
Round 3: (INC, SC) 6 times [18].
Round 4: (SC, INC, SC) 6 times [24].
Round 5: (3 SC, INC) 6 times [30].
Round 6: (2 SC, INC, 2 SC) 6 times [36].
Round 7: (5 SC, INC) 6 times [42].
Round 8: SC in BLOS [42].
Rounds 9-10: 2 rows SC [42 stitches per row].
Round 11: (5 SC, DEC) 6 times [36].
Rounds 12-13: 2 rows SC [36 stitches per row].
Round 14: (4 SC, DEC) 6 times [30].
Rounds 15-16: 2 rows SC [30 stitches per row].
Start stuffing
Round 17: (3 SC, DEC) 6 times [24].
Rounds 18-19: 2 rows SC [24 stitches per row].
Round 20: (2 SC, DEC) 6 times [18].
Rounds 21-22: 2 rows SC [18 stitches per row].
Round 23: (SC, DEC) 6 times [12].
Fasten off and sew to bottom of head.

ARMS (Make 2)
In Pistache, Ch 2
Round 1: 4 SC in 2nd Ch from hook [4].
Round 2: SC row [4], Change color to white.
Round 3: (SC, INC) 2 times [6].
Rounds 4-7: 4 rows SC [6 stitches per row].

Crocheted Frankenstein and Bride of Frankenstein
Wedded Bliss

Check out my Etsy shop for completed plush, patterns, and kits.

June the Lady Bug – Free Pattern Tuesdays

Crochet lady bug pattern

June is just a super sweet little ladybug crawling around.

This pattern can be completed using the 100% free version right here on this page. However, many people prefer the convenience of a printable, ad-free PDF. The PDF is available in my shop for a minimal fee.


Materials
Worsted Weight Yarn
I Love This Yarn – Firered
I Love This Yarn – Black
Scraps of White
Size E crochet hook
Polyfiberfill
Large Eye Needle

SC – Single Crochet
DC – Double Crochet
CH- Chain
FO – Fasten Off
SL ST – Slip Stitch
INC – Make two Single Crochet in Same Stitch
DEC – Single Crochet two stitches together
Puff Stitch –(Insert the hook in the stitch, yarn over, draw the yarn through the stitch) repeat 2 more times. You should have loops on your hook. Yarn over and draw through all 6 loops on the hook. Push the stitch out.
BLO – Back Loops Only
FLO – Front Loops Only
HDC – Half Double Crochet

Note: Entire project is worked in the round. Use a stitch marker or a scrap piece of yarn to mark the beginning of each row. Then you don’t have to count every row. Do not join unless instructed to.

Parentheses indicate a repeat. Repeat the stitches in the parentheses for the number of times indicated.

The bracketed number [] is the number of stitches at the end of each row.

I spread my increases out so there isn’t a seam on the finished piece. If you do not like this method, you can do regular increases.

If you have any questions, please feel free to email me at drunkenauntwendy@gmail.com

HEAD (black or contrast color)
Ch 2

Round 1: 4 SC in 2nd CH from hook [4].
Round 2: INC in each stitch around [8].
Round 3: (SC, INC) 4 times [12].
Round 4: (SC, INC, SC) 4 times [16].
Round 5: (3 SC, INC) 4 times [20].
Round 6: (2 SC, INC, 2 SC) 4 times [24].
Rounds 7-11: 5 rows SC [24 stitches per row].
Join with a slip stitch and fasten off.

HEAD (black or contrast color)
Ch 2

Round 1: 6 SC in 2nd Ch from hook [6].
Round 2: INC in each stitch [12].
Round 3: (SC, INC) 6 times [18].
Round 4: (SC, INC, SC) 6 times [24].
Round 5: (3SC, INC) 6 times [30].
Round 6: (2 SC, INC, 2 SC) 6 times [36].
*5 sc, inc* 6 times (42)
*6 sc, inc* 6 times (48)
*7 sc, inc* 6 times (54)
*8 sc, inc* 6 times (60)
*9sc, inc * 6 times (66)
*10 sc, inc* 6 times (72),

Join with slip stitch and fasten off.

Top (red or main color)
1. 6 sc in magic adjustable ring
2. 2 sc in each stitch (12 sc)
3. *1 sc, inc (2 sc in stitch)* 6 times (18 sc)
4. * 2 sc, inc* 6 times (24sc)
5. *3sc, inc* 6 times (30 sc)
6. *4 sc, inc* 6 times (36)
7. *5 sc, inc* 6 times (42)
8. *6 sc, inc* 6 times (48)
9. *7 sc, inc* 6 times (54)
10. *8 sc, inc* 6 times (60)
11. *9sc, inc * 6 times (66)
12. *10 sc, inc* 6 times (72)
13-20 8 rows SC
Single crochet top to bottom stuffing as you go. Leave 12 stitches remaining to single crochet top to head (do not fasten off continue to edging after the head is sewn on) stuff head and sew bottom of head to bottom of ladybug.

Edging: continue working around in main color as follows (Sc chain 2, 2hdc in same stitch) skip 2 stitches repeat around.

Antennae (black or contrast) make 2

1. Ch 7,
2. sc in 2nd chain from hook, SC each remaining stitch. Sew to top of head sticking upright
Legs (black or contrast ) make 6 optional

6 stitch I cord for 10 rows and bind off. Sew to bottom under edging.

Finishing

Embroider two white dots on the head to act as eyes.

Embroider a center line across the top in the contract color. I used long straight stitches from the center to each edge.

This is a fun project to change up your colors. You can also use size 14mm safety eyes.

Light Pink and Chocolate Brown adds a fun color combination

Bright Pink with a light blue and the 14 mm eyes.


Jason Voorhees – Free Pattern Fridays

Crochet Jason Voorhees Mini

Mini Monsters continue. I know he doesn’t get his mask until the absolutely fabulous Friday the 13th 3D. The 3D effects are hilarious.

Let me know if you make him. He’s super cute, but not tested. Check around the blog for the other mini monsters.

It’s almost Halloween!

IMG_3147


Materials


I love this yarn in Graphite

Vanna’s Choice in Beige

I love this yarn in Light Sage

I love this cotton in Dove
I love this yarn in Black

I love this yarn in White

I love this yarn in Red
12 mm safety eyes
Size E crochet hook

Large eye blunt needle

Polyfiberfill

Abbreviations


SC – Single Crochet

Ch- Chain
INC – SC 2 stitches into same stitch

DEC – SC two stitches together
BLO – Back loops only

FLO – Front Loops only

Gauge – Gauge is not important for this project, but if you are making it from the kit, you should use the right size needle to ensure you don’t run out of yarn.


Notes:

Parentheses indicate a repeat. Repeat the stitches in the parentheses for the number of times indicated.

The bracketed number [] is the number of stitches at the end of each row.


I spread my increases out so there isn’t a seam on the finished piece. If you do not like this method, you can do regular increases.


Crochet section is worked in partly in the round. Use a stitch marker or a scrap piece of yarn to mark the beginning of each row. Then you don’t have to count every row. Do not join unless instructed to.


If you have any questions, please feel free to email me at drunkenauntwendy@gmail.com.


BODY


In Graphite, Ch 2
Round 1: 6 SC in 2nd Ch from hook [6].
Round 2: INC in each stitch [12].
Round 3: (SC, INC) 6 times [18].
Round 4: (SC, INC, SC) 6 times [24].

Round 5: (3 SC, INC) 6 times [30].

Round 6: SC row [30]. Change Color to Light Sage

Rounds 7-9:  3 Rows SC [30 stitches each row].

Round 10: (13 SC, DEC) 2 times [28]. Round 11: (5 SC, DEC) 4 times [24].

Round 12: (4 SC, DEC) 4 times [20]. Round 13: (8 SC, DEC) 2 times [18].

Round 14: SC row [18]. Change color to Round 15: SC row [18].

Fasten off. Stuff and set aside.


HOCKEY MASK

In White, Ch 5

Round 1: SC in 2nd Ch, SC in next 2 stitches. 3 SC in last stitch. Working in the unused loops from the chain, SC 3, 3 SC in last chain. [12].

Round 2: [3 SC, (INC) 3 times] repeat bracket one more time [18].

Round 3: [6 SC, (SC, INC) 3 times] repeat bracket one more time [24].

Round 4: (3 SC, INC) 6 times [30].

Round 5: (4 SC, INC) 4 times, Note this is not a complete Round [24].

Fasten off. Using Black, embroider the holes onto the hockey mask.

Using red make a V at the top of the mask and two slashes on the side.


HEAD


In Beige, Ch 2
Round 1: 6 SC in 2nd Ch from hook [6].
Round 2: INC in each stitch [12].
Round 3: (SC, INC) 6 times [18].
Round 4: (5 SC, INC) 3 times [21].

Round 5: (6 SC, INC) 3 times [24].

Rounds 6-8: 3 rows SC [24 stitches each row].

Stop here and insert safety eyes through mask and into face to secure mask in place and start stuffing.

Embroider eyebrows in black.

Round 9: (6 SC, DEC) 3 times [21].

Round 10: (5 SC, DEC) 3 times [18].

Round 11: (SC, DEC) 6 times [12].

Round 12: DEC 6 times [6].

Fasten off. Attach to Body.


Using Brown, embroider small straight stitches on the side of the body for the hilt of the machete. Using the Dove, embroider four long straight stitches for the machete.


Voila


Chief Featherbrain – Free Turkey Pattern

Crochet Turkey

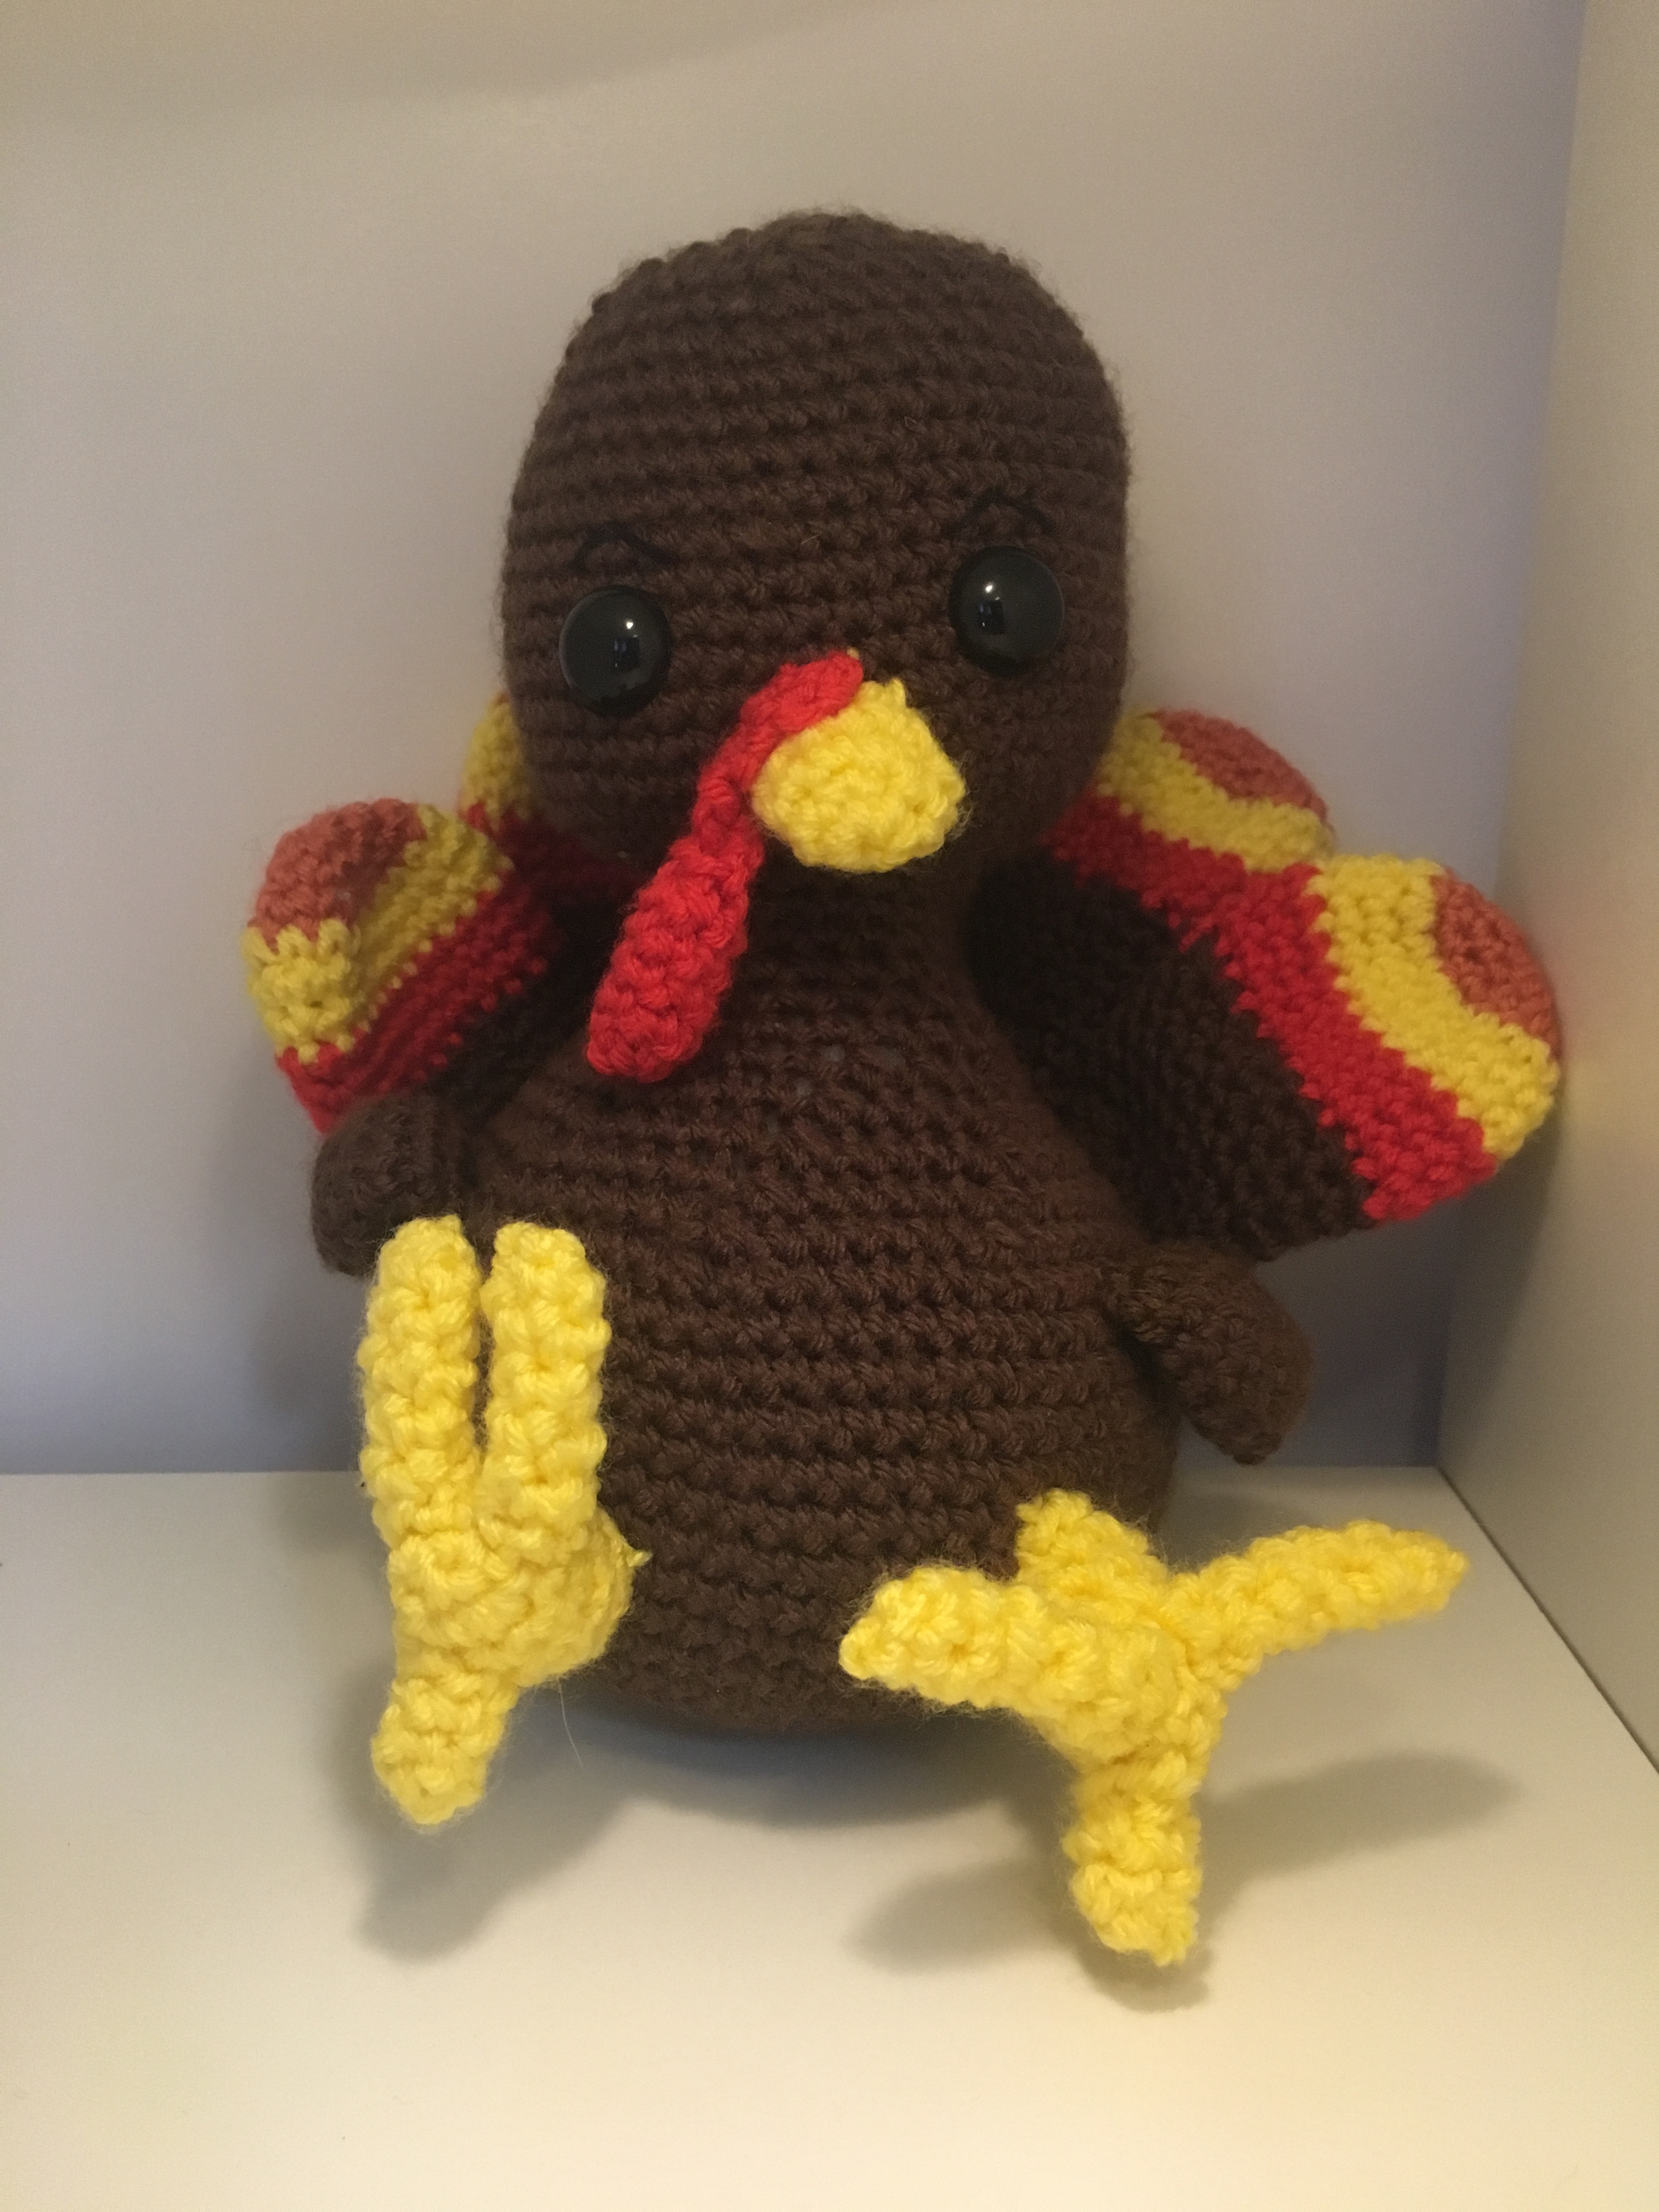
It is almost the end of October. While I’m still anticipating Halloween, many might be ready for Thanksgiving. This turkey is a fun addition to your Thanksgiving décor or toys.

This pattern can be completed using the 100% free version right here on this page. However, many people prefer the convenience of a printable, ad-free PDF. The PDF is available in my shop for a minimal fee. Want to make him, but don’t have all the supplies? Check out my Chief Featherbrain Kit.


img_2052

Materials

I love this yarn – Brown (160 yds)

I love this yarn – Yellow (35 yds) I love this yarn – Red (25 yds)

I love this yarn – Orange (12 yds) Black Floss to embroider Eyebrows (optional).

18 mm safety eyes Size E crochet hook

Large eye blunt needle

Polyfiberfill
Abbreviations


SC – Single Crochet

Ch- Chain INC – SC 2 stitches into same stitch

DEC – SC two stitches together BLO – Back loops only
Gauge – Gauge is not important for this project, but if you are making it from the kit, you should use the right size needle to ensure you don’t run out of yarn.


Notes:

Parentheses indicate a repeat. Repeat the stitches in the parentheses for the number of times indicated.

The bracketed number [] is the number of stitches at the end of each row.


I spread my increases out so there isn’t a seam on the finished piece. If you do not like this method, you can do regular increases.


Crochet section is worked in partly in the round. Use a stitch marker or a scrap piece of yarn to mark the beginning of each row. Then you don’t have to count every row. Do not join unless instructed to.


If you have any questions, please feel free to email me at drunkenauntwendy@gmail.com.


BEAK – in Yellow

Ch 2

Round 1: 6 SC in 2nd Ch from hook [6].

Round 2: (INC, 2 SC) 2 times [8].

Round 3: (INC, 3 SC) 2 times [10].

Round 4: (INC, 4 SC) 2 times [12].

Fasten off. Fold opening closed and fold in half to sew to head following the instructions below.

WATTLE – in red

Ch 2

Round 1: 6 SC in 2nd Ch from hook [6].

Rounds 2-5: SC for 4 rows [6 stitches per row].

Round 6: 3 DEC [3].

The next portion in worked back and forth, not in the round.

Rows 7-12: Ch 1, SC, Turn for 6 rows [1 stitch per row].

Fasten off and sew to the beak as shown below.

HEAD – in Brown

The head is made by doing an oval increase. Sometime it helps to mark where your increases are going to go with a spare piece of contrasting yarn. Just note that the first row is worked on both sides of the starting chain. The face is then embroidered on before you finish the head and stuff him.Ch 8

Round 1: SC in 2nd Ch, SC in next 5 stitches. 3 SC in last stitch. Working in the unused loops from the chain, SC 5, 3 SC in last chain. [18].

Round 2: [6 SC, (INC) 3 times] repeat bracket one more time [24].

Round 3: [6 SC, (SC, INC) 3 times] repeat bracket one more time [30].

Round 4: [6 SC, (SC, INC, SC) 3 times] repeat bracket one more time [36].

Round 5: [6 SC, (3 SC, INC) 3 times] repeat bracket one more time [42].

Round 6: [6 SC, (2 SC, INC, 2 SC) 3 times] repeat bracket one more time [48].

Rounds 7-17: SC in each stitch for 11 rows [48 stitches per row].

Stop here to insert eyes between rows 12-13 with about 7 stitches between the posts of the eyes.

Sew beak and wattle on as well.

At this time, using black embroidery floss add eyebrows if you wish.

Tie off any strings inside. Start stuffing.

Round 18: (6 SC, DEC) 6 times [42].

Round 19: (5 SC, DEC) 6 times [36].

Round 20: (4 SC, DEC) 6 times [30].

Round 21: (3 SC, DEC) 6 times [24].

Round 22: (2 SC, DEC) 6 times [18].

Round 23: (SC, DEC) 6 times [12].

Round 24: DEC 6 times [6].

Fasten off. Thread tail through the stitches in Round 24 and pull up tight to close opening.


BODY – in Brown

Ch 2

Round 1:  6 SC in 2nd Ch from hook [6].

Round 2: INC 6 times [12].

Round 3: (SC, INC) 6 times [18].

Round 4: (SC, INC, SC) 6 times [24].

Round 5: (3 SC, INC) 6 times [30].

Round 6: (2 SC, INC, 2 SC) 6 times [36].

Round 7: (5 SC, INC) 6 times [42].

Round 8: (3 SC, INC, 3 SC) 6 times [48].

Round 9: (7 SC, INC) 6 times [54].

Rounds 10-19: 10 rows SC [54 stitches per row].

Round 20: (7 SC, DEC) 6 times [48].

Round 21: (6 SC, DEC) 6 times [42].

Round 22: (5 SC, DEC) 6 times [36].

Round 23: (4 SC, DEC) 6 times [30].

Start stuffing

Round 24: (3 SC, DEC) 6 times [24].

Round 25: (2 SC, DEC) 6 times [18].

Rounds 26-31: 6 rows SC [18 stitches per row].

Fasten off, leave a long tail. Making sure the neck is firmly stuffed. Sew to the bottom of the head.


WINGS – in Brown (Make 2)

Ch 2

Round 1: 6 SC in 2nd Ch from hook [6].

Round 2: INC 6 times [12].

Round 3: (SC, INC) 6 times [18].

Rounds 4-6: 3 rows SC [18 stitches per row].

Round 7: SC opening together [9].

Fasten off and sew to the sides of the body, curving them as you attach.


TAIL FEATHERS (Make 5)

In Orange, Ch 2

Round 1: 6 SC in 2nd Ch from hook [6].

Round 2: INC 6 times [12].

Round 3: (SC, INC) 6 times, change colors to yellow in the last stitch [18]. 

Round 4: (SC, INC, SC) 6 times [24].

Rounds 5-6: 2 rows SC, change colors to red in last stitch [24 stitches per row].

Rounds 7-9: 3 rows SC, change colors to Brown in last stitch [24 stitches per row].

Round 10: (2 SC, DEC) 6 times [18].

Rounds 11-15:  5 rows SC [18 stitches per row].

Round 16: (SC, DEC) 6 times [12].

Round 17-21: 5 rows SC [12 stitches per row].

Round 22: SC opening closed [6].

Fasten off and sew them to the back of body, starting with center tail feather, then sew outside feathers.

Sew the feathers to the body as along the sides to help them stay upright.

Sew the last two feathers in the openings behind the first three feathers.

LEG (Make 2) – in yellow

Ch 2

Round 1:  4 SC in 2nd Ch from hook [4].

Round 2:  INC in each stitch [8].

Rounds 3-6: 4 rows SC [8 stitches per row].

Fasten off. Leave long tail for sewing. You will sew the open end to the body after you sew on the toes.

SMALL TOES (Make 2) – in yellow

Ch 2

Round 1: 4 SC in 2nd Ch from hook [4].

Rounds 2-3: 2 rows SC [4 stitches per row].

Fasten off. Sew to bottom of the leg (non-open edge).

LARGE TOES (Make 4) – in yellow

Ch 2

Round 1: 4 SC in 2nd Ch from hook [4].

Rounds 2-6: 5 rows SC [4 stitches per row].

Fasten off. Sew to bottom of the leg (non-open edge), in a Y pattern across from the small toe.

Sew to the body.


Chief Featherbrain is all done and ready for action. Or a Nap!