Beetlejuice – Free Pattern

Drunken Aunt Wendy Crocheted Beetlejuice pattern

He’s the ghost with the most. Did everyone else love this movie as much as I did? And the cartoon? Sometimes I sing Day-O out of nowhere. People might think I’m a bit nuts.

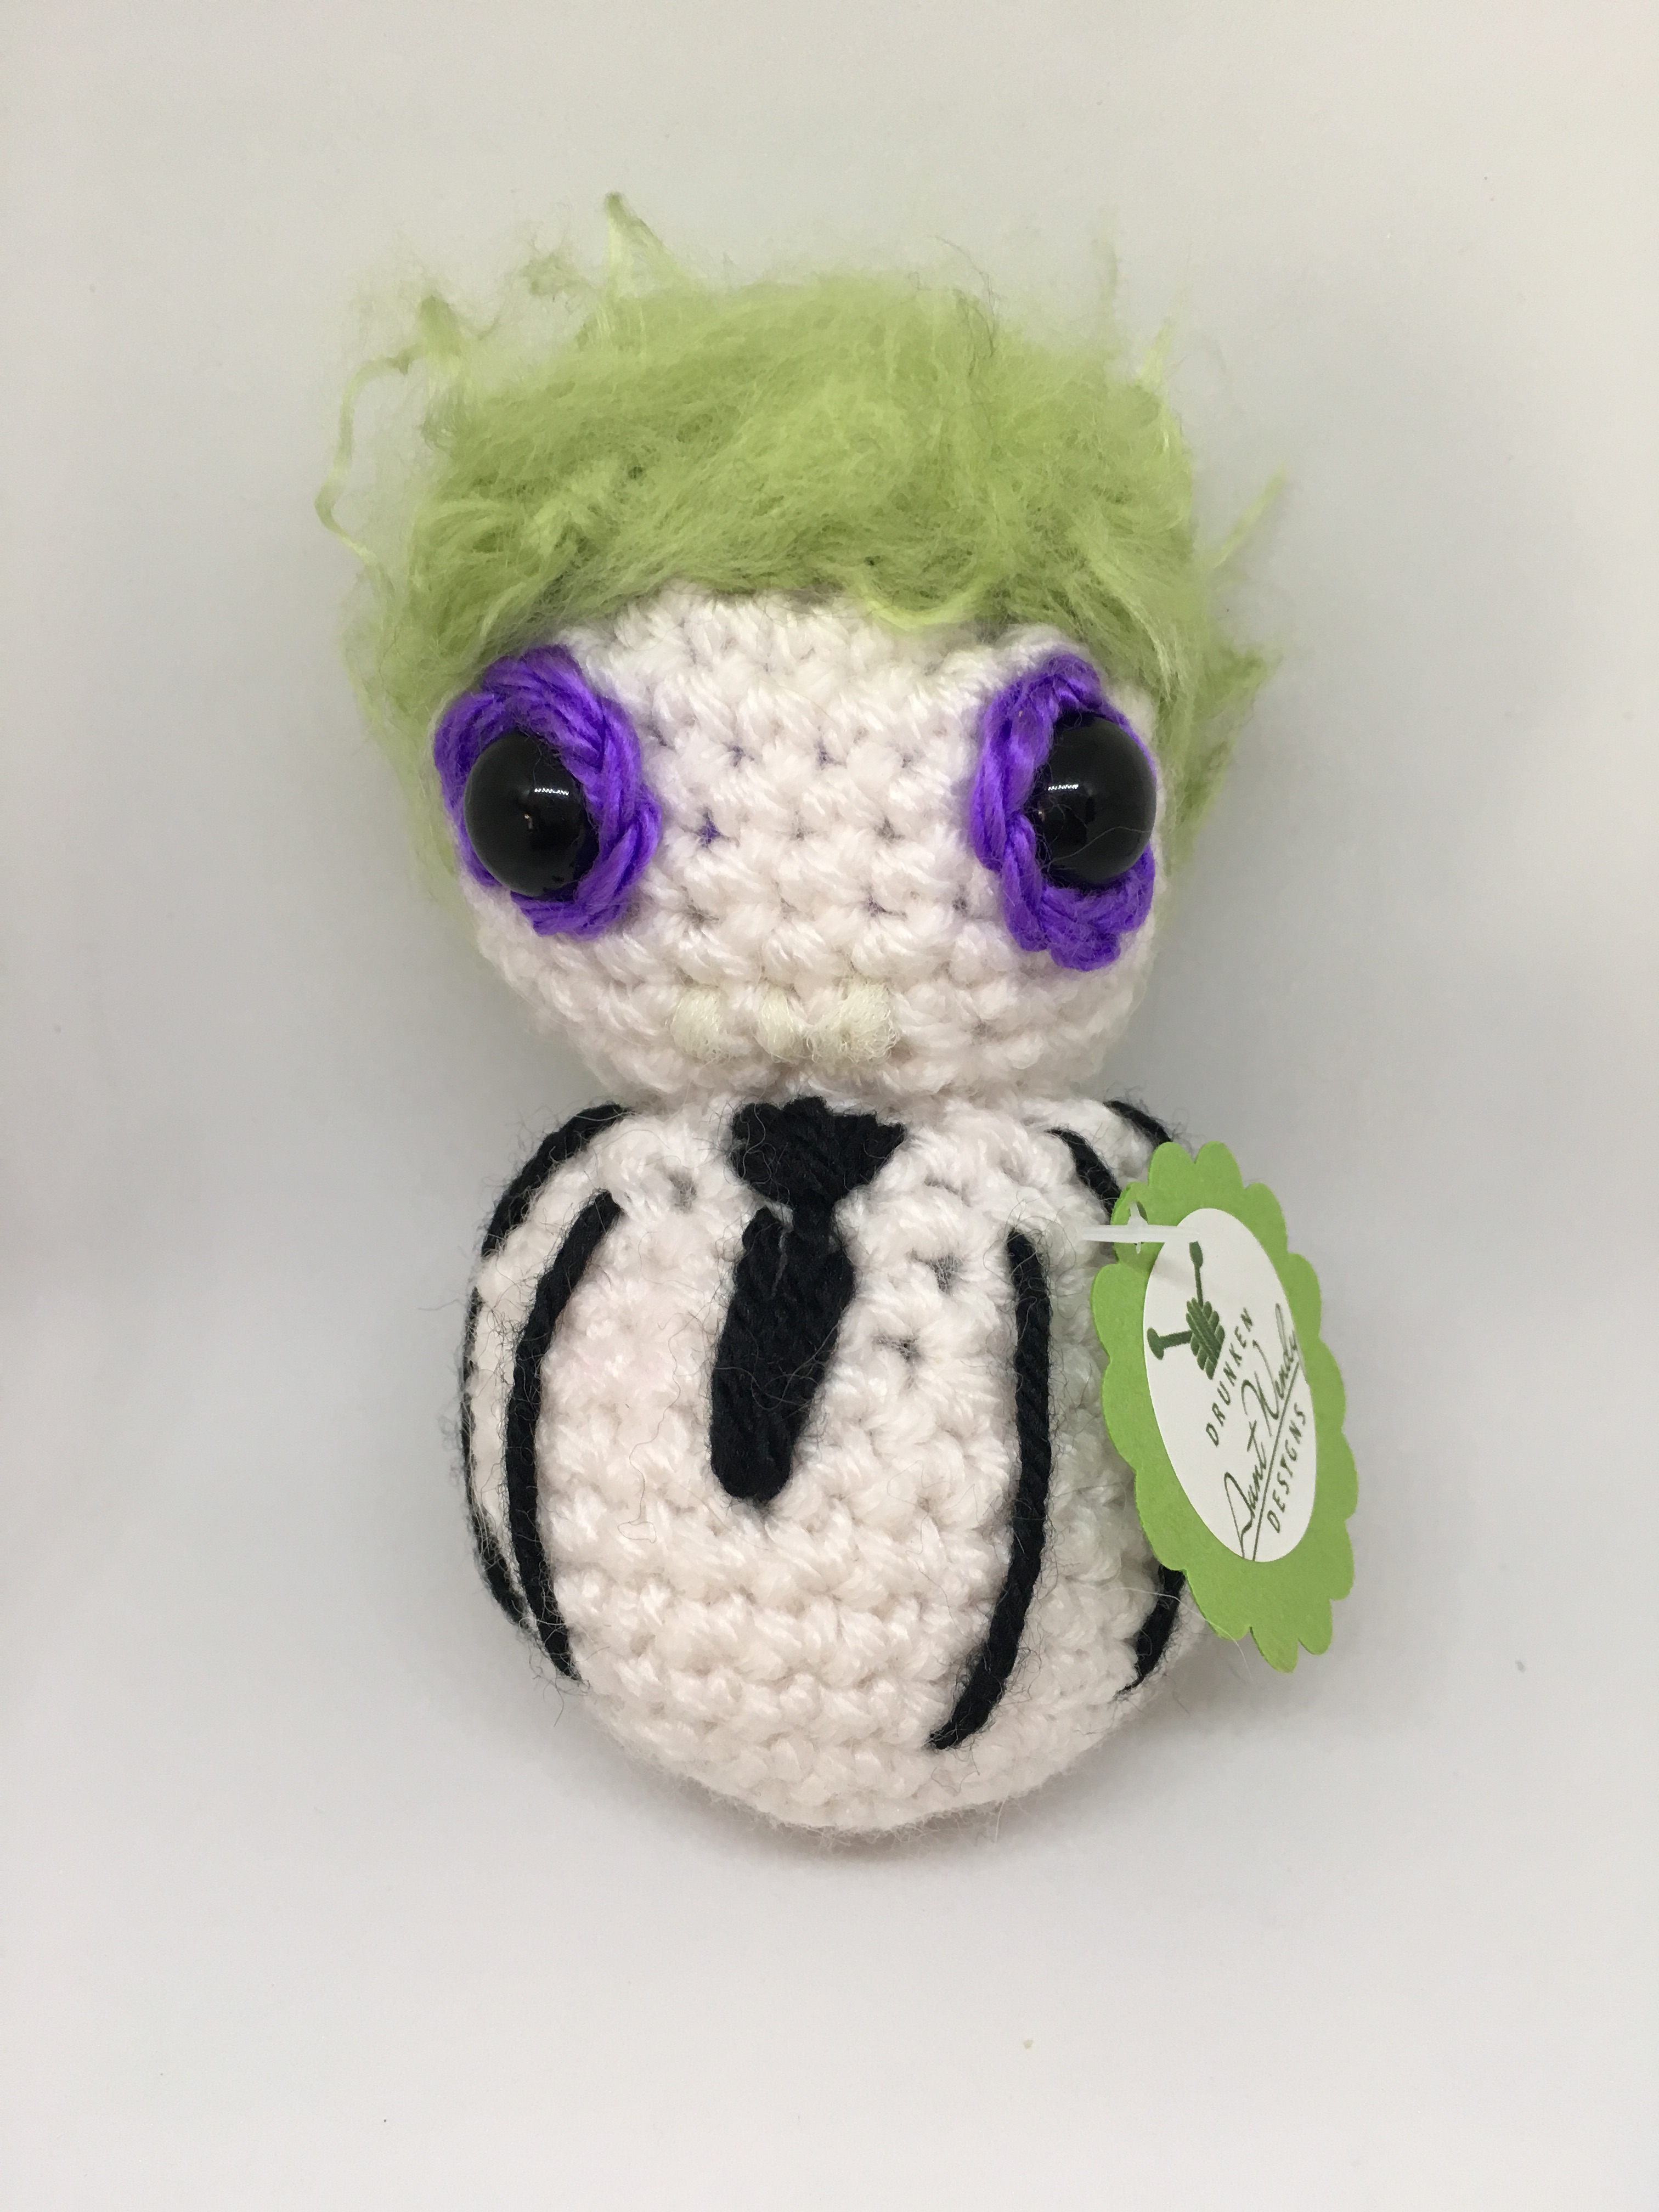
You can’t really tell from this picture, but I gave him glow in the dark teeth. At night he is spooky, but awesome.

If it is your first time visiting my site, join my mailing list for exclusive content, like Chucky. Also, make sure to look around and check out the other patterns. Many haven’t been tested, so let me know if there are problems. There are several other mini-monsters: Freddy, Samara, Jason, Twisty, and Billy.

Now, “Let’s turn on the juice and see what shakes loose.”

Use #drunkenauntwendy if you make him. I would love to see your work.

Beetlejuice
© DrunkenAuntWendyDesigns

Materials

I love this yarn – Black
I love this yarn – Antique White
Caron’s Simply Soft – Grape
Caron’s Simply Soft – Pistachio
Glow in the Dark Yarn (Optional)
12 mm safety eyes
Size E crochet hook
Large eye blunt needle
Slicker Brush
Needlefelting tool
Polyfiberfill

Abbreviations

SC – Single Crochet
DC – Double Crochet
Ch- Chain
INC – SC 2 stitches into same stitch
DEC – SC two stitches together
BLO – Back loops only
FLO – Front Loops only

Gauge – Gauge is not important for this project, but if you are making it from the kit, you should use the right size needle to ensure you don’t run out of yarn.

Notes:
Parentheses indicate a repeat. Repeat the stitches in the parentheses for the number of times indicated.
The bracketed number [] is the number of stitches at the end of each row.

I spread my increases out so there isn’t a seam on the finished piece. If you do not like this method, you can do regular increases.

Crochet section is worked in partly in the round. Use a stitch marker or a scrap piece of yarn to mark the beginning of each row. Then you don’t have to count every row. Do not join unless instructed to.

If you have any questions, please feel free to email me at drunkenauntwendy@gmail.com.

BODY

In Antique White, Ch 2
Round 1: 6 SC in 2nd Ch from hook [6].
Round 2: INC in each stitch [12].
Round 3: (SC, INC) 6 times [18].
Round 4: (SC, INC, SC) 6 times [24].
Round 5: (3 SC, INC) 6 times [30].
Rounds 6-9: 4 rows SC [30 per row].
Round 10: (13 SC, DEC) 2 times [28]. Round 11: (5 SC, DEC) 4 times [24].
Round 12: (4 SC, DEC) 4 times [20].
Round 13: (8 SC, DEC) 2 times [18].
Round 14: SC row [18].
Fasten off.

Using Black, Embroider Long Stripes on the body. Then embroider a small necktie in black as well.

EYE PATCHES (Make 2)
In Grape, Ch 2
Round 1: 6 SC in 2nd Chain from hook, join with a Slip Stitch to make a circle. [6]
Fasten off. Insert posts of eyes through the center of the eye patches before you attach to head.

HEAD

In Antique White, Ch 2
Round 1: 6 SC in 2nd Ch from hook [6].
Round 2: INC in each stitch [12].
Round 3: (SC, INC) 6 times [18].
Round 4: (5 SC, INC) 3 times [21].
Round 5: (6 SC, INC) 3 times [24].
Rounds 6-8: 3 rows SC [24 stitches each row].
Stop here and insert safety eyes. Using the Glow in the dark yarn, embroider teeth. Start stuffing.
Round 9: (6 SC, DEC) 3 times [21].
Round 10: (5 SC, DEC) 3 times [18].
Round 11: (SC, DEC) 6 times [12].
Round 12: DEC 6 times [6].
Fasten off. Attach to Body.

WIG CAP
In Pistachio, Ch 2
Round 1: 6 SC in 2nd Ch from hook [6].
Round 2: INC in each stitch [12].
Round 3: (SC, INC) 6 times [18].
Round 4: (SC, INC, SC) 6 times [24].
Round 5: (3 SC, INC) 6 times [30].
Round 6: (2 SC, INC, 2 SC) 6 times [36].
Round 7: SC row [36].
Fasten off.
Place on back of head and sew into place.

HAIR
Wrap Pistachio yarn around your hand for several wraps. Cut on one side. Using the Slicker Brush, shred the yarn into tufts. Then you use the needle felting tool to attach it. Allow it to be a bit crazy but attach firmly.

Voila


Free Pattern Friday – Billy from Saw

Drunken Aunt Wendy Billy from Saw crochet pattern

If you follow me on Instagram, you might have seen all my mini-monsters. I love scary movies. I love October because it ends with Halloween. I’ve been having a lot fun with these guys. I’ve made 10 that will be typed up and make it onto the blog. Samara, Twisty, Jason, Beetlejuice, the Babadook and Freddy Krueger are already up.

The movie series Saw pits the victims against elaborately constructed “Games” to make them learn the value of life. These games are often introduced by a ventriloquist puppet.

IMG_3322

His name is Billy and you can crochet him by following the pattern below.

Side note, you may have noticed my mailing list pop up. You should really join my mailing list. I promise you the information won’t be sold. What is does do is give you access to exclusive content.

Like this guy.

Members will be given the code to visit the page with this pattern. So Join! Its fun!

Here’s your free pattern.

Billy from Saw

© DrunkenAuntWendyDesigns

Materials
I love this yarn – Black

I love this yarn – Antique White

I love this yarn – Red

12 mm safety eyes

Red Embroidery Floss

Black Embroidery Floss
Size E crochet hook

Large eye blunt needle

Polyfiberfill
Abbreviations


SC – Single Crochet

DC – Double Crochet

Ch- Chain
INC – SC 2 stitches into same stitch

DEC – SC two stitches together
BLO – Back loops only

FLO – Front Loops only
Gauge – Gauge is not important for this project, but if you are making it from the kit, you should use the right size needle to ensure you don’t run out of yarn.


Notes:

Parentheses indicate a repeat. Repeat the stitches in the parentheses for the number of times indicated.

The bracketed number [] is the number of stitches at the end of each row.


I spread my increases out so there isn’t a seam on the finished piece. If you do not like this method, you can do regular increases.


Crochet section is worked in partly in the round. Use a stitch marker or a scrap piece of yarn to mark the beginning of each row. Then you don’t have to count every row. Do not join unless instructed to.


If you have any questions, please feel free to email me at drunkenauntwendy@gmail.com.


BODY


In Black, Ch 2
Round 1: 6 SC in 2nd Ch from hook [6].
Round 2: INC in each stitch [12].
Round 3: (SC, INC) 6 times [18].
Round 4: (SC, INC, SC) 6 times [24].

Round 5: (3 SC, INC) 6 times [30].

Rounds 6-9: 4 rows SC [30 per row].

Round 10: (13 SC, DEC) 2 times [28]. Round 11: (5 SC, DEC) 4 times [24].

Round 12: (4 SC, DEC) 4 times [20].

Round 13: (8 SC, DEC) 2 times [18].

Round 14: SC row [18].


TRIANGLE

This part is not worked in the round.

In White

Ch 2

Row 1: Sc in 2nd Ch from hook [1].

Row 2: Ch 1, turn, 3 SC in stitch [3].

Row 3: Ch 1, turn, INC, SC, INC [5].

Fasten off. Sew to top of body in the center.


BOWTIE

In Red, Ch 9

Row 1: In 3rd Ch from hook, DC, HDC, SC, SL, SC, HDC, DC.

Fasten off. Wait until head is done and then attach bow tie under head.


EYES (Make 2).

Use a red acrylic paint and a small brush to paint an open red circle on each eye. Set aside to dry.

IMG_3323


HEAD


In Antique White, Ch 2
Round 1: 6 SC in 2nd Ch from hook [6].
Round 2: INC in each stitch [12].
Round 3: (SC, INC) 6 times [18].
Round 4: (5 SC, INC) 3 times [21].

Round 5: (6 SC, INC) 3 times [24].

Rounds 6-8: 3 rows SC [24 stitches each row].

Stop here and insert safety eyes. Using Red Floss Embroider spirals on each cheek and a straight stitch to act as the mouth. Using Black Floss, Embroider dark eyebrows and lines down on both sides of the mouth. Then Start stuffing.

Round 9: (6 SC, DEC) 3 times [21].

Round 10: (5 SC, DEC) 3 times [18].

Round 11: (SC, DEC) 6 times [12].

Round 12: DEC 6 times [6].

Fasten off. Attach to Body.


HAIR

Note this part is worked back and forth.

Ch 8

Row 1:  SC in 2nd Ch from hook. SC in remaining 6 Stitches. [7].

Rows 2-6: Ch 1, SC in each stitch for 5 rows [7 stitches per row].

Row 7:  Ch 5, Turn and SC in 2nd Ch from Hook. SC in remaining three chains and across the 7 SC from row 6. Ch 5. [10 Ch, 10 SC].

Row 8: Turn, SC in 2nd Ch from hook and remaining 3 chains. SC across row [14].

Rows 9-11: Ch 1, Turn, SC across row for 3 rows [14 stitches per row].

Fasten off. Attach to head by placing the tab on top of the head and wrapping the sides around to join.


All done. Now he wants to play a game.

Video Pattern – Samara from the Ring

Drunken Aunt Wendy Crocheted Samara Doll

VHS tapes are rare these days. But if you happen upon an unmarked cassette, make sure you don’t watch it less Samara comes out of the TV to scare you to death.

She’s another part of my mini-monster collection. Other patterns done are Freddy Krueger, Billy from Saw, Jason Voorhees, Beetlejuice, Twisty, and The Babadook. New ones are added each year. Join my mailing list for links to exclusive content. Use #drunkenauntwendy if you post on Instagram.

Follow along with the video to make your own mini monster.

Frank Cyclopstra – Free Pattern

Crochet Monster Pattern

2014-03-05 15.53.48

Old blue eye, will croon a little song for you.

Back when I was obsessed with making monsters. I love this guy and his little pocket square. He’s a super fun and super bright monster.

Once again he isn’t tested so let me know if you have any problems or corrections.

FRANK CYCLOPSTRA
© DrunkenAuntWendyDesigns

Materials
Worsted Weight Yarn
I love this yarn – White
I love this yarn – Black
I love this yarn – Orange Neon
I love this yarn – Limelight
Vanna’s Choice – Aqua
Hot Pink Felt
Size E crochet hook
Polyfiberfill
Large Eye Needle

Abbreviations
SC – Single Crochet
CH- Chain
FO – Fasten Off
SL ST – Slip Stitch
INC – Make two Single Crochet in Same Stitch
DEC – Single Crochet two stitches together
BLO – Back Loops Only
Note: Entire project is worked in the round. Use a stitch marker or a scrap piece of yarn to mark the beginning of each row. Then you don’t have to count every row. Do not join unless instructed to.

Parentheses indicate a repeat. Repeat the stitches in the parentheses for the number of times indicated.

The bracketed number [] is the number of stitches at the end of each row.

I spread my increases out so there isn’t a seam on the finished piece. If you do not like this method, you can do regular increases.

If you have any questions, please feel free to email me at drunkenauntwendy@gmail.com.


CENTER LEG – in Orange Neon

Ch 2
Round 1: 6 SC in 2nd CH from hook.
Round 2: (INC) 6 times [12].
Round 3: (SC, INC) 6 times [18].
Round 4: (SC, INC, SC) 6 times [24].
Round 5: (3 SC, INC) 6 times [30].
Round 6: (2 SC, INC, 2 SC) 6 times [36].
Round 11-16: 6 rows SC [36 in each row].
FO. Set aside until you finish the other 2 legs.

SIDE LEGS (Make 2) – Orange Neon
Ch 2
Round 1: 6 SC in 2nd CH from hook.
Round 2: (INC) 6 times [12].
Round 3: (SC, INC) 6 times [18].
Round 4: (SC, INC, SC) 6 times [24].
Round 5: (3 SC, INC) 6 times [30].
Round 6: (2 SC, INC, 2 SC) 6 times [36].
Round 11-18: 8 rows SC [36 stitches per row].
Fasten Off the first leg and make a second leg. After finishing the second leg proceed to below instructions.

BODY

Round 19: SC around each leg to join [108].
Rounds 20-21: 2 rows SC [108 stitches per row]
Round 22: (16 SC, DEC) 6 times [102].
Round 23: (15 SC, DEC) 6 times [96].
Round 24: (14 SC, DEC) 6 times [90].
Round 25: (13 SC, DEC) 6 times [84].
Round 26: (12 SC, DEC) 6 times [78].
Round 27: (11 SC, DEC) 6 times [72].
Round 28: (10 SC, DEC) 6 times [66].
Round 29: (9 SC, DEC) 6 times [60].
Round 30: (8 SC, DEC) 6 times [54].
Round 31: (7 SC, DEC) 6 times [48].
Round 32: (6 SC, DEC) 6 times [42].
Round 33: (5 SC, DEC) 6 times [36].
Round 34: (4 SC, DEC) 6 times [30].
Start Stuffing and continue as you go.
Round 35: (3 SC, DEC) 6 times [24].
Round 36: (2 SC, DEC) 6 times [18].
Rounds 37-39: 3 rows SC [18 stitches per row].
Round 40: (SC, INC, SC) 6 times [24].
Round 41: (3 SC, INC) 6 times [30].
Round 42: (2 SC, INC, 2 SC) 6 times [36].
Round 41: (3 SC, INC) 6 times [30].
Round 42: (2 SC, INC, 2 SC) 6 times [36].
Round 43: (5 SC, INC) 6 times [42].
Round 44: (3 SC, INC, 3 SC) 6 times [48].
Rounds 45-54: 10 rows SC [48 stitches per row.
Round 55: (6 SC, DEC) 6 times [42].
Round 56: (5 SC, DEC) 6 times [36].
Round 57: (4 SC, DEC) 6 times [30].
Round 58: (3 SC, DEC) 6 times [24].
Round 59: (2 SC, DEC) 6 times [18].
Round 60: (SC, DEC) 6 times [12].
Round 61: DEC 6 times [6].
Fasten off leaving a long tail. Thread tail through the last row and pull up tight to close the hole.

EYE
In Black, CH 2
Round 1: 6 SC in 2nd Chain from hook, Round 2: (INC) 6 times [12], Change color to aqua.
Round 3: (INC, SC) 6 times [18], Change color to white
Round 4: Sl Stitch in first stich for jogless join, SC, INC (SC, INC, SC) 5 times [24].
Round 5: (3SC, INC) 6 times [30].

FO leaving a long tail. Use tail to sew the eye to body.

Embroider a large eyebrow in Black over the eye.

BOWTIE in Aqua
Ch 11,
Row 1: In 3rd Chain from hook DC, DC, HDC, HDC, SC, HDC, HDC, DC, DC, DC, Slip stitch 5 to the center SC. Wrap Yarn around to pull center tight. SL through the wraps to secure them. Ch enough to fit around neck, Slip Stitch to bow tie to secure it in place around his neck.

Pocket Square in Orange
Ch 6
Row 1: SC in 2nd Chain from hook, SC in next 4 stitches [5].
Rows 2-4: Ch 1, turn, SC 5 [5 stitches per row].
Row 5: SC in FLOs [5 stitches]

Fasten off.
Attach Aqua with a slip stitch to make the accent. TC, DC, SC, Sl St

HEAD BUMPS – make 5 in limelight
Ch 2
Round 1: 6 SC in 2nd Chain from hook [6].
Round 2: INC in each stitch [12].
Round 3: SC row [12].
Fasten off. Lightly stuff and attach to the head.


Sergeant Spinner – Free Pattern

Crochet Spider Pattern

Not one of my mini-monsters, but spiders scare the crap out of me.

This might be one of the scariest things I ever made. Those eyes, those legs… EEEEK!

Enjoy this free pattern. Let me know if you like him or if you have problems. Make sure to use #drunkenauntwendy if you post a picture on Instagram.

Mini-monsters are being typed and will be put up as they are completed.

Sargeant Spinner


Materials


I love this yarn – Graymist

I love this yarn – Eggplant
6 9mm safety eyes

Size E crochet hook
Poly fiberfill
Large eye blunt needle


Abbreviations


Ch – Chain

SC – Single Crochet
INC – 2 Single Crochet in designated stitch
DEC – Single Crochet 2 stitches together

DC – Double Crochet


Gauge is not important for this project. If you have purchased the kit, it is important to use the right size hook  in order to ensure you have enough yarn.
Note – this project is worked in continuous rounds. Do not join the rounds.


Notes: Almost the entire project is worked in the round. Use a stitch marker or a scrap piece of yarn to mark the beginning of each row. Then you don’t have to count every row. Do not join unless instructed to.


Parentheses indicate a repeat. Repeat the stitches in the parentheses for the number of times indicated.


The bracketed number [] is the number of stitches at the end of each row.


I spread my increases out so there isn’t a seam on the finished piece. If you do not like this method, you can do regular increases.


If you have any questions, please feel free to email me at drunkenauntwendy@gmail.com.


HEAD

In Eggplant, Ch 8,
Round 1: SC in 2nd Chain from hook, SC in next 5 stitches, 3 SC in last stitch, using the unused loops from the first 6 stitches SC 6 times, 3 SC in the end [18].

Round 2: (6 SC, 3 INC) 2 times [24].
Round 3: {6 SC (SC, INC) 3 times} 2 times [30].
Round 4: {6 SC (SC, INC, SC) 3 times} 2 times [36].
Round 5: {6 SC (3 SC, INC) 3 times} 2 times [42].
Round 6: {6 SC (2 SC, INC, 2  SC) 3 times} 2 times [48].

Rounds 7-17: 11 rows SC [48 stitches per row]

Round 18: (6 SC, DEC) 6 times [42].

Round 19: (5 SC, DEC) 6 times [36].

Round 20: (4 SC, DEC) 6 times [30].

Place Eyes as follows:

2 in between rows 11-12 approximately 2 stitches apart.

4 between rows 13-14, 2 stitches apart spacing the two above evenly.

Start stuffing firmly.
Round 21: (3 SC, DEC) 6 times [24].

Round 22: (2 SC, DEC) 6 times [18].

Round 23: (SC, DEC) 6 times [12].
Round 24: (DEC) 6 times [6].

Fasten off, leave a long tail for sewing. Weave the tail through the last six stitches and pull to close the opening.


MANDIBLES (Make 2)

In Graymist Ch 7

Row 1: SC in 2nd Ch from hook, SC remaining 5 stitches [6].

Fasten off. Sew to the head under the eyes. Twist the mandibles slightly to get the feeler look.


BODY

In Eggplant, Ch 2

Round 1: 6 SC in 2nd Chain from hook [6].

Round 2: INC in each stitch [12].

Round 3: (SC, INC) 6 times [18].

Round 4: (SC, INC, SC) 6 times [24].

Round 5: (3 SC, INC) 6 times [30].

Round 6: (2 SC, INC, 2 SC) 6 times [36].

Round 7: (5 SC, INC) 6 times [42].

Round 8: (3 SC, INC, 3 SC) 6 times [48].

Rounds 9-12: 4 rows SC [48 stitches per row].

Round 13: (6 SC, DEC) 6 times [42].

Round 14: (5 SC, DEC) 6 times [36].

Round 15: (4 SC, DEC) 6 times [30].

Start stuffing firmly.
Round 16: (3 SC, DEC) 6 times [24].

Round 17: (2 SC, DEC) 6 times [18].

Round 18: (SC, DEC) 6 times [12].
Round 19: (DEC) 6 times [6].

Fasten off, leave a long tail for sewing. Weave the tail through the last six stitches and pull to close the opening.

Sew to the bottom of the head.


LEGS (Make 8)

Note 4 legs are made in the color scheme 4 eggplant, 4 graymist, 4 eggplant. The other 4 are made in the reverse 4 graymist, 4 eggplant, 4 graymist. They are sewn on in an alternating pattern on the body.

In starting color, Ch 2

Round 1: 6 SC in 2nd Chain from hook [6].

Round 2: INC in each stitch [12].

Rounds 3-4: 2 rows SC, Change colors [12 stitches per row].

Rounds 5-6: 2 rows SC [12 stitches per row].

Round 7: DEC, DEC, 4 SC, INC, INC, 2 SC [12].

Round 8: SC row, Change Colors [12].

Round 9: DEC, DEC, 4 SC, INC, INC, 2 SC [12].

Round 10 SC row, Change Colors [12].

Round 11: DEC, DEC, 4 SC, INC, INC, 2 SC [12].

Round 12: SC row, Change Colors [12].

Fasten off. Stuff firmly. Sew around the body making sure all the curves of the legs go the same way.


The Babadook – Free Pattern

Crochet Babadook Pattern

 the babadook picture

Next in my series of mini movie monsters we have The Babadook from the movie of the same name. Your finished little monster will be about 5″ from top of his hat to the end of his outfit.

I find him super cute and not creepy at all. Again not tested, so let me know if you have problems. Coming soon we should have Jason, Michael Myers, Pennywise and Twisty. At least that is my 1st 6. I’ve sketched 6 more. I’m working on Ghostface now. I had to rework him as he looked too much like Jack Skellington.

Materials


I love this yarn Black

I love this yarn in Antique White

9 mm safety eyes
Size E crochet hook

Large eye blunt needle

Polyfiberfill

Abbreviations


SC – Single Crochet

Ch- Chain
INC – SC 2 stitches into same stitch

DEC – SC two stitches together
BLO – Back loops only

FLO – Front Loops only

Gauge – Gauge is not important for this project, but if you are making it from the kit, you should use the right size needle to ensure you don’t run out of yarn.


Notes:

Parentheses indicate a repeat. Repeat the stitches in the parentheses for the number of times indicated.

The bracketed number [] is the number of stitches at the end of each row.


I spread my increases out so there isn’t a seam on the finished piece. If you do not like this method, you can do regular increases.


Crochet section is worked in partly in the round. Use a stitch marker or a scrap piece of yarn to mark the beginning of each row. Then you don’t have to count every row. Do not join unless instructed to.


If you have any questions, please feel free to email me at drunkenauntwendy@gmail.com.


BODY


In Black, Ch 2
Round 1: 6 SC in 2nd Ch from hook [6].
Round 2: INC in each stitch [12].
Round 3: (SC, INC) 6 times [18].
Round 4: (SC, INC, SC) 6 times [24].

Round 5: In BLOs (3 SC, INC) 6 times [30].

Round 6-9: 4 rows SC [30 per row].

Round 10: (13 SC, DEC) 2 times [28]. Round 11: (5 SC, DEC) 4 times [24].

Round 12: (4 SC, DEC) 4 times [20].

Round 13: (8 SC, DEC) 2 times [18].

Round 14: SC row [18].

Round 15: SC row [18].

Fasten off. Stuff and set aside.


RATTY TAILS AT THE BOTTOM OF BODY

In Black, Attach with a slip stitch to the unused loops from Round 5.

(Ch 3, SC in 2nd Stitch, SC, Slip St to next stitch in Round 5) Repeat 9 times.


Fasten off.


EYE PATCHES (make 2)

In Antique White, Ch 2

Round 1:  6 SC in 2nd Chain from Hook Join with a Slip Stitch to make a circle [6].

Fasten off.

Insert Eye posts through center.


HEAD


In Black, Ch 2
Round 1: 6 SC in 2nd Ch from hook [6].
Round 2: INC in each stitch [12].
Round 3: (SC, INC) 6 times [18].
Round 4: (5 SC, INC) 3 times [21].

Round 5: (6 SC, INC) 3 times [24].

Rounds 6-8: 3 rows SC [24 stitches each row].

Stop here and insert safety eyes that were already through the eye patches. Embroier Mouth in Antique White using one straight stitch and two little straight stitches.Start stuffing.

Round 9: (6 SC, DEC) 3 times [21].

Round 10: (5 SC, DEC) 3 times [18].

Round 11: (SC, DEC) 6 times [12].

Round 12: DEC 6 times [6].

Fasten off. Attach to Body.


HAT


In Brown, Ch 2
Round 1: 6 SC in 2nd Ch from hook [6].
Round 2: INC in each stitch [12].
Round 3: (SC, INC) 6 times [18].
Round 4: SC in BLOs [18].

Round 5: (DEC, SC) 6 times [12].

Round 6: SC row [18].


Round 7: In FLOs (INC, SC) 6 times [18].

Round 8: (SC, INC, SC) 6 times [24].

Round 9: (3 SC, INC) 6 times [30].

Fasten off. Weave in ends.


HAIR

Wrap Black yarn around your hand for 6 wraps. Cut to have 6 pieces for hair. Attach to every other unused loop from Row Round 7. Let Dangle.


Sew Hat to the top of the head through the brim.


Voila


Freddy Krueger – Free Pattern

Freddy Krueger Crochet


I’ve been working on these absolutely adorable mini monsters.

Mini Monster
These pots don’t need to be watered.

I love scary movies and October is fast approaching. Nightmare on Elm Street is one of my favorites. Freddy Krueger is scary and funny all at once. My favorite kind of movie villain.

While they don’t have to be in pots, they certainly look cute in these little 2.5″ terra cotta pots. The finished ones are about 5 inches tall.

As I have mentioned before, the below pattern isn’t tested. If you have problems or issues, please let me know. If you make him, use #drunkenauntwendy so I can find your work on Instagram and give you love.


IMG_3137


Freddy Krueger – mini monsters

© DrunkenAuntWendyDesigns


Materials


I love this yarn Stonewash in Coraline


I love this yarn in Brown


I love this yarn in Terra Cotta


I love this yarn in Light Sage


I love this cotton in Dove
I love this yarn in Black
12 mm safety eyes
Size E crochet hook


Large eye blunt needle


Polyfiberfill


Abbreviations


SC – Single Crochet


Ch- Chain
INC – SC 2 stitches into same stitch


DEC – SC two stitches together
BLO – Back loops only


FLO – Front Loops only


Gauge – Gauge is not important for this project, but if you are making it from the kit, you should use the right size needle to ensure you don’t run out of yarn.


Notes:


Parentheses indicate a repeat. Repeat the stitches in the parentheses for the number of times indicated.


The bracketed number [] is the number of stitches at the end of each row.


I spread my increases out so there isn’t a seam on the finished piece. If you do not like this method, you can do regular increases.


Crochet section is worked in partly in the round. Use a stitch marker or a scrap piece of yarn to mark the beginning of each row. Then you don’t have to count every row. Do not join unless instructed to.


If you have any questions, please feel free to email me at drunkenauntwendy@gmail.com.


BODY


In Brown, Ch 2
Round 1: 6 SC in 2nd Ch from hook [6].
Round 2: INC in each stitch [12].
Round 3: (SC, INC) 6 times [18].
Round 4: (SC, INC, SC) 6 times [24].


Round 5: (3 SC, INC) 6 times [30].


Round 6: SC row [30]. Change Colors to Terra Cotta


Rounds 7-8: 2 Rows SC [30 stitches each row] Change Colors to light sage don’t cut the Terra Cotta. Run it up the inside.


Round 9: SC Row [30].


Round 10: (13 SC, DEC) 2 times [28]. Change colors to Terra Cotta, Don’t cut light sage. Run it up the inside of the body.


Round 11: (5 SC, DEC) 4 times [24].


Round 12: (4 SC, DEC) 4 times [20]. Change colors to Light Sage


Round 13: (8 SC, DEC) 2 times [18].


Round 14: SC row [18]. Change color to Terra Cotta. Fasten off the Sage.


Round 15: SC row [18].


Fasten off. Stuff and set aside.


HEAD


In Coraline, Ch 2
Round 1: 6 SC in 2nd Ch from hook [6].
Round 2: INC in each stitch [12].
Round 3: (SC, INC) 6 times [18].
Round 4: (5 SC, INC) 3 times [21].


Round 5: (6 SC, INC) 3 times [24].


Rounds 6-8: 3 rows SC [24 stitches each row].


Stop here and insert safety eyes, and start stuffing.

Embroider Eyebrows in Black


Round 9: (6 SC, DEC) 3 times [21].


Round 10: (5 SC, DEC) 3 times [18].


Round 11: (SC, DEC) 6 times [12].


Round 12: DEC 6 times [6].


Fasten off. Attach to Body.


HAT


In Brown, Ch 2
Round 1: 6 SC in 2nd Ch from hook [6].
Round 2: INC in each stitch [12].
Round 3: (SC, INC) 6 times [18].
Round 4: SC in BLOs [18].


Round 5: SC row [18].


Round 6: (DEC, SC) 6 times [12].


Round 7: In FLOs (INC, SC) 6 times [18].


Round 8: (SC, INC, SC) 6 times [24].


Round 9: (3 SC, INC) 6 times [30].


Fasten off. Weave in ends.


Sew to the top of the head. Dent the top of the hat to make it look like a fedora and curve the sides of the brim.


Using Brown, embroider small straight stitches on the side of the body for the glove. Using the Dove, embroider four long straight stitches for the knives in his glove.


One, two Freddy’s coming for you!

IMG_3140.JPG


Free Pattern – Ms. Prickles – The Cactus

Drunken Aunt Wendy Crocheted Cactus

Meet Ms. Prickles. Isn’t she just the cutest.

I’m changing things up. I will post patterns here after I type them. They won’t be tested, so if there is an error, I am sorry. Please feel free to let me know.

While you can make this from the pattern below, some prefer the convenience of an ad-free .pdf. You can get that here for a nominal fee.  Want to make Ms. Prickles, but don’t want to buy all the yarn? There’s a kit for that. Finally, want a Ms. Prickles, but you don’t crochet? You can always order your very own plush.

There is another Cactus pattern if you want variety.

Previous .pdfs of older patterns will be removed.

Cacti© DrunkenAuntWendyDesigns
Materials

I love this Yarn – Black (1 yd)
I love this Yarn – Limelight (12 yds)
I love this Yarn – Sungold (12 yds)
I love this yarn – Hot Rose (2 yds)
2 12 mm safety eyes
Size E crochet hook
2.5 inch Terra Cotta Pots
Poly fiberfill
Glue if you want
Large eye blunt needle

Abbreviations

Ch – Chain
SC – Single Crochet
INC – 2 Single Crochet in designated stitch
DEC – Single Crochet 2 stitches together
DC – Double Crochet
BLO – back loops only

Gauge is not important for this project unless you have purchased a kit. Using the right size hook is important to ensure you have enough yarn.

Notes: Almost the entire project is worked in the round. Use a stitch marker or a scrap piece of yarn to mark the beginning of each row. Then you don’t have to count every row. Do not join unless instructed to.
Parentheses indicate a repeat. Repeat the stitches in the parentheses for the number of times indicated.

The bracketed number [] is the number of stitches at the end of each row.

I spread my increases out so there isn’t a seam on the finished piece. If you do not like this method, you can do regular increases.

If you have any questions, please feel free to email me at drunkenauntwendy@gmail.com.

BASE
In Sungold, Ch 2
Round 1: 6 SC in 2nd Chain from hook [6].
Round 2: INC in each stitch [12].
Round 3: (SC, INC) 6 times [18].
Round 4: (SC, INC, SC) 6 times [24].
Round 5: (3 SC, INC) 6 times [30].
Round 6: SC row in BLOs [30].
Round 7: (DEC, 3 SC) 6 times [24].
Round 8: SC row [24].
Round 9: (DEC, 2 SC) 6 times [18].
Round 10: SC row [18].
Round 11: (DEC, SC) 6 times [12].
Round 12: SC row [12].
Stuff
Round 13: DEC 6 times in BLO.
Fasten off. Using a long tail sew up opening. Once you have sewn on the body stuff into the pot. You can glue it in if you want.

BODY

In Limelight CH 2
Round 1: 6 SC in 2nd Chain from hook [6].
Round 2: INC in each stitch [12].
Round 3: (SC, INC) 6 times [18].
Round 4: (SC, INC, SC) 6 times [24].
Round 5: (3 SC, INC) 6 times [30].
Rounds 6-7: 2 rows SC [30 stitches in each row].
Round 8: (DEC, 3 SC) 6 times [24].
Rounds 9-10: 2 rows SC [24 stitches per row].
Round 11: (DEC, 2 SC) 6 times [18].

Insert safety eyes between rows 8 and 9 approximately 7 stitches apart.
Start stuffing.

Rounds 12-13: 2 rows SC [18 stitches per row].
Round 14: (DEC, SC) 6 times [12].

Using black embroider mouth using a straight stitch with a small stitch to make the curve.

Round 15-16: 2 rows SC [12 per row].

Fasten off and sew to base.

BRANCH
In Limelight CH 2
Round 1: 6 SC in 2nd Chain from hook [6].
Round 2: INC in each stitch [12].
Rounds 3-4: 2 rows SC [12 stitches per row].

Start stuffing

Round 5: DEC 6 times [6].
Rounds 6-7: 2 rows SC [6 stitches per row].
Fasten off. Sew to the body at an angle.

FLOWER
In Hot Rose
Ch 2
Round 1: 6 SC in 2nd Ch from hook [6].
Round 2: INC in each stitch around, slip stitch to join [12].
Round 3: (3 DC in 1st Stitch, Slip stitch in next stitch) 6 times, [6 DC, 6 Slip Stitch].

Fasten off. Attach to head above the eye opposite the branch.

KODAK Digital Still Camera


To make her giant, three strands of yarn held together, 25 mm eyes and a 5 inch pot result in a Ms. Prickles that is about 1 foot tall.


Helmet Pig

Free crochet pattern Angry Birds

I reworked my Helmet Pig from Angry Birds. I needed something for all my birds to attack. You can find the patterns for red, black, yellow and blue. There is even a green pig if you want a couple different versions. Helmet pig is now available for you to make your own. Throw the birds at them. It is fun.  As you can see, this one has already taken some damage.

As I have been trying to expand my crafty repertoire here lately, I tried my had at cross stitching last week. It took a bit longer than I expected. Here’s my progress so far:

I’m going to have to pick it up again in a few weeks. The pattern is from the shop ElCrossStitch on Etsy. There were quite a few fun patterns and she was doing a BOGO sale.

The best part of this project was the price. Materials cost me less than $10.00. I like it when my crafts give me lots of time for the price.

I was also working on my resin jewelry since the last time. The post office just released these awesome new stamps, which made amazing necklaces. And as luck would have it, the resin was exceedingly cooperative this week. No issues with setting up, so nothing had to be thrown away.

That’s it for this week. Let me know if you make the pig. I am working on Yakko’s brother Wakko this week. Hopefully, I will be able to get both Wakko and Dot done this week.


Champagne Corks and Monsters

Champagne Cork Ornaments

This week the blog post is late as when I went to do my photo shoot yesterday, it started to downpour. As I like to photograph outside in natural light, I had to wait.

If you haven’t heard of or checked out Craftsy, I highly recommend it. The pattern I used this week is from the class Make Your Own Monster. Once a month I work from a pattern written by someone else. This allows me to see things I like in the way a pattern is presented and to not have to think so much. It is the Red Monstie #2. Unlike the other patterns that come with this class, this one is not fully written out. It is guidelines. Since the guidelines are pretty similar to my notes when I draft patterns, it worked out okay. I also don’t crochet in the back loops unless it is a design element. This is where I differ from this designer.

KODAK Digital Still Camera
RAWR!

KODAK Digital Still Camera
I’m obsessed with my tags.

KODAK Digital Still Camera
I like to call this the up the skirt angle.

I used bigger eyes as it ended up a lot bigger than I thought it was from the original picture. I had fun not coming up with my own, but I definitely like each row written out for me in the patterns I use. Also I’m not super happy with the felt teeth, but I think that is more my fault.

This was a quick project so I spent the rest of the week working on my 2017 Champagne Cork Collection. This year I have chosen White, Soft Blue and Jellybean. I added a snowman this year as well.

KODAK Digital Still Camera
Front view of all four.

KODAK Digital Still Camera

The pompoms make them a touch harder to get into the box this year. I will be creating a kit for this color combo. Check out my Etsy shop soon.

Have a great weekend. Next week, I am testing an old pattern in order to fix any issues and get it posted.

Happy Crocheting.