Mummy – Free Crochet Pattern

free pattern for crocheted mummy

This week, I am finishing up my testing of Brain and making sure that there are no issues with the pattern. I should have a kit finished by the beginning of next year if you want to make your own brain. Remember, there is exclusive content for those that are mailing list members.

Questions:

  1. What would you like for me to add to the blog? More patterns? Videos?
  2. Mailing list members, would you like an email when I post a new pattern?
  3. What should I make next: Princess Bride? Ghostbusters? Female comic heros? Avengers Infinity War? Leave a comment, Let me know.

I am also working on another faux taxidermy head. This one is a rabbit. The pattern is confusing the crap out of me, but I am plugging along.

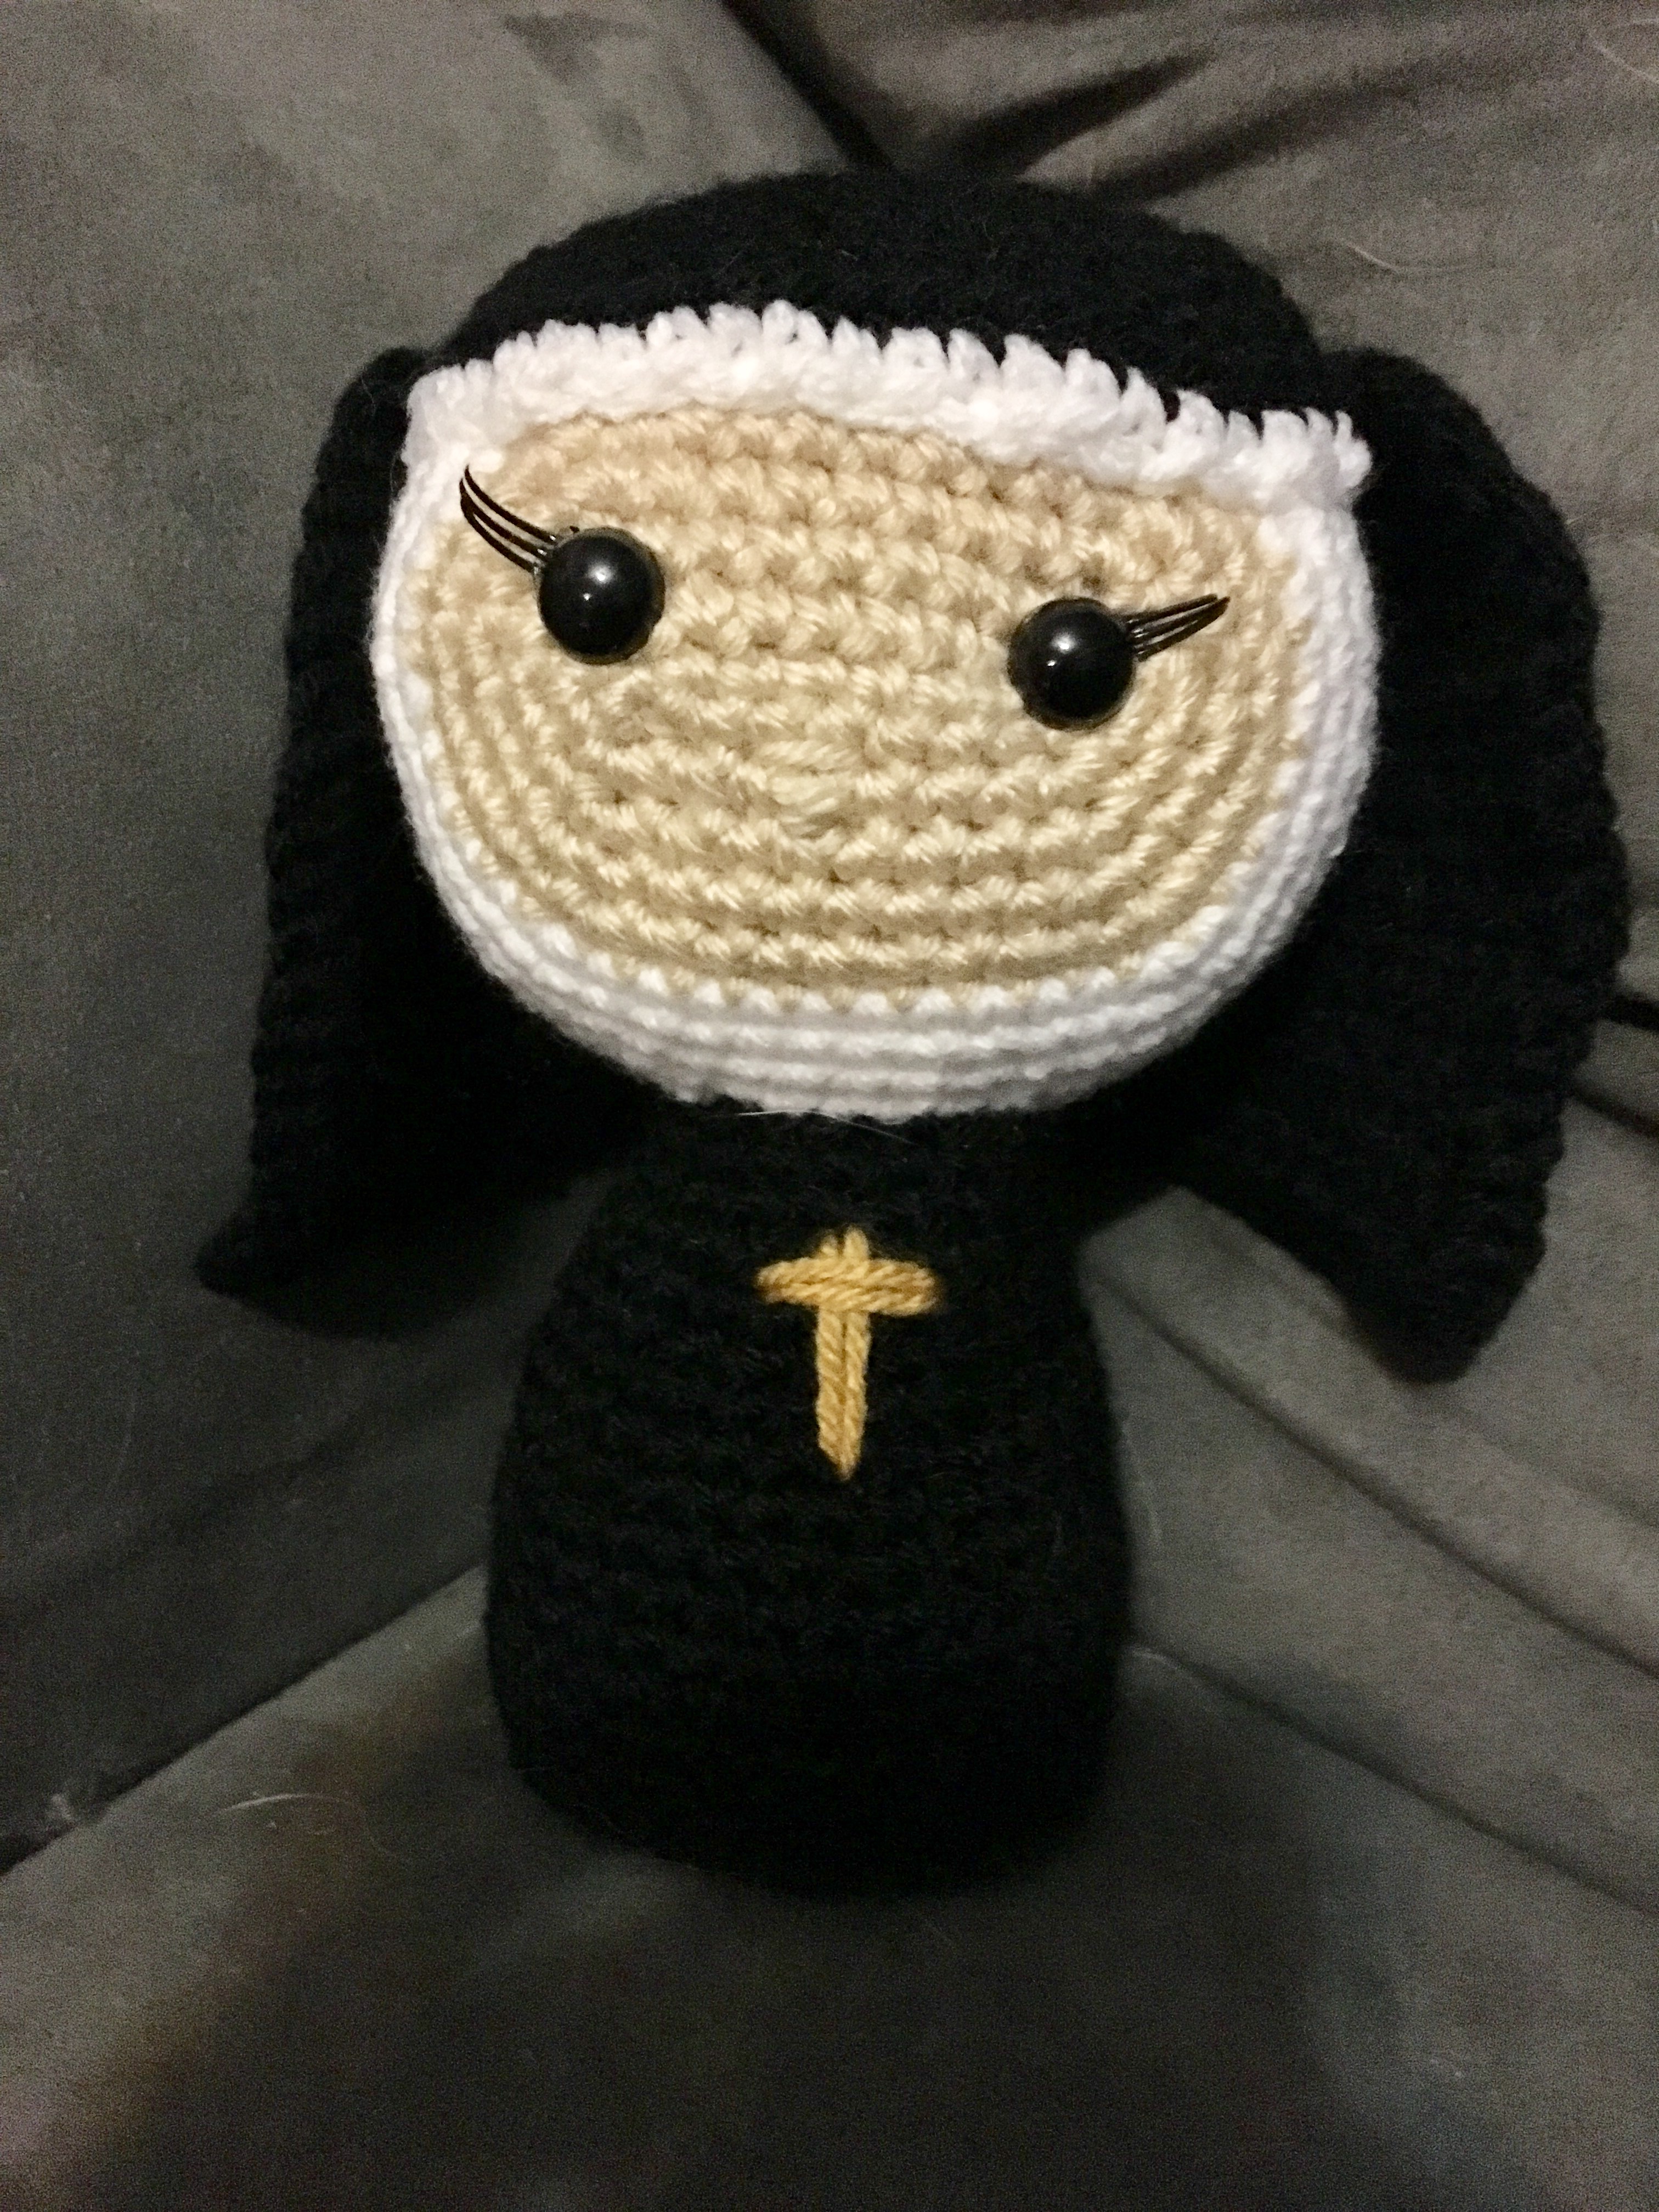
Now for the free pattern. He stumbles along and hopes his wrappings don’t come undone. If you make him, post it on Instagram. Use #drunkenauntwendy so I can find him and give you lots of love.

Super cute Mummy. This one actually brings a lot of people to my table whenever I am at a show. It brings them in, but no one ever buys him. He is really sad about that.

This little guy is approximately 8″ when finished. You can make him smaller or larger depending on your hook and yarn size.

Materials
Worsted Weight Yarn
I love this yarn – Greymist
I love this yarn – White
I love this yarn – Black
10.5 mm safety eyes
Size E crochet hook
Polyfiberfill
Large Eye Needle

Abbreviations
SC – Single Crochet
CH- Chain
FO – Fasten Off
SL ST – Slip Stitch
INC – Make two Single Crochet in Same Stitch
DEC – Single Crochet two stitches together
BLO – Back Loops Only
Note: Entire project is worked in the round. Use a stitch marker or a scrap piece of yarn to mark the beginning of each row. Then you don’t have to count every row. Do not join unless instructed to.

Parentheses indicate a repeat. Repeat the stitches in the parentheses for the number of times indicated.

The bracketed number [] is the number of stitches at the end of each row.

I spread my increases out so there isn’t a seam on the finished piece. If you do not like this method, you can do regular increases.

If you have any questions, please feel free to email me at drunkenauntwendy@gmail.com.


HEAD in Greymist
The head is made by doing an oval increase. Sometimes it helps to mark where your increases are going to go with a spare piece of contrasting yarn. Just note that the first row is worked on both sides of the starting chain. The face

is then embroidered on before you finish the head and stuff her.

Ch 8
Round 1: SC in 2nd Ch, SC in next 5 stitches. 3 SC in last stitch. Working in the unused loops from the chain, SC 5, 3 SC in last chain. [18].

Round 2: [6 SC, (INC) 3 times] repeat bracket one more time [24].

Round 3: [6 SC, (SC, INC) 3 times] repeat bracket one more time [30].
Round 4: [6 SC, (SC, INC, SC) 3 times] repeat bracket one more time [36].
Round 5: [6 SC, (3 SC, INC) 3 times] repeat bracket one more time [42].
Round 6: [6 SC, (2 SC, INC, 2 SC) 3 times] repeat bracket one more time [48].

Rounds 7-17: SC in each stitch for 11 rows [48 stitches per row].

Fasten off. Insert eyes 5 rows down from the open edge 7 stitches apart.

Using Black Embroider a straight stitch for the mouth.

TOP OF HEAD (in White)
Ch 8
Round 1: SC in 2nd Ch, SC in next 5 stitches. 3 SC in last stitch. Working in the unused loops from the chain, SC 5, 3 SC in last chain. [18].

Round 2: [6 SC, (INC) 3 times] repeat bracket one more time [24].

Round 3: [6 SC, (SC, INC) 3 times] repeat bracket one more time [30].
Round 4: [6 SC, (SC, INC, SC) 3 times] repeat bracket one more time [36].
Round 5: [6 SC, (3 SC, INC) 3 times] repeat bracket one more time [42].
Round 6: [6 SC, (2 SC, INC, 2 SC) 3 times] repeat bracket one more time [48].
Fasten off and sew to top of head, stuffing firmly as you go.

BODY and LEGS in Greymist
Starting with legs
Ch 2
Round 1: 6 SC in 2nd Ch from hook [6].
Round 2: INC in each stitch [12].
Round 3: (SC, INC) 6 times [18].
Round 4: SC in BLOs [18].
Rounds 5-11: 7 rows SC [18 stitches per row].
Fasten off 1st leg. On 2nd leg do not fasten off. Continuing with the 2nd leg
Round 12: SC around both legs to join them [36].
Rounds 13-15: 3 rows SC [36 stitches per row].
Start stuffing here. Make sure you stuff each leg.
Round 14: SC row [36].

Round 15: (4 SC, DEC) 6 times [30].
Round 16: SC row [30].
Round 17: (3 SC, DEC) 6 times [24].
Round 18: SC row [24].
Round 19: (2 SC, DEC) 6 times [18].
Round 20: SC row [18].
Round 21: (SC, DEC) 6 times [12].
Fasten off. Sew to the bottom of the head.

MUMMY WRAPS in white
Long (Make 2)
Ch 101
Row 1: SC in 2nd Chain from hook, 99 SC. [100].
Row 2: Ch 1, turn, SC 100 [100].
Sew overlapping itself to the body and up one leg.

Medium (Make 2)
Ch 76
Row 1: SC in 2nd Chain from hook, 74 SC. [75].
Row 2: Ch 1, turn, SC 75 [75].
Sew overlapping itself to the body, head or arms

Short (Make 2)
Ch 51
Row 1: SC in 2nd Chain from hook, 49 SC. [50].
Row 2: Ch 1, turn, SC 50 [50].
Sew overlapping itself to the body, head or arms

ARMS – make 2
In Greymist , Ch 2
Round 1: 4 SC in 2nd chain from hook [4].
Round 2: SC row [4]. Change Colors to White
Round 3: (SC, INC) 2 times [6]
Rounds 4-11: 8 rows SC [6 in each row].
Fasten off, tighten hole and sew to the sides of the body.


Brain – Free Crochet Pattern

Crocheted Brain

It’s time to take over the world. Brain is the next in my set of Animaniacs. Pinky, Yakko, Wakko and Dot are also available. How awesome is he? Again he isn’t tested. If you make him, make sure to use #drunkenauntwendy if you post it on Instagram. Then I can find your work and give you lots of likes!

The tested version will eventually available in my Etsy shop sans ads for a minimal fee. I will also try to get this set up as a kit as well.

Join my email mailing list for exclusive content. Pinky will only be available for mailing list member when he is done.

IMG_3593

Materials
Worsted Weight Yarn
I love this yarn – White
I love this yarn – Pink
Embroidery Floss in Black
14 MM Safety Eyes
Oval Safety nose Spray painted Red (I used pink ones from Fresh Stitches)
Size E crochet hook
Polyfiberfill
Large Eye Needle

Abbreviations
SC – Single Crochet
HDC – Half Double Crochet
DC – Double Crochet
CH- Chain
FO – Fasten Off
SL ST – Slip Stitch
INC – Make two Single Crochet in Same Stitch
DEC – Single Crochet two stitches together
BLO – Back Loops Only
Puff Stitch –(Insert the hook in the stitch, yarn over, draw the yarn through the stitch) repeat 2 more times. You should have loops on your hook. Yarn over and draw through all 6 loops on the hook. Push the stitch out.

Note: Entire project is worked in the round. Use a stitch marker or a scrap piece of yarn to mark the beginning of each row. Then you don’t have to count every row. Do not join unless instructed to.

Parentheses indicate a repeat. Repeat the stitches in the parentheses for the number of times indicated.

The bracketed number [] is the number of stitches at the end of each row.

I spread my increases out so there isn’t a seam on the finished piece. If you do not like this method, you can do regular increases.

If you have any questions, please feel free to email me at drunkenauntwendy@gmail.com.

Spray Paint the Nose before you start crocheting to give them time to dry. I recommend 2 coats to get even coverage. I find Krylon in a Satin Finish gives me the best results.

EYELIDS – in White (make 2)
Ch 2
Row 1: 4 SC in 2nd Chain from hook [4].
Row 2: Ch 1, turn, (SC, INC) 2 times [6].

Fasten off leaving a long tail and set aside to sew to face when instructed.

HEAD – in White
The head is made by doing an oval increase. Sometimes it helps to mark where your increases are going to go with a spare piece of contrasting yarn. Just note that the first row is worked on both sides of the starting chain. The face is then embroidered on before you finish the head and stuff him.
Ch 8
Round 1: SC in 2nd Ch, SC in next 5 stitches. 3 SC in last stitch. Working in the unused loops from the chain, SC 6, 3 SC in last chain. [18].
Round 2: [6 SC, (INC) 3 times] repeat bracket one more time [24].
Round 3: [6 SC, (SC, INC) 3 times] repeat bracket one more time [30].
Round 4: [6 SC, (SC, INC, SC) 3 times] repeat bracket one more time [36].
Round 5: [6 SC, (3 SC, INC) 3 times] repeat bracket one more time [42].
Round 6: [6 SC, (2 SC, INC, 2 SC) 3 times] repeat bracket one more time [48].
Round 7: [6 SC, (5 SC, Inc) 3 times] repeat bracket one more time. [54]
Rounds 8-15: SC in each stitch for 8 rows [54 stitches per row].

Insert the safety eyes btw rows 10 & 11. Approximately 11 stitches apart.

Place the nose halfway between the eyes one row down.

Place the eyelids slanted over the safety eyes and sew in place.

Using the embroidery floss, embroider eyebrows.

The mouth is optional. I did it because my nose ended up being off center.

Round 16: (7 SC, DEC) 6 times [48].
Round 17: (6 SC, DEC) 6 times [42].
Round 18: (5 SC, DEC) 6 times [36].
Round 19: (4 SC, DEC) 6 times [30].
Start stuffing
Round 20: (3 SC, DEC) 6 times [24].
Round 21: (2 SC, DEC) 6 times [18].
Round 22: (SC, DEC) 6 times [12].
Round 23: DEC 6 times [6].
Fasten off. Leave a long tail. Thread tail through the stitches in Round 23. Pull up tight to close the hole.

OUTER EAR (Make 2)
In White, Ch 2
Round 1: 6 SC in 2nd Chain from hook [6].
Round 2: INC in each stitch [12].
Round 3: (SC, INC) 6 times [18].
Round 4: (SC, INC, SC) 6 times [24].
Round 5: (3 SC, INC) 6 times [30].
Round 6: (2 SC, INC, 2 SC) 6 times [36].
Round 7: (5 SC, INC) 6 times [42].
Fasten off and leave a long tail for sewing.

INNER EAR (Make 2)
In Pink, Ch 2
Round 1: 6 SC in 2nd Chain from hook [6].
Round 2: INC in each stitch [12].
Round 3: (SC, INC) 6 times [18].
Round 4: (SC, INC, SC) 6 times [24].
Round 5: (3 SC, INC) 6 times [30].
Round 6: (2 SC, INC, 2 SC) 6 times [36].
Fasten off and leave a long tail for sewing. Attach with the wrong sides together. Be careful sewing so that the pink doesn’t show through on the other side.

Attach ears high on the sides of the head. You may want to pin them in place to check placement before sewing them on.

FEET (Make 2)
Note you will make two feet and attach them pursuant to the instructions for the body. You will fasten off the first one and not the

second one. These are also done with an oval increase.
In Pink, Ch 5
Round 1: SC in 2nd Ch, SC in next 2 stitches. 3 SC in last stitch. Working in the unused loops from the chain, SC 3, 3 SC in last chain. [12].
Round 2: 3 SC, INC 3 times, 6 SC [18].
Round 3: 3 SC, (Puff Stitch, SC) 3times, 6 SC [12 SC, 3 Puff Stitches].
Round 4: 3 SC, 3 DEC, 6 SC [12]. Change colors to White.
Round 5: (SC, DEC) 4 times [8].
Rounds 6-7: 2 rows SC [8 SC per row].
Fasten off the first one. Do not fasten off the second leg and proceed to the instructions for the body.

BODY (In White)
Making sure both feet are facing the same direction:
Round 1: SC around first leg and then around second leg to join legs together [16].
Round 2: (3 SC, INC) 4 times [20].
Round 3: (2 SC, INC, 2 SC) 4 times [24].
Round 4: (3 SC, INC) 6 times [30].
Round 5: SC row [30].
Round 6: (4 SC, INC) 6 times [36].
Rounds 7-9: 3 Rows SC [36 stitches per row].
Round 10: (4 SC, DEC) 6 times [30].
Round 11: SC row [30].
Round 12: (3 SC, DEC) 6 times [24].
Start Stuffing
Rounds 13-14: 2 rows SC [24 stitches per row].
Round 15: (2 DC, DEC) 6 times [18].
Rounds 16-17: 2 rows SC [18].
Fasten off. Stuff firmly and attach to the bottom of the head.

ARMS (Make 2)
In Pink Ch 2:
Round 1: 8 SC in 2nd Chain from hook [8].
Round 2: SC row [8].
Round 3: (DEC, 2 SC) 2 times [6].
Round 4: (DEC, SC) 2 times [4]. Change Colors to White.
Rounds 5-14: 10 rows SC [4 stitches per row.

Fasten off and sew to the body right under the head. Then attach the hands together behind the body to give him his pondering look.

Crocheted Brain

TAIL in Pink
3 stitch crochet Icord for 13 rows.
Fasten off and sew to back of body.
Stick with the Icord, it is fiddly, but works out. Promise.

Now go take over the world with Brain.

Dot – Free Crochet Pattern

Crocheted Dot from Animaniacs

Last week was my off week for crochet. I try to schedule one week a month that do another craft non crochet related, be it knitting, soap making, weaving, etc. This week, I went back to cross stitch. I started this a long time ago and decided I needed to finish it this week. Naively, I thought “How long could it take.”

Cross stitch Hogwarts Express

3-5 hours a night later for the whole week, I learned just how long it could take. I was also halfway done when I started this week. I will not be posting a picture of the back of the project as it is a complete disaster. Plus I somehow managed to spill a little bit of red wine on it.  AAAAAAAH! Now I need to remember how to frame it and all that fun wonderful stuff.

Now for the free pattern. I’m sure you remember Yakko and Wakko. There are also Pinky and the Brain Pattern. The Warner Brothers have been up on my blog for a little bit, making their poor sister sad. No worries, Dot. We just saved the best for last. If you make Dot and post her on Instagram, please use the hashtag #drunkenauntwendy so I can find it. I’d love to see your work.

Dot picture

Materials
Worsted Weight Yarn
I love this yarn – White
I love this yarn – Pink
I love this yarn – Black
I love this yarn – Sungold
I love this yarn – Yellow
12 MM Safety Eyes
Oval Safety nose Spray painted Red (I used pink ones from Fresh Stitches)
Doll Eyelashes
Size E crochet hook
Polyfiberfill
Large Eye Needle

Abbreviations
SC – Single Crochet
HDC – Half Double Crochet
DC – Double Crochet
CH- Chain
FO – Fasten Off
SL ST – Slip Stitch
INC – Make two Single Crochet in Same Stitch
DEC – Single Crochet two stitches together
BLO – Back Loops Only

Note: Entire project is worked in the round. Use a stitch marker or a scrap piece of yarn to mark the beginning of each row. Then you don’t have to count every row. Do not join unless instructed to.

Parentheses indicate a repeat. Repeat the stitches in the parentheses for the number of times indicated.

The bracketed number [] is the number of stitches at the end of each row.

I spread my increases out so there isn’t a seam on the finished piece. If you do not like this method, you can do regular increases.

If you have any questions, please feel free to email me at drunkenauntwendy@gmail.com.

Spray Paint the Nose before you start crocheting to give them time to dry. I recommend 2 coats to get even coverage.

Cut 3 pieces of eyelashes and glue to the flat part of your safety eye. I use E6000 to get a good tight hold. Set aside to dry and attach as instructed.

FACE PIECE
In White, Ch 8

Round 1: SC in 2nd Ch, SC in next 5 stitches. 3 SC in last stitch. Working in the unused loops from the chain, SC 5, 3 SC in last chain. [18].
Round 2: [6 SC, (INC) 3 times] repeat bracket one more time [24].
Round 3: [6 SC, (INC, SC) 3 times] repeat bracket one more time [30].
Round 4: Note this row is not worked in the round. Skip first Stitch, 6 DC in next stitch, SL ST, SL ST, 6 DC in next stitch, SL ST.
Round 5: This row is not worked in the round. Turn, 6 SC, 2 SL ST, 6 SC, SL ST
Round 6: Again this row is not worked in the round. Turn, SL ST, SL ST, 2 SC, 2 SL ST, Spike Stitch between the two DC sections from row 4, 2 SL ST, 2 SC, 2 SL ST.

Fasten off. Set aside until the head instructions tell you to attach the face.

EARS (Make 2)
Ch 2
Round 1: 5 SC in 2nd Chain from hook.[5]
Rounds 2-6: 5 rows SC [5 stitches per row].
Round 7: DEC, DEC, SC [3]
Rounds 8-10: 3 rows SC [3].

Fasten off. Set aside until the instructions tell you to attach to the ears after you have competed the head.

Whiskers (Make 2)
In Black, Ch 5
Note this portion is worked back and forth
Row 1: SL ST in 2nd Chain from hook, 3 SC, Ch 3
Row 2: SL in 2nd Ch from hook, SC.

Fasten off. Set aside until the instructions tell you to attach to the face.

HEAD – in Black
The head is made by doing an oval increase. Sometime it helps to mark where your increases are going to go with a spare piece of contrasting yarn. Just note that the first row is worked on both sides of the starting chain. The face is then embroidered on before you finish the head and stuff him. The example pictures are from a different head that has the same construction as Black is difficult to see the stitches.

Ch 8
Round 1: SC in 2nd Ch, SC in next 5 stitches. 3 SC in last stitch. Working in the unused loops from the chain, SC 5, 3 SC in last chain. [18].

Round 2: [6 SC, (INC) 3 times] repeat bracket one more time [24].

Round 3: [6 SC, (SC, INC) 3 times] repeat bracket one more time [30].
Round 4: [6 SC, (SC, INC, SC) 3 times] repeat bracket one more time [36].
Round 5: [6 SC, (3 SC, INC) 3 times] repeat bracket one more time [42].
Round 6: [6 SC, (2 SC, INC, 2 SC) 3 times] Rounds 7-17: SC in each stitch for 11 rows [48 stitches per row].repeat bracket one more time [48].

Center the face with the bottom close to the edge of Round 17. Insert the eyes in the Double Crochet Sections, center the nose. After the eyes and nose are secured, sew the face piece down.

Attach the whiskers on the sides of the head with the longer side on the bottom.

Round 18: 6 SC, (4 SC, DEC) 3 times, 6 SC, (4SC, DEC) 3 times [42].
Round 19: 6 SC, (3 SC, DEC) 3 times, 6 SC, (3 SC, DEC) 3 times [36].
Round 20: 6 SC, (2 SC, DEC) 3 times, 6 SC, (2 SC, DEC) 3 times [30].
Round 21: 6 SC, (SC, DEC) 3 times, 6 SC, (SC, DEC) 3 times [24].
Start Stuffing here.

Round 22: (SC, DEC) 8 times [16].
Round 23: DEC 8 times [8].
Fasten off and thread tail through the stitches in Round 23 and pull up tight to close.

You can attach the ears here. Dot’s ears are closer together than her brothers and will be secured with a flower.

FLOWER
In Sungold Chain 2
Round 1: 8 SC in 2nd Chain from hook [8]. Change colors to yellow in the last stitch.
Round 2: (4 DC in next stitch, Slip Stitch) 4 times. The last slip stitch should join at the end of the row. You should have 4 petals on the flower. [16 DC, 4 Slip Stitches].
Fasten off. Attach to ears gathering the ears together and making sure the flower is facing forward.

BODY
Body is made by crocheting two legs and then attaching the second to the first.
In White, Ch 5
Round 1: SC in 2nd Ch, SC in next 2 stitches. 3 SC in last stitch. Working in the unused loops from the chain, SC 3, 3 SC in last chain. [12].
Round 2: [3 SC, (INC) 3 times] repeat bracket one more time [18].
Round 3: 3 SC (INC, SC) 3 times, 9 SC [21].
Round 4: SC row [21].
Round 5: 3 SC, 4 DEC, 10 SC [17].
Round 6: 3 SC, 3 DEC, 8 SC [14].
Round 7: 2 SC, 3 DEC, 6 SC [11]. Change colors to Black.
Round 8: 9 SC, DEC [10].
Stuff Feet here and using black sew two lines on each foot for toes.
Rounds 9-14: SC in each stitch for 6 rows [10 stitches per row]
Fasten off leg number one and repeat above instructions for leg number 2.

Do not fasten off leg number 2, follow the instructions below for leg number 2.
Round 15: SC around stitches in leg number one and then around the stitches in leg number 2 [20]. Using the tail from leg number one, sew up any gaps that may have resulted at the join.

Stuff legs and continue crocheting in the round.

Rounds 16-21: SC in each stitch for 6 rows. [20 stitches per row].

Make sure you stuff the body and legs as you go.
Round 22: 5 SC, DEC, 7 SC, DEC [18].
Round 23: SC row [18].
Round 24: 4 SC, DEC, 6 SC, DEC [16].
Round 25: SC row [16].
Round 26: (2 SC, DEC) 4 times [12].
Fasten off.

Don’t attach the body to the head yet or you will have trouble getting the skirt on.

SKIRT in pink
Ch 21, join to make a circle.
Round 1: HDC in each stitch around [21].
Round 2: SC in each stitch [21].

Round 3: INC in each stich. [42].
Rounds 4-9: 6 rows SC [42 stitches per row].
Fasten off leave a long tail for sewing.

Fit skirt over the top of the body and position where you like. Sew in place.

Sew body to head.

TAIL
In Black, Ch 2.
Round 1: 6 SC in 2nd Chain from hook [6].
Rounds 2-7: 6 rows SC [6 stitches per row].
Round 8: DEC, 2 SC, INC, SC [6].
Rounds 9-14: 6 rows SC [6 stitches per row].
Sew tail to back of skirt in the center.

ARMS (Make 2)
In White Ch 2:
Round 1: 8 SC in 2nd Chain from hook [8].
Round 2: SC row [8].
Round 3: (DEC, 2 SC) 2 times [6].
Round 4: (DEC, SC) 2 times [4]. Change Colors to Black.
Rounds 5-12: 8 rows SC [4 stitches per row.

Fasten off and sew to the body right under the head.

Animaniac crochet

I’m working on Brain right now. We shall see if he gets done this week. Right now it is just a giant noggin. Updated: The link is above. 

Wakko – Free Crochet Pattern

Crocheted Wakko Pattern

Remember the Animaniacs? I loved this show. Yakko, Wakko and Dot were the best. Plus it spawned Pinky and the Brain.

I’ve been working on crocheting my childhood.

Here’s Wakko. You can also get Dot and Yakko. Crocheted Animaniacs

Remember this one isn’t tested. If you see problems, let me know. If you make Wakko, use #drunkenauntwendy when posting pictures so I can find it.

WAKKO
© 2017DrunkenAuntWendyDesigns
Materials
Worsted Weight Yarn
I love this yarn – White
I love this yarn – Red
I love this yarn – Black
I love this yarn – Medium Blue
12 MM Safety Eyes
Oval Safety nose Spray painted Red (I used pink ones from Fresh Stitches)
Size E crochet hook
Polyfiberfill
Large Eye Needle

Abbreviations
SC – Single Crochet
HDC – Half Double Crochet
DC – Double Crochet
CH- Chain
FO – Fasten Off
SL ST – Slip Stitch
INC – Make two Single Crochet in Same Stitch
DEC – Single Crochet two stitches together
BLO – Back Loops Only

Note: Entire project is worked in the round. Use a stitch marker or a scrap piece of yarn to mark the beginning of each row. Then you don’t have to count every row. Do not join unless instructed to.

Parentheses indicate a repeat. Repeat the stitches in the parentheses for the number of times indicated.

The bracketed number [] is the number of stitches at the end of each row.

I spread my increases out so there isn’t a seam on the finished piece. If you do not like this method, you can do regular increases.

If you have any questions, please feel free to email me at drunkenauntwendy@gmail.com.

Spray Paint the Nose before you start crocheting to give them time to dry. I recommend 2 coats to get even coverage.

FACE PIECE
In White, Ch 8

Round 1: SC in 2nd Ch, SC in next 5 stitches. 3 SC in last stitch. Working in the unused loops from the chain, SC 5, 3 SC in last chain. [18].

Round 2: [6 SC, (INC) 3 times] repeat bracket one more time [24].
Round 3: [6 SC, (INC, SC) 3 times] repeat bracket one more time [30].
Round 4: Note this row is not worked in the round. Skip first Stitch, 6 DC in next stitch, SL ST, SL ST, 6 DC in next stitch, SL ST.
Round 5: This row is not worked in the round. Turn, 6 SC, 2 SL ST, 6 SC, SL ST
Round 6: Again this row is not worked in the round. Turn, SL ST, SL ST, 2 SC, 2 SL ST, Spike Stitch between the two DC sections from row 4, 2 SL ST, 2 SC, 2 SL ST.

Fasten off. Set aside until the head instructions tell you to attach the face.

EARS (Make 2)
Ch 2
Round 1: 5 SC in 2nd Chain from hook.[5]
Rounds 2-6: 5 rows SC [5 stitches per row].
Round 7: DEC, DEC, SC [3]
Rounds 8-10: 3 rows SC [3].

Fasten off. Set aside until the instructions tell you to attach to the face.

Whiskers (Make 2)
In Black, Ch 5
Note this portion is worked back and forth
Row 1: SL ST in 2nd Chain from hook, 3 SC, Ch 3
Row 2: SL in 2nd Ch from hook, SC.

Fasten off. Set aside until the instructions tell you to attach to the face.

HEAD – in Black
The head is made by doing an oval increase. Sometime it helps to mark where your increases are going to go with a spare piece of contrasting yarn. Just note that the first row is worked on both sides of the starting chain. The face is then embroidered on before you finish the head and stuff him. The example pictures are from a different head that has the same construction as Black is difficult to see the stitches.

Ch 8
Round 1: SC in 2nd Ch, SC in next 5 stitches. 3 SC in last stitch. Working in the unused loops from the chain, SC 5, 3 SC in last chain. [18].

Round 2: [6 SC, (INC) 3 times] repeat bracket

Round 3: [6 SC, (SC, INC) 3 times] repeat bracket one more time [30].
Round 4: [6 SC, (SC, INC, SC) 3 times] repeat bracket one more time [36].
Round 5: [6 SC, (3 SC, INC) 3 times] repeat bracket one more time [42].
Round 6: [6 SC, (2 SC, INC, 2 SC) 3 times] repeat bracket one more time [48].

Rounds 7-17: SC in each stitch for 11 rows [48 stitches per row].

Fasten off.

Center the face with the bottom close to the edge of Round 17. Insert the eyes in the Double Crochet Sections, center the nose. After the eyes and nose are secured, sew the face piece down.

Attach the whiskers on the sides of the head with the longer side on the bottom.

BALL CAP in red
Ch 2
Round 1: 6 SC in 2nd Ch from hook [6].
Round 2: (INC) 6 times [12].
Round 3: (INC, SC) 6 times [18].
Round 4: (SC, INC, SC) 6 times [24].
Round 5: (INC, 3 SC) 6 times [30].
Round 6: (2 SC, INC, 2 SC) 6 times [36].
Round 7: (5 SC, INC) 6 times [42].
Round 8: (3 SC, INC, 3 SC) 6 times [48].
Round 9: (7 SC, INC) 6 times [54].
Rounds 10-14: 5 rows SC [54 stitches per row].

BILL in red
Ch 2
Round 1: 3 SC in 2nd Ch from hook [3].
Round 2: (INC) 3 times [6].
Round 3: (INC, SC) 3 times [9].
Round 4: (SC, INC, SC) 3 times [12].

Round 5: (INC, 3 SC) 3 times [15].
Round 6: (2 SC, INC, 2 SC) 3 times [18].
Round 7: (5 SC, INC) 3 times [21].
Round 8: (3 SC, INC, 3 SC) 3 times [24].
Fasten off. Sew to ball cap. Attach Ball cap to head with the bill on the back of the head. Stuffing as you go.

Attach the ears to the top of the ball cap. Make sure the ears point in instead of out like Yakkos.

BODY
Body is made by crocheting two legs and then attaching the second to the first.
In White, Ch 5
Round 1: SC in 2nd Ch, SC in next 2 stitches. 3 SC in last stitch. Working in the unused loops from the chain, SC 3, 3 SC in last chain. [12].
Round 2: [3 SC, (INC) 3 times] repeat bracket one more time [18].
Round 3: 3 SC (INC, SC) 3 times, 9 SC [21].
Round 4: SC row [21].
Round 5: 3 SC, 4 DEC, 10 SC [17].
Round 6: 3 SC, 3 DEC, 8 SC [14].
Round 7: 2 SC, 3 DEC, 6 SC [11]. Change colors to Black.
Round 8: 9 SC, DEC [10].
Stuff Feet here and using black sew two lines on each foot for toes.
Rounds 9-14: SC in each stitch for 6 rows [10 stitches per row]
Fasten off leg number one and repeat above instructions for leg number 2.

Do not fasten off leg number 2, follow the instructions below for leg number 2.
Round 15: SC around stitches in leg number one and then around the stitches in leg number 2 [20].

Using the tail from leg number one, sew up any gaps that may have resulted at the join.

Stuff legs and continue crocheting in the round.

Rounds 16-21: SC in each stitch for 6 rows. [20 stitches per row].

Make sure you stuff the body and legs as you go.

Round 22: 5 SC, DEC, 7 SC, DEC [18].
Round 23: SC row [18].
Round 24: 4 SC, DEC, 6 SC, DEC [16].
Round 25: SC row [16]. Change colors to Medium Blue
Round 26: In BLOS, (2 SC, DEC) 4 times [12].
Fasten off.

SHIRT
In Medium Blue
Join to Round 26 to the unused loops.
Round 1: (2 SC, INC) 4 times [16].
Round 2: (3 SC, INC) 4 times [20].
Rounds 3-8: 6 rows SC [20 stitches per row].

Sew body to head.

TAIL
In Black, Ch 2.
Round 1: 6 SC in 2nd Chain from hook [6].
Rounds 2-7: 6 rows SC [6 stitches per row].
Round 8: DEC, 2 SC, INC, SC [6].
Rounds 9-14: 6 rows SC [6 stitches per row].
Fasten off. Sew to back of pants.

ARMS (Make 2)
In White Ch 2:
Round 1: 8 SC in 2nd Chain from hook [8].
Round 2: SC row [8].
Round 3: (DEC, 2 SC) 2 times [6].
Round 4: (DEC, SC) 2 times [4]. Change Colors to Medium Blue
Rounds 5-12: 8 rows SC [4 stitches per row.

Fasten off and sew to the body right under the head.

Crocheted Animaniacs

Sister Margaretta – Free Crochet Pattern

Crocheted Nun pattern

My daughter was in the Sound of Music with her high school this year. She was super excited to get the role of Sister Margaretta.

Last year she was the Wicked Witch of the West and I made her a Wicked Witch Doll to match her outfit.

This year I surprised her with a nun to match this role. I guess I have to make one each year from now on.

This isn’t tested, let me know if you have problems. If you make her, use #drunkenauntwendy so I can find it.


Materials
Worsted Weight Yarn
I love this yarn – Goldenrod
I love this yarn – Beige
I love this yarn – White
I love this yarn – Black
12 mm plastic safety eyes
Doll Eyelashes
Size E crochet hook
Polyfiberfill
Large Eye Needle

Abbreviations
SC – Single Crochet
HDC – Half Double Crochet
CH- Chain
FO – Fasten Off
SL ST – Slip Stitch
INC – Make two Single Crochet in Same Stitch
DEC – Single Crochet two stitches together
BLO – Back Loops Only

Note: Entire project is worked in the round. Use a stitch marker or a scrap piece of yarn to mark the beginning of each row. Then you don’t have to count every row. Do not join unless instructed to.

Parentheses indicate a repeat. Repeat the stitches in the parentheses for the number of times indicated.

The bracketed number [] is the number of stitches at the end of each row.

I spread my increases out so there isn’t a seam on the finished piece. If you do not like this method, you can do regular increases.

If you have any questions, please feel free to email me at drunkenauntwendy@gmail.com.


Before starting I recommend you cut a small piece of eyelashes and glue to the back of the safety eyes and set them aside to dry while you work on the head.

Attach to head pursuant to the instructions below.

HEAD

The head is made by doing an oval increase. Sometimes it helps to mark where your increases are going to go with a spare piece of contrasting yarn. Just note that the first row is worked on both sides of the starting chain. The face is then embroidered on before you finish the head and stuff her.

In Beige, Ch 8
Round 1: SC in 2nd Ch, SC in next 5 stitches. 3 SC in last stitch. Working in the unused loops from the chain, SC 5, 3 SC in last chain. [18].
Round 2: [6 SC, (INC) 3 times] repeat bracket one more time [24].
Round 3: [6 SC, (SC, INC) 3 times] repeat bracket one more time [30].
Round 4: [6 SC, (SC, INC, SC) 3 times] repeat bracket one more time [36].
Round 5: [6 SC, (3 SC, INC) 3 times] repeat bracket one more time [42]. Change Colors to White.
Round 6: [6 SC, (2 SC, INC, 2 SC) 3 times] repeat bracket one more time [48].
Rounds 7-15: SC in each stitch for 9 rows [48 stitches per row].
Pause here and place eyes between rows 13-14 approximately 8 stitches apart. Make a couple of straight stitches to act as the nose for your doll. You can also use a bit of red makeup to give her rosy cheeks.

DRESS
In black, Ch 2
Round 1: 6 SC in 2nd Ch from hook [6].
Round 2: INC in each stitch [12].
Round 3: (INC, SC) 6 times [18].
Round 4: (SC, INC, SC) 6 times [24].
Round 5: (3 SC, INC) 6 times [30].
Round 6: (2 SC, INC, 2 SC) 6 times [36].
Round 7: (5 SC, INC) 6 times [42].
Round 8: SC in BLOS [42].
Rounds 9-10: 2 rows SC [42 stitches per row].
Round 11: (5 SC, DEC) 6 times [36].
Rounds 12-13: 2 rows SC [36 stitches per row].
Round 14: (4 SC, DEC) 6 times [30].
Rounds 15-16: 2 rows SC [30 stitches per row].
Start stuffing
Round 17: (3 SC, DEC) 6 times [24].
Rounds 18-19: 2 rows SC [24 stitches per row].
Round 20: (2 SC, DEC) 6 times [18].
Rounds 21-22: 2 rows SC [18 stitches per row].
Fasten off. Using Goldenrod and straight stitches embroider a cross on the front of her dress. Finish stuffing and sew to bottom of head.

HABIT (Top of habit)
In Black, Ch 8
Round 1: SC in 2nd Ch, SC in next 5 stitches. 3 SC in last stitch. Working in the unused loops from the chain, SC 5, 3 SC in last chain. [18].
Round 2: [6 SC, (INC) 3 times] repeat bracket one more time [24].
Round 3: [6 SC, (SC, INC) 3 times] repeat bracket one more time [30].
Round 4: [6 SC, (SC, INC, SC) 3 times] repeat bracket one more time [36].
Round 5: [6 SC, (3 SC, INC) 3 times] repeat bracket one more time [42].
Round 6: [6 SC, (2 SC, INC, 2 SC) 3 times] repeat bracket one more time [48].
Round 7: SC row [48]. Change colors to White
Round 8: SC in BLOs [48]. Fasten off and leave a long tail for sewing.
Sew to top of head. It may cover part of the beige and that is just fine.

Back of habit
In Black, find the side of her head and join with a slip stitch into the unused loops from Round 8. Note this portion is worked back and forth.

Row 1: 24 SC around the back of head [24].

Row 2: Ch 1, turn, INC in each stitch [48].
Rows 3-25: Ch 1, turn, SC row for 23 rows. [48 stitches per row].
You can make this part shorter or longer depending on your preference. Fasten off, weave in ends.


Pink and White Harley Quinn – Free Pattern

Crochet Harley Quinn

A while back I made this super cute Harley Quinn. I like the pink and white version. She is a bit softer in pink and white.

Pink and White

Warning, there are quite a few color changes on this one. You need to try to make them at the same spot each row to keep the color blocking right. Again this is not tested. If you have questions or problems, please let me know.

For other Comic Book ladies, check out She-Hulk, Mystique and Cheetara.

Materials
Worsted Weight Yarn
I love this yarn – Pink
I love this yarn – Antique White
14 MM Safety Eyes
Doll eyelashes
E6000 epoxy
Size E crochet hook
Polyfiberfill
Large Eye Needle

Abbreviations
SC – Single Crochet
DC – Double Crochet
CH- Chain
FO – Fasten Off
SL ST – Slip Stitch
INC – Make two Single Crochet in Same Stitch
DEC – Single Crochet two stitches together
Puff Stitch –(Insert the hook in the stitch, yarn over, draw the yarn through the stitch) repeat 2 more times. You should have loops on your hook. Yarn over and draw through all 6 loops on the hook. Push the stitch out.
BLO – Back Loops Only
FLO – Front Loops Only

Note: Entire project is worked in the round. Use a stitch marker or a scrap piece of yarn to mark the beginning of each row. Then you don’t have to count every row. Do not join unless instructed to.

Parentheses indicate a repeat. Repeat the stitches in the parentheses for the number of times indicated.

The bracketed number [] is the number of stitches at the end of each row.

I spread my increases out so there isn’t a seam on the finished piece. If you do not like this method, you can do regular increases.

If you have any questions, please feel free to email me at drunkenauntwendy@gmail.com.

EYES

Before starting the head, clip a section of three lashes per eye. Glue to the flat portion of your safety eyes and set aside to dry.

HEAD in Antique White
Head is worked as an oval. The increases go on the sides of the oval.
Ch 8
Round 1: SC in 2nd Ch from hook, SC for 5 stitches, 3 SC in last stitch, working in the unused loops from the first few stitches, 6 SC, 3 SC in the beginning loop [18].
Round 2: 6 SC, INC 3 times, 6 SC, INC 3 times [24].
Round 3: 6 SC, (SC, INC) 3 times, 6 SC, (SC, INC) 3 times [30].
Round 4: 6 SC, (SC, INC, SC) 3 times, 6 SC, (SC, INC, SC) 3 times [36].
Round 5: 6 SC, (3 SC, INC) 3 times, 6 SC, (3 SC, INC) 3 times [42].
Round 6: 6 SC, (2 SC, INC, 2 SC) 3 times, 6 SC, (2 SC, INC, 2 SC) 3 times [48].
Rounds 7-16: 10 rows SC [48 stitches per row.
Stop here to Insert Eyes. Use a piece of white to embroider nose with straight stitches. Fold the curved sides together and mark the halfway points on the front and back of the head. Starting in the center between the eyes, insert your hook. Slip stitch in pink her mask around the eyes.
This next part might vary depending on how much your crochet shifts when you are working in the round and your halfway point.
Round 17: SC in white until you hit the marked halfway point. Change colors here to Pink and SC around to next mark. Switch back to White and finish the row.
Here you are going to start decreasing the head. Continue to switch the colors at the halfway point while you are decreasing.
Round 18: (6 SC, DEC) 6 times [42].
Round 19: (5 SC, DEC) 6 times [36].
Round 20: (4 SC, DEC) 6 times [30].
Round 21: (3 SC, DEC) 6 times [24].
Round 22: (2 SC, DEC) 6 times [18].
Round 23: (SC, DEC) 6 times [12].
Round 24: DEC 6 times [6].
Fasten off. Thread yarn through last row and pull up tight to close opening.

BACK OF HEAD
Make 1 in each color.
Ch 16
Row 1: SC in 2nd Chain from hook, 14 SC (15).
Rows 2-11: 8 rows SC [15 stitches per row].
Fasten off and sew to the back of the head under the colored section of the head.

BALLS for hat make 1 in pink and 1 in white
Ch 2.
Round 1: 4 SC in 2nd Ch from hook [4].
Round 2: INC in each stitch [8].
Round 3: SC row [8].
Round 4: DEC 4 times [4].
Fasten off. Set aside to sew to jester hat spikes.

HAT – make 2 one in each color.
Ch 2
Round 1: 4 SC in 2nd Chain from hook [4].
Round 2: INC, 3 SC [5].
Round 3: INC, 4 SC [6].
Round 4: INC, 5 SC [7].
Round 5: INC, 6 SC [8].
Round 6: INC, 7 SC [9].
Round 7: INC, 8 SC [10].
Round 8: INC, 9 SC [11].
Round 9: INC, 10 SC [12].
Round 10: INC, 11 SC [13].
Round 11: INC, 12 SC [14].
Round 12: INC, 13 SC [15].
Round 13: INC, INC, INC, 12 SC [18].
Round 14: SC row [18].
Round 15: INC, INC, INC, INC, 14 SC [22].
Rounds 16-23: 8 rows SC [22 Stitches per row].
Fasten off and sew to the hat following the appropriate colors.

MALLET in pink
Head
Ch 2
Round 1: 6 SC in the 2nd Ch from hook [6].
Round 2: INC in each stitch [12].
Round 3: (SC, INC) 6 times [18].
Round 4: SC row in BLOS [18].
Rounds 5-12: 8 rows SC [18 stitches per row].
Stuff firmly
Round 13: In BLOS, (DEC, SC) 6 times [12].
Round 14: DEC 6 times [6].
Fasten off. Thread tail through last row and pull up tight to close.

Handle
Note it is hard to count when the number of stitches per row is this small so just repeat until it is 3 inches tall.

Ch 2
Round 1: 4 SC in 2nd Ch from hook [4].
Round 2: SC row [4].
Round 3: Repeat row 2 until piece measures 3 inches.
Fasten off. Sew handle to mallet head.

When you are done with the arms you can sew the mallet to her hands. You could also use Velcro so it is detachable.

ARMS – Make 2, start with pink on one and start with white on the other. Switch color to the opposite color.
Ch 2,
Round 1: 4 SC in 2nd Ch from hook [4].
Round 2: SC, Puff Stitch, 2 SC [3 SC, 1 Puff Stitch].
Round 3: 4 SC, change colors to the opposite color4 in last stitch [4].
Round 4: (SC, INC) 2 times [6].
Rounds 5-11: 7 rows SC [6 stitches per row].
Fasten Off. Don’t stuff arms.

FEET – Make 2, Start one in pink, start the other in white.
Ch 5
Round 1: SC in 2nd Ch from hook, SC for 2 stitches, 3 SC in last stitch, working in the unused loops from the first few stitches, 3 SC, 3 SC in the beginning loop [12].
Round 2: 3 SC, INC 3 times, 3 SC, INC 3 times [18].
Round 3: Working in BLOs SC row [18].
Round 4: 3 SC, DEC in next 6 stitches, 6 SC [12].
Start stuffing feet.
Round 5: 2 SC, DEC, DEC, 4 SC [8].
Round 6: Slip Stitch 3, turn, in FLOs SC row, do not join. [3 Slip Stitches, 7 SC].
Round 7: Turn, SC row [7 SC].
Fasten off.
Round 8: Join opposite color in unworked stitches from row 6. INC, SC 6 [8].
Rounds 9-18: 10 rows SC [8 Stitches per row].
Fasten off 1st leg and make second leg in opposite colors.
Do not fasten off second leg. Keeping the color changes SC around each leg to join. This counts as round 19.

Rounds 20-21: SC for 2 rows [8 stitches in each color].
Round 22: (INC, 7 SC) 2 times [9 stitches in each color].
Rounds 23-24: 2 rows SC [9 stitches in each color].
Switch the color blocking
Rounds 25-30: 6 rows SC [9 stitches in each color].
Round 31: (SC, DEC) 6 times [6 stitches in each color.
Fasten off and sew to head.

Embroider hearts in opposite colors in clusters of three on the legs. Embroider one heart in each arm.

BREASTS
Make one in each color
Ch 2,
Round 1: 4 SC in 2nd chain from hook. [4].
Round 2: INC in each stitch around [8].
Fasten off and sew to chest.

NECKPIECE

(Ch 3, Slip Stich in 2nd Chain from hook, HDC) repeat 7 or 8 times. Attach under the head.

You can also do Harley Quinn in Black and Red. Embroider Diamonds on that one.

Jacques the Pumpkin Bear – Free Pattern

Crochet Plush : Holidays

Jacques.

I know Halloween is over, but I just finished typing this pattern. Now you have time to make it up before next October.

You can use safety eyes instead of embroidering if you want to. It might read a bit better. Again it is not tested.

Materials
Worsted Weight Yarn
I love this yarn – Orange
I love this yarn – Black
Size E crochet hook
Black Metallis Floss for the eyes and nose or
24 mm safety eyes and 24 mm nose
Polyfiberfill
Large Eye Needle

Gauge – Gauge is not important for this project, but if you are using the kit materials using a larger hook might make you run out of yarn.

Abbreviations
SC – Single Crochet
HDC – Half Double Crochet
CH- Chain
FO – Fasten Off
SL ST – Slip Stitch
INC – Make two Single Crochet in Same Stitch
DEC – Single Crochet two stitches together
3DEC – Single Crochet three stitches together
BLO – Back Loops Only
PUFF Stitch – (Yarn over, pull up stitch, yarn over, pull through 2 loops) 4 times, yarn over, pull through remaining four loops

Note: Almost the entire project is worked in the round. Use a stitch marker or a scrap piece of yarn to mark the beginning of each row. Then you don’t have to count every row. Do not join unless instructed to.

Parentheses indicate a repeat. Repeat the stitches in the parentheses for the number of times indicated.

The bracketed number [] is the number of stitches at the end of each row.

I spread my increases out so there isn’t a seam on the finished piece. If you do not like this method, you can do regular increases.

If you have any questions, please feel free to email me at drunkenauntwendy@gmail.com.

HEAD
In Black, Ch 2

Round 1: 6 SC in 2nd Ch from hook [6].
Round 2: INC in each stitch [12].
Round 3: (SC, INC) 6 times [18].
Round 4: (SC, INC, SC) 6 times [24].
Round 5: (3 SC, INC) 6 times [30].
Rounds 6-9: 4 rows SC [30 stitches per row].
Round 10: 13 SC, INC, 2 SC, INC, 13 SC [32].
Round 11: 14 SC, INC, 3 SC, INC, 13 SC [34].
Round 12: 15 SC, INC, 4 SC, INC, 13 SC [36].
Round 13: 13 SC, INC, 2 SC, INC, 5 SC, INC, 2 SC, INC, 10 SC [40].
Round 14: 14 SC, INC, 3 SC, INC, 6 SC, INC, 3 SC, INC, 10 SC [44].
Round 15: 12 SC, INC, 2 SC, INC, 4 SC, INC, 7 SC, INC, 4 SC, INC, 2 SC, INC, 7 SC [50].
Round 16: 13 SC, INC, 3 SC, INC, 5 SC, INC, 8 SC, INC, 5 SC, INC, 3 SC, 7 SC [56].
Round 17: 14 SC, INC, 4 SC, INC, 6 SC, INC, 9 SC, INC, 6 SC, INC, 4 SC, INC, 7 SC [62].
Rounds 18-25: 8 rows SC [62 Stitches per row].
If using safety eyes and noses, insert now.
If embroidering, use a straight stitch to make the nose and eyes.
Stuff nose.
Round 26: (29 SC, DEC) 2 times [60].
Round 27: SC row [60].
Round 28: (8 SC, DEC) 6 times [54].
Round 29: SC row [54].
Round 30: (7 SC, DEC) 6 times [48].
Round 31: SC row [48].
Round 32: (6 SC, DEC) 6 times [42].
Round 33: SC row [42].
Round 34: (5 SC, DEC) 6 times [36].
Round 35: SC row [36].
Round 36: (4 SC, DEC) 6 times [30].
Round 37: (3 SC, DEC) 6 times [24].
Finish stuffing.
Round 38: (2 SC, DEC) 6 times [18].
Round 39: (SC, DEC) 6 times [12].
Round 40: DEC 6 times [6].
Fasten off. Using tail thread through the stitches in Round 40 and pull up tight to close the circle.

PUMPKIN SUIT
In orange, Ch 2
Round 1: 6 SC in 2nd Ch from hook [6].
Round 2: INC in each stitch [12].
Round 3: (SC, INC) 6 times [18].
Round 4: (SC, INC, SC) 6 times [24].
Round 5: (3 SC, INC) 6 times [30].
Round 6: (2 SC, INC, 2 SC) 6 times [36].
Round 7: (5 SC, INC) 6 times [42].
Round 8: (3 SC, INC, 3 SC) 6 times [48].
Round 9: (7 SC, INC) 6 times [54].
Round 10: (4 SC, INC, 4 SC) 6 times [60].
Round 11: (9 SC, INC) 6 times [66].
Round 12: (5 SC, INC, 5 SC) 6 times [72].
Round 13: (11 SC, INC) 6 times [78].
Rounds 14-27: 14 Rows SC [78 stitches per row.
Round 28: (11 SC, DEC) 6 times [72].
Round 29: (10 SC, DEC) 6 times [66].
Round 30: (9 SC, DEC) 6 times [60].
Round 31: (8 SC, DEC) 6 times [54].
Round 32: (7 SC, DEC) 6 times [48].
Round 33: (6 SC, DEC) 6 times [42].
Stop here and use straight stitches and black yarn to embroider the face on the pumpkin. Start Stuffing.
Round 34: (5 SC, DEC) 6 times [36].
Round 35: (4 SC, DEC) 6 times [30].
Round 36: (3 SC, DEC) 6 times [24].
Sew the open end of the pumpkin suit to the bottom of the head.

EARS (Make 2) in Black


Ch 2


Round 1: 6 SC in 2nd Ch from hook [6]


Round 2: INC in each stitch [12].


Round 3: (SC, INC) 6 times [18].


Round 4: (SC, INC, SC) 6 times [24].


Rounds 5-10: 6 Rows SC [24 stitches per row].


Round 11: (10 SC, DEC) 2 times [20].


Round 12: SC bottom opening together.


Fasten off and leave a long tail for sewing. Sew to the top of head.


ARMS (Make 2) – in black


Ch 2


Round 1: 5 SC in 2nd Ch from hook [5]


Round 2: INC in each stitch [10].


Round 3: (SC, INC) 5 times [15].


Round 4:  INC, 14 SC [16].


Round 5: INC, 15 SC [17].


Round 6: INC, 16 SC [18].


Rounds 7-12: 6 rows SC [18 stitches per row].


Fasten off and sew to sides of pumpkin.


LEGS (Make 2) – in black


Ch 2


Round 1: 6 SC in 2nd Ch from hook [6]


Round 2: INC in each stitch [12].


Round 3: (SC, INC) 6 times [18].


Round 4: (SC, INC, SC) 6 times [24].


Round 5: (3 SC, INC) 6 times [30].


Round 6: 6 SC, (Puff Stitch, SC) 4 times, 16 SC [4 puff stitches, 26 SC].


Round 7: SC Row [30].


Round 8: (3 SC, DEC) 4 times, 10 SC [26].


Round 9: (2 SC, DEC) 4 times , 10 SC [22].


Rounds 10-17: 8 rows SC.


Fasten off and sew to pumpkin.


TAIL – in black


Ch 2,


Round 1: 6 SC in 2nd Ch from hook [6].


Round 2: INC in each stitch around [12].


Rounds 3-4: 2 rows SC [12 stitches per row].


Fasten off and sew to the back of the pumpkin.


Annabelle the pink robot – free pattern

Crocheted robot plush in pink

Remember Annabelle? She so daggone cute. She’s got a little wheel at the bottom to transport her anywhere she wants to go.

She does wish she had thumbs.

If you make her, please use #drunkenauntwendy so I can find it.

Let me know if there are any problems or complications with the pattern.

Materials
Worsted Weight Yarn
I love this yarn – Hot Rose (222 yds)
I love this yarn – Gray Mist (69 yds)
I love this yarn – White (6 yds)
I love this yarn – Graphite (24 yds)
I love this yarn – Black (1 yd)
24 mm Safety Eyes in Black
Size E crochet hook
Polyfiberfill
Large Eye Needle

Gauge – Gauge is not important for this project, but if you are using the kit materials using a larger hook might make you run out of yarn.

Abbreviations
SC – Single Crochet
HDC – Half Double Crochet
CH- Chain
FO – Fasten Off
SL ST – Slip Stitch
INC – Make two Single Crochet in Same Stitch
DEC – Single Crochet two stitches together
3DEC – Single Crochet three stitches together
BLO – Back Loops Only

Note: Almost the entire project is worked in the round. Use a stitch marker or a scrap piece of yarn to mark the beginning of each row. Then you don’t have to count every row. Do not join unless instructed to.

Parentheses indicate a repeat. Repeat the stitches in the parentheses for the number of times indicated.

The bracketed number [] is the number of stitches at the end of each row.

I spread my increases out so there isn’t a seam on the finished piece. If you do not like this method, you can do regular increases.

If you have any questions, please feel free to email me at drunkenauntwendy@gmail.com.

HEAD

In Hot Rose, CH 2
Note: This is creating a triangle shape, not the typical circle.
Round 1: 6 SC in 2nd CH from hook [6].
Round 2: (3 SC in the same stitch, SC) 3 times [12].
Round 3: 2 SC, 3 SC in same stitch, 3 SC, 3 SC in same stitch, 3 SC, 3 SC in same stitch, SC [18].
Round 4: 3 SC, 3 SC in same Stitch, (5 SC, 3 SC in same Stitch) 2 times, 2 SC [24].
Round 5: 4 SC, 3 SC in same Stitch, (7 SC, 3 SC in same Stitch) 2 times, 3 SC [30].
Round 6: 5 SC, 3 SC in same Stitch, (9 SC, 3 SC in same Stitch) 2 times, 4 SC [36].
Round 7: 6 SC, 3 SC in same Stitch, (11 SC, 3 SC in same Stitch) 2 times, 5 SC [42].
Round 8: 7 SC, 3 SC in same Stitch, (13 SC, 3 SC in same Stitch) 2 times, 6 SC [48].
Round 9: 8 SC, 3 SC in same Stitch, (15 SC, 3 SC in same Stitch) 2 times, 7 SC [54].
Round 10: 9 SC, 3 SC in same Stitch, (17 SC, 3 SC in same Stitch) 2 times, 8 SC [60].
Round 11: SC row BLO [60].
Rounds 12 – 19: SC in each stitch for 8 rows [60 stitches per row].
Note – the decreases should be at approximately the same place as the increases. My stitches tend to shift the below instructions are to compensate for the shift.
Round 20: IN BLO for whole row, 12 SC, 3 Stitch DEC, (17 SC, 3 Stitch DEC) 2 times, 5 SC [54].
Rounds 21: 11 SC, 3 Stitch DEC, (15 SC, 3 Stitch DEC) 2 times, 4 SC [48].
Round 22: 10 SC, 3 Stitch DEC, (13 SC, 3 Stitch DEC) 2 times, 3 SC [42].
Rounds 23: 9 SC, 3 Stitch DEC, (11 SC, 3 Stitch DEC) 2 times, 2 SC [36].
Round 24: 8 SC, 3 Stitch DEC, (9 SC, 3 Stitch DEC) 2 times, 1 SC [30].
Rounds 25: 7 SC, 3 Stitch DEC, (7 SC, 3 Stitch DEC) 2 times [24].

Place Eyes. Embroider mouth in a sideways smirk using black.

Note – Start Stuffing here. Make sure you really get into the corners to define the triangular shape.

Round 26: (5 SC, 3 Stitch DEC) 3 times [18].
Round 27: (3 SC, 3 Stitch DEC) 3 times [12].
Round 28: (1 SC, 3 Stitch DEC) 3 times [6].

FO leaving a long tail. Thread tail through last 6 stitches and pull up tight to close hole.

TORSO

In Hot Rose, Ch 2
Round 1: 6 SC in 2nd CH from hook [6].
Round 2: (INC) 6 times [12].
Round 3: (SC, INC) 6 times [18].
Round 4: (SC, INC, SC) 6 times [24].
Round 5: (3 SC, INC) 6 times [30].
Round 6: (2 SC, INC, 2 SC) 6 times [36].
Round 7: (5 SC, INC) 6 times [42].
Round 8: (3 SC, INC, 3 SC) 6 times [48].
Round 9: (7 SC, INC) 6 times [54].
Round 10: (4 SC, INC, 4 SC) 6 times [60].
Round 11: (9 SC, INC) 6 times [66].
Round 12: (5 SC, INC, 5 SC) 6 times [72].
Round 13: SC row in the BLO [72].

Round 14: (5 SC, DEC, 5 SC) 6 times [66].
Round 15: (9 SC, DEC) 6 times [60].
Round 16-19: 4 rows SC in each stitch, change colors to Gray Mist, don’t cut Hot Rose. [60 stitches per row].
Round 20: 1 row SC in each stitch, change colors back to Hot Rose. [60].
Round 21-35: 15 rows SC in each stitch, change to Gray Mist. [60 stitches per row].
Round 36: (9 SC, INC) 6 times [66].
Round 37: SC row in BLO [66].
Round 38: (9 SC, DEC) 6 times [60].
Round 39: (8 SC, DEC) 6 times [54].
Round 40: (7 SC, DEC) 6 times [48].
Round 41: (6 SC, DEC) 6 times [42].
Round 42: (5 SC, DEC) 6 times [36].
Round 43: (4 SC, DEC) 6 times [30].
Round 44: (3 SC, DEC) 6 times [24].
Start stuffing firmly and keep stuffing until you close the hole. Try to make the stuffing smooth.
Round 45: (2 SC, DEC) 6 times [18].
Round 46: (SC, DEC) 6 times [12].
Round 47: (DEC) 6 times [6].
Fasten off leave a long tail approximately 25 inches long. Thread the tail through the last 6 stitches and pull the opening closed.
To flatten out top, thread the yarn through the top and bottom of the body keeping it centered. Tighten it to make the top lay flat. This will be covered with the neck piece and the skirt will cover the bottom stitches.

SKIRT

Ch 2 in Hot Rose
Round 1: 6 SC in 2nd CH from hook [6].
Round 2: (INC) 6 times [12].
Round 3: (SC, INC) 6 times [18].
Round 4: (SC, INC, SC) 6 times [24].
Round 5: (3 SC, INC) 6 times [30].
Round 6: (2 SC, INC, 2 SC) 6 times [36].
Round 7: (5 SC, INC) 6 times [42].
Round 8: (3 SC, INC, 3 SC) 6 times [48].
Round 9: (7 SC, INC) 6 times [54].
Round 10: (4 SC, INC, 4 SC) 6 times [60].
Round 11: (9 SC, INC) 6 times [66].
Round 12: (5 SC, INC, 5 SC) 6 times [72].
Round 13: (11 SC, INC) 6 times [78].
Round 14: (6 SC, INC, 6 SC) 6 times [84].
Round 15: (13 SC, INC) 6 times [90].
Round 16: (7 SC, INC 7 SC) 6 times [96].
Round 17: SC row in BLO [96].
Round 18: (7 SC, DEC, 7 SC) 6 times, Change Color to Gray Mist [90].
Round 19: SC Row [90].
Round 20: (13 SC, DEC) 6 times [84].
Round 21: (6 SC, DEC, 6 SC) 6 times Change Color to Hot Rose [78].
Round 22: SC row [78].
Round 23: (11 SC, DEC) 6 times [72].
Round 24: (5 SC, DEC, 5 SC) 6 times, Change color to Gray Mist [66].
Round 25: Single Crochet skirt to unused loops from Round 37 of the torso, stuffing while you go.

TIRES (make 2)
Do no work in the round

Sides (make 2 for each tire)
Ch 2 in Graphite
Row 1: 3 SC in 2nd Chain from hook [3].
Row 2: Ch1, turn, INC in each stitch [6].
Row 3: Ch 1, turn, (SC, INC) 3 times [9].
Row 4: Ch 1, turn, (SC, INC, SC) 3 times [12].
Row 5: Ch1, turn, (3 SC, INC) 3 times [15].

Row 6: Ch 1, turn (2 SC, INC, 2 SC) 3 times [18].
Fasten off.

Tread (Make 1 for each tire)
In Graphite Ch 6
Row 1: SC in 2nd Chain from hook, SC remaining 4 stitches [5].
Row 2: Ch1, SC row in BLOs [5].
Rows 3-21: Ch 1, SC row in BLOs for 19 rows [5 stitches per row].
Fasten off. Sew to curved edges of tires making a semicircle. Stuff and sew to the bottom of skirt.

ARMS (make 2)

Ch 2 in Gray Mist
Round 1: 6 SC in 2nd Ch from hook [6].
Round 2: INC in each stitch [12].
Rounds 3-17: 15 rows SC [12 stitches each row].
Fasten off and stuff.

HANDS (make 2)
Do not work in the round

Ch 2 in Hot Rose
Row 1: 5 SC in 2nd Ch from hook
Row 2: Ch1, turn, INC in each stitch [10].
Row 3: Ch 1, turn, (SC, INC) 5 times [15].
Row 4: Ch 1, turn, (SC, INC, SC) 5 times [20].
Rows 5-8: Ch 1, turn, SC row for 4 rows [20].
Row 9: (2 SC, DEC) 5 times [15].
Row 10: (SC, DEC) 5 times [10].
Row 11: DEC 5 times [5].
Fold hand in half so it looks like a fortune cookie and SC both sides together stuffing as you go. Sew hand to open end of arm. Sew arms to the torso posing how you wish.

NECK

Ch 2 in Gray Mist
Round 1: 6 SC in 2nd Ch from hook [6].
Round 2: INC in each stitch [12].
Round 3: (SC, INC) 6 times [18].
Round 4: (SC, INC, SC) 6 times [24].
Round 5: (3 SC, INC) 6 times [30].
Round 6: SC row in BLO [30].
Round 7: In BLO (3 SC, DEC) [24].
Round 8: In BLO SC row [24].
Fasten off. Sew to the top of the torso covering your stitches that you used to make the top flat. Stuff and sew on the head.

ROUND BUTTON

Ch 2 in white
Round 1: 6 SC in 2nd Chain from hook [6].
Round 2: INC in each stitch [12].
Round 3: (SC, INC) 6 times [18].
Round 4: SC row [18].
Round 5: (DEC) 9 times [9].
Fasten off and sew to front in the center.

SQUARE BUTTON (make 2)

Ch 6 in White
Row 1: SC in 2nd Ch from hook and SC 4 remaining stitches [5].
Row 2-4: Ch 1, turn and SC row for 3 rows.
Fasten off and sew to the torso on each side of the round button.


Smiley Cyrus – Free Crochet Pattern

Crochet monster pattern

She sings! She sticks out her tongue! She just the cutest little monster.

Smiley Cyrus likes to hang out with her friends Frank Cyclopstra and Beebs.

Let me know if you have any problems or questions. While you can make this little monster with the pattern below, some people prefer an ad free .pdf. I have one available for a minimal charge.

Materials
Worsted Weight Yarn
Vanna’s Choice – Aqua
I love this yarn – White
I love this yarn – Black
I love this yarn – Fuchsia Neon
Hot Pink Felt
Size E crochet hook
Polyfiberfill
Large Eye Needle

Abbreviations
SC – Single Crochet
CH- Chain
FO – Fasten Off
SL ST – Slip Stitch
INC – Make two Single Crochet in Same Stitch
DEC – Single Crochet two stitches together
BLO – Back Loops Only
Note: Entire project is worked in the round. Use a stitch marker or a scrap piece of yarn to mark the beginning of each row. Then you don’t have to count every row. Do not join unless instructed to.

Parentheses indicate a repeat. Repeat the stitches in the parentheses for the number of times indicated.

The bracketed number [] is the number of stitches at the end of each row.

I spread my increases out so there isn’t a seam on the finished piece. If you do not like this method, you can do regular increases.

If you have any questions, please feel free to email me at drunkenauntwendy@gmail.com.

BODY – in Aqua

CH 2
Round 1: 6 SC in 2nd CH from hook.
Round 2: (INC) 6 times [12].
Round 3: (SC, INC) 6 times [18].
Round 4: SC Row [18].
Round 5: (SC, INC, SC) 6 times [24].
Round 6: SC Row [24]
Round 7: (3 SC, INC) 6 times [30].
Round 8: SC Row [30].
Round 9: (2 SC, INC, 2 SC) 6 times [36].

Round 10: SC Row [36].
Round 11: (5 SC, INC) 6 times [42].
Rounds 12 – 15: SC in each stitch around for 4 rows [42 stitches per row].
Round 16: (DEC, 5 SC) 6 times [36].
Round 17: (DEC, 4 SC) 6 times [30].
Round 18: (DEC, 3 SC) 6 times [24].
Start stuffing top part here before the opening gets too small for your hand.
Round 19: (DEC, 2 SC) 6 times [18].
Rounds 20 – 24: SC in each stitch for 5 rows [18 stitches per row].
Round 25: (SC, INC, SC) 6 times [24].
Round 26: (3 SC, INC) 6 times [30].
Round 27: (2 SC, INC, 2 SC) 6 times [36].
Round 29: (5 SC, INC) 6 times [42].
Round 30: (3 SC, INC, 3 SC) 6 times [48].
Round 31: (7 SC, INC) 6 times [56].
Round 32-40: SC in each stitch around for 9 rows [56 stitches per row].
Continue stuffing. Make sure you stuff firmly enough to hold the shape, but not too firmly that you stretch your stitches.
Round 41: (DEC, 7 SC) 6 times [48].
Round 42: (DEC, 6 SC) 6 times [42].
Round 43: (DEC, 5 SC) 6 times [36].
Round 44: (DEC, 4 SC) 6 times [30].
Round 45: (DEC, 3 SC) 6 times [24].
Round 46: (DEC, 2 SC) 6 times [18].
Round 47: (DEC, 1 SC) 6 times [12].
Round 48: (DEC) 6 times [6]

FO leaving a long tail. Thread tail through last 6 stitches and pull up tight to close hole.

EYES – Make 2

In Black, CH 2
Round 1: 6 SC in 2nd Chain from hook, Change Color to white in last stitch.
Round 2: (INC) 6 times [12].
Round 3: (INC, 1 SC) 6 times [18].
Round 4: (SC, INC, SC) 6 times [24].
Rounds 5 – 6: SC in each stitch for 2 rows. Change Color to Aqua in last stitch [24 stitches per row].
Rounds 6-7: SC in each stitch for 2 rows [24 stitches per row].
Round 8: (DEC, 2 SC) 6 times [18].
Round 9: (DEC, 1 SC) 6 times [12].
Round 10: (DEC) 6 times [6]

FO leaving a long tail. Thread tail through last 6 stitches and pull up tight to close hole. Use tail to sew to body along the sides of head between rows 12-15.

LEGS – Make 3
she needs the tripod base in order to stand without falling over.

In Fuchsia Neon, Ch 2
Round 1: 6 SC in 2nd CH from hook
Round 2: (INC) 6 times [12].
Round 3: (SC, INC) 6 times [18].
Round 4: SC in each stitch in the BLO [18].
Round 5-8: SC in each stitch for 4 rows Change color to Aqua in last stitch. Do not cut fuchsia. You will simply run it along the inside until the next color change. [18 stitches per row].
Round 9: SL ST in first stitch and SC in remaining stitches (this helps avoid a seam at your color changes) [18 stitches per row].
Round 10: SC in each stitch Change color to Fuchsia in last stitch. Do not cut Aqua. You will simply run it along the inside until the next color change. [18 stitches per row].
Round 11: SL ST in first stitch and SC in remaining stitches [18 stitches per row].
Round 12-13: SC in each stitch for 2 rows Change color to Aqua in last stitch. [18 stitches per row].

Round 14: SL ST in first stitch and SC in remaining stitches [18 stitches per row].
Round 15: SC in each stitch Change color to Fuchsia in last stitch. You can cut the Aqua here if you would like. [18 stitches per row].
Round 16: SL ST, DEC, (1 SC, DEC) 2 times, (2 SC, INC) 3 times. [15]
Round 17: (SC, DEC) 3 times, (2 SC, INC) 3 times [15]
This section of increases and decreases causes the leg to curve.
Round 18: Repeat round 17.
Round 19: SC in each stitch around.

FO leaving a long tail. Stuff and sew to the bottom. Make a tripod with the legs to support the body.

MOUTH

Embroider a sideways smile in black across 4 rows of SC starting a row 32.

Cut a tongue out of felt and glue to mouth.

20140216-094128.jpg